Tweak Blends
As you ve seen, blending is a very versatile technique that you can use for everything from seamlessly smooth color blends to animation-style sets of objects that transition from one shape to another. Although you can do a lot to control blends ”both in the Blend Options dialog box and by adhering a blend to a spine ”sometimes you will want to tweak (adjust) the result of a blend.
For example, Figure 12-15 was created with a blend, augmented by some significant altering of the generated transitional blend objects.
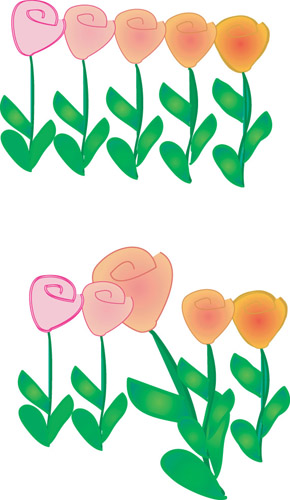
Figure 12-15: The flowers were generated by a blend that was then expanded so that the middle flower could be resized.
You can t do this level of fine-tuning using only a blend. Expanding a blend converts each of the generated transitional shapes into a distinct, editable shape. To expand a blend, first select the blend. Then select Objects Blend Expand. The result will be a set of paths that you can edit. When you first expand a blend, the objects that made up the blend will be grouped, so ungroup them (Object Ungroup) before you start editing individual objects.
Once you expand a blend, of course, it loses all its blend properties. You can no longer adjust the blend options or work with a spine path .
EAN: 2147483647
Pages: 175