Creating a New Enterprise Report
The report-building process begins by creating a new report template and setting its data source. The reporting engine connects to databases through drivers written for specific data source types. To provide the most flexible data access to applications, database drivers support both a pull and a push model of data access.
You can use the database drivers both at design time and at runtime. At design time, the database driver identifies the schema of the source data and fills the table entries in the Field Explorer. In most cases, this process involves connecting to a database and selecting the tables, views, or stored procedures to specify the schema. During runtime, the report will use the same database driver used to create the report. If data is pushed into the report, the report will select the appropriate driver to handle the supplied RecordSet or DataSet object.
Adding a New Report Template
A report exists independently of its type of viewer. The best way to begin a reporting project is to create the report template. Begin by creating a new Class Library project named EnterpriseReports . Once created, select the new project in the Solution Explorer and choose Add ˜ Add New Item from its context menu. Select the Crystal Report template and enter the name OpenIssuesReport.rpt , as shown in Figure 10-3.
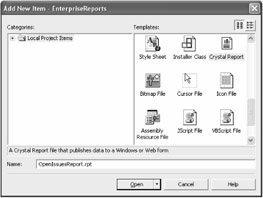
Figure 10-3: Creating a new report with the Add New Item dialog box
Adding a new Crystal Report template triggers the Crystal Report Gallery, as shown in Figure 10-4. This dialog box allows you to start creating a new report based on the Report Expert, a blank report, or an existing report.
Figure 10-4: Selecting the Report Expert in the Crystal Report Gallery
A Report Expert is a wizard that walks you through the report creation process. Each Report Expert begins with a data source definition. There are seven different Report Experts that assist in the creation of the following report types: Standard, Form Letter, Form, Cross-Tab, Subreport, Mail Label, and Drill Down.
The Standard Report Expert is the most generic of the experts. It guides the developer through the process of choosing a data source and linking database tables, as shown in Figure 10-5. It also helps add fields and specify grouping, summarization, and sorting criteria. This expert also displays a Chart tab for creating different types of charts and a Select tab for filtering specific rows of data. The Style tab contains predefined layouts for formatting data to help give the report a professional look.
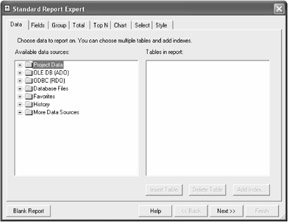
Figure 10-5: The Standard Report Expert
The Form Letter Report Expert creates form letters that access the database for customer mailing information. It offers much of the functionality found in the Standard Report Expert, but it adds a Form Letter tab to specify the text and database fields that will appear in each section of the letter. The Form Letter tab can also import text that has been created in another application.
The Form Report Expert creates reports that can be printed on predefined forms, such as company invoices and statements. It offers much of the functionality found in the Standard Report Expert, but it also features a Form tab to specify a company logo image or form. You can apply logos and forms to the header or the Details section of a report.
The Cross-Tab Report Expert creates a report that displays data as a crosstab object. Three additional tab pages ”Cross-Tab, Style, and Customize Style ”define the format of the cross-tab report. A cross-tab object is represented as a grid that returns values based on criteria supplied to it. Data appears as rows and columns that help users compare data and identify trends.
The Subreport Expert creates a main report and a subreport at the same time. It offers much of the functionality found in the Standard Report Expert for creating the main report. An additional Subreport tab page defines a new or existing report as the subreport. You create new subreports by repeating the steps found in the Standard Report Expert.
The Mail Label Report Expert creates a report formatted to print on a mailing label of any size . The Label tab lets you select a commercial label type or define a custom layout of rows and columns for any style of multicolumn report.
The Drill Down Report Expert creates a report that hides sections and makes them available for viewing only through a drill-down process. It offers much of the functionality of the Standard Report Expert. An additional Drill tab displays a list of sections that you can hide. Hidden sections do not appear on the report until you select the appropriate field. Typically, you will use hidden data for summaries and totals.
Specifying a Reporting Data Source
Because data access is at the center of the report-building process, each Report Expert requires a data source to be specified at the beginning. You can bind a report to any number and type of data sources. You can specify additional data sources (after you have completed a Report Expert) by selecting the report and choosing Database ˜ Add/Remove Database from its context menu to display the Database Expert, as shown in Figure 10-6.
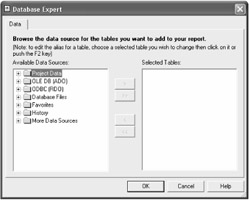
Figure 10-6: The Database Expert designates referenced data sources.
In the Database Expert, expand the OLE DB (ADO) tree node and select Microsoft OLE DB Provider for SQL Server. Click Next and select the source Server to enter the database server login parameters. Enter IssueTracker as the source database and click Next. Leave the default settings listed in the Advanced Information dialog box and click Finish.
This creates a new database connection, which can be expanded in the Database Expert's Available Data Sources tree list. Expand the IssueTracker node to see the list of individual tables. Add all the tables in the Selected Tables list and click OK. Next, the Database Expert displays the Links tab, as shown in Figure 10-7.
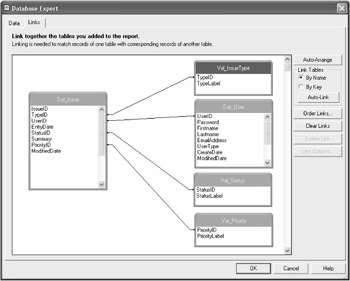
Figure 10-7: The Database Expert maps database table relationships.
The Links tab displays the join relationships between all the tables selected. The Dat_Issue table is the master table with joins into Val_IssueType, Dat_User, Val_Status, and Val_Priority. The Data Expert does a great job of automatically linking tables. To add an additional link, click one table field and drag it to another. For example, bind Dat_Issue.AuthorID to Dat_User.UserID and click the OK button to complete the process.
EAN: 2147483647
Pages: 119
- Step 1.2 Install SSH Windows Clients to Access Remote Machines Securely
- Step 3.3 Use WinSCP as a Graphical Replacement for FTP and RCP
- Step 3.4 Use PuTTYs Tools to Transfer Files from the Windows Command Line
- Step 4.3 How to Generate a Key Pair Using OpenSSH
- Step 6.2 Using Port Forwarding Within PuTTY to Read Your E-mail Securely