Implementing the Business Process
Developers interact with BizTalk Orchestration differently than business analysts do. After the business analyst defines the business process, developers implement it by mapping out how BizTalk Server must perform each task. BizTalk Orchestration does most of the work, so the amount of actual coding left is minimal. A developer completes the diagram by adding a combination of BizTalk Messaging shapes, COM Component shapes, and Message Queuing shapes . Code is not written to bind the individual steps together. Rather, coding is applied to the individual components that provide specialized business logic.
By dragging the BizTalk Messaging shape into the implementation section of the drawing, the BizTalk Messaging Binding Wizard starts, as shown in Figure 6-7. This wizard steps through a series of pages that define how the messaging port is associated with an implementation shape. A messaging port is simply an access point into or out of a process implementation diagram and is associated with a collection of properties. Enter IncomingIssue for the port name. The message port name must match the port name specified in the BizTalk Messaging Manager. Set the communication direction to receive and enable the XLANG schedule activation. Finally, click the Finish button to complete the wizard.
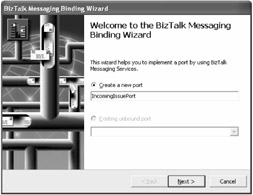
Figure 6-7: Binding BizTalk Server to messaging services
If you indicate that a port will send documents from the XLANG schedule to BizTalk Messaging rather than receive them, the BizTalk Messaging Binding Wizard requires the name of a channel that will receive these documents. This channel does not have to exist at the time that the XLANG schedule drawing is being created, but it must exist when the schedule is executed.
Another way to receive a document in an XLANG schedule is to use the Message Queuing shape. When you add this shape to the drawing, the Message Queuing Binding Wizard starts, and you must specify the name of a private or public message queue that will send or receive documents. This is how the IssueTracker application will submit data, using the message queues created in Chapter 4, "Applying Reliable Messaging."
In addition to the Microsoft Message Queue (MSMQ) and BizTalk Messaging ports, a business process can be exposed to other ports where specialized business logic is implemented by the enterprise application. These other ports include script components and COM components. Script components implement simple tasks and are created with a scripting language such as Microsoft Visual Basic Scripting Edition (VBScript). COM components implement specialized tasks , such as access to databases or other system and application resources. COM components can also wrap C# code, as shown in Figure 6-8.
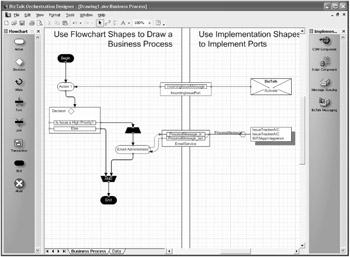
Figure 6-8: Completing the business process with implementation objects
After an XLANG schedule processes data, the next step is to send out the resulting data. To send the document back to BizTalk Messaging, add a BizTalk Messaging shape to the right side of the drawing and specify the name of the channel to which the document must be sent. After the Orchestration port is created, connect an Action shape to this port and in the XML Communication Wizard specify whether the document is sent as XML or as a string, specify the message type information, and specify an optional XML specification to validate the document, which is similar to the receive document messaging port described earlier.
You can also send out documents from an XLANG schedule by using Message Queuing. In this case, instead of specifying the name of a channel, specify a name of a private or public queue, where the document will be posted. Again, this is how the IssueTracker application expects to receive responses from the business process.
Creating an Application Integration Component in C#
To expose any .NET application functionality to BizTalk Server, you need to create a new AIC that wraps the functionality. Implementing an AIC requires the following key steps: create the wrapper project and class, create a strong name, build and register the component, and bind it to a schedule.
Creating the AIC Project and Class
To implement the AIC, create a new class library project named IssueTrackerAIC under the IssueTracker solution. Next, add a .NET reference to System.EnterpriseServices and a COM reference of Microsoft BizTalk Server Application Interface Component 1.0 Type Library to the project. Rename the Class1 declaration to IssueTrackerAIC . Finally, modify the class declaration to inherit from the ServicedComponent class and implement the IBTSAppIntegration interface as in Listing 6-1.
| |
public class IssueTrackerAIC : ServicedComponent, IBTSAppIntegration { public IssueTrackerAIC() { } string IBTSAppIntegration.ProcessMessage( string strDocument ) { return "Welcome to BizTalk!"; } } | |
This skeleton class implements the minimal code that completes an AIC. The only required interface method to implement is ProcessMessage. This is the method invoked by BizTalk Messaging. The method parameter is a single string that contains the contents of the document being edited. The intention is that the AIC will work on this document and send a modified version back to the caller as a return value. Once inside this method, any application-specific or .NET- related functionality can occur. The incoming document can be written to a file, stored to a database, delivered elsewhere via File Transfer Protocol (FTP) or SMTP, or it can be processed in any other way specific to your business needs.
Creating and Applying a Strong Name
Because the AIC is implemented as an enterprise service and will be registered as a COM+ application, you need to create a strong name key and associate it with the IssueTrackerAIC assembly. Create a strong name key at the command line using the sn.exe application as follows :
sn.exe -k sharedkey.snk
After you create the strong name key file, copy it to the project directory and then add the file to the project. Finally, you need to associate the shared key file with the IssueTrackerAIC assembly. Select the IssueTrackerAIC project node in the Solution Explorer and open its properties. In the Common Properties' General section, enter sharedkey.snk for the Wrapper Assembly Key File value. Next, add the strong name key reference to the AssemblyInfo.cs file by replacing the following statement:
[assembly: AssemblyKeyFile(@"..\..\sharedkey.snk")]
The file path specified is relative to the project output directory. Lastly, you must recompile and register the project.
| Note | The Visual Basic .NET Integrated Development Environment (IDE) is not able to generate strongly named COM wrapper classes. Developers must use the tlbimp.exe utility from the command line rather than simply providing an AssemblyKeyFile attribute. |
Registering an Application Integration Component
To register AIC as a COM+ application that BizTalk Server recognizes, begin by opening Start ˜ Control Panel ˜ Administrative Tools ˜ Component Services. From the console root, click Computers ˜ My Computer ˜ COM+ Applications. This displays all registered COM+ applications. To add a new one, select Action ˜ New ˜ Application from the menu. This starts the COM+ Application Installation Wizard. Step through the wizard and click the Create an Empty Application button. Next, enter IssueTrackerAIC for the application name, as shown in Figure 6-9.

Figure 6-9: Registering an AIC as a COM+ service
Select Library Application as the Activation Type and complete the wizard. This creates an empty application container. In the component tree, select the newly created IssueTrackerAIC entry and click New ˜ Component from its context menu. Step through the wizard and click the Install New Component(s) button. Browse to the new AIC's project output directory and select IssueTrackerAIC.dll. The new AIC should appear in the Components Found list. After completing the wizard, the new AIC should appear in the components list ”ready for BizTalk Server use.
Binding an Orchestration Diagram
After drawing the process diagram and defining the implementation ports in BizTalk Orchestration, you need to link the two drawings together. Each flowchart shape drawn by a business analyst and each implementation shape drawn by a developer have a connection point on its side. Using familiar Visio techniques, an Action shape on the left connects to an implementation shape on the right by simply drawing a line between their handles. Each time you make a connection, the XML Communication Wizard starts to capture how the communication between these shapes will occur.
The first binding you need to create is the one that begins the entire automation process. First, connect the Receive Issue Item process step defined by the business analyst to the IncomingIssue port defined by the developer. Bind the two together by clicking the process step, selecting the yellow grab handle on its right, and dragging a connection to the IncomingIssue port. This action triggers the XML Communication Wizard, as shown in Figure 6-10.

Figure 6-10: Identifying incoming documents
The XML Communication Wizard goes through the process of creating a message that will carry the source document through the business process. Label the new message IncomingMessage . Specify to receive XML from the message queue. If the document is not formatted as XML, the XLANG Schedule Engine must "wrap" the document in the engine's standard XML wrapper. After that, the wizard prompts you for a message type. Use the same document definition used to configure the messaging port that delivered this document to the XLANG schedule or enter the name of the root element from the document schema. Set the message type label to IncomingIssue . Choose the message specification by browsing to and selecting the NewIssue.xml file. BizTalk Orchestration will validate each document against this specification prior to processing it. Click the Add button to display the Field Selection dialog box. The NewIssue schema will appear. Expand the header node and select the issuePriority field, as shown in Figure 6-11. You can browse individual fields from the original schema document by using a standard XML query language called XPath . XPath is a standard XML query language used for addressing parts of an XML document. A blue line will appear that connects the IncomingMessage port to the Receive Issue Item process step.
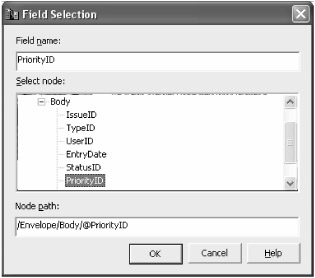
Figure 6-11: Selecting specific document fields to act upon
Next, the process definition needs to bind the E-mail Administrator process step with the NotifyAdministrator script object. Drag a link from the E-mail Administrator action object to the SendMessage_in node of the NotifyAdministrator port. This action launches the Method Communication Wizard. Select the Initiate a Synchronous Method Call option and click Next. Then, select the Create a New Message option and click Next. Finally, select the message specification for the communication and click Finish.
Defining the Data Flow
When all of the business process steps have been connected to all of the implementation shapes, all that remains is the underlying data flow. The data view defines how business documents pass from one process step to the next. In BizTalk Orchestration, open the data view by clicking the Data tab at the bottom of the screen. The process data view appears as shown in Figure 6-12. Several groups of fields will display. Each group is named after the message that carries the document to or from an Orchestration port.
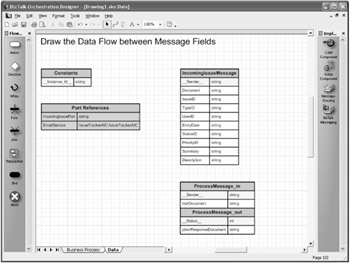
Figure 6-12: Viewing the flow of data within a document by individual fields
Earlier, you used the XML Communication Wizard to define a message and indicate which XML specification represented the document being received. In the process data view, values of individual fields inside the document are mapped to implementation objects, such as COM or script components. The Document fields represent an entire document passed into the XLANG schedule.
The document received from BizTalk Messaging by IncomingMessage needs to be passed on to the SendMessage_in and InsertIssue_in messages, which will later submit the document to script components. The NotifyAdministrator script component will return the same document to BizTalk Messaging via the SendMessage_out message. You can reposition the message objects on this page to make the drawing easier to read. Figure 6-13 shows the resulting page.

Figure 6-13: Specifying document field mappings
After you have connected all the message fields in the process data view, you can save and compile the diagram into an XLANG schedule file.
Mapping the Data Document
To have BizTalk Messaging accept an incoming document and route it as an outgoing document, you need to define document mapping (see Figure 6-14). BizTalk Mapping provides an interface for mapping data fields from a source document to a destination document. Document mapping can also apply transformation methods that reshape the data as necessary.
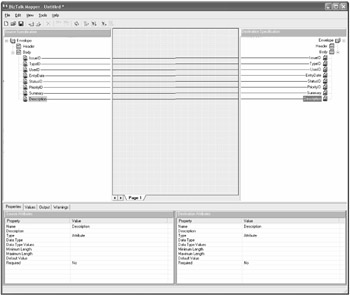
Figure 6-14: Applying transformation functions to document field mappings
Defining Messaging Ports
To deliver a document to a destination, you must define the destination in BizTalk Messaging. Destinations are known in BizTalk Messaging as messaging ports . A messaging port also contains a set of properties that define how documents are secured and transported to their destination. You can group messaging ports into distribution lists to have the same document sent to several different destinations.
From the BizTalk Messaging Manager, open the Messaging ports view. Next, select File ˜ New ˜ Messaging Port ˜ To an Application from the menu. Enter New Issue for the messaging port name and click the Next button. In the next page, select New XLANG Schedule as the destination for this port and IncomingMessage for the port name to receive the notification, as shown in Figure 6-15. No special envelope or encoding is necessary. When finished, the wizard creates the messaging port and starts the Channel Definition Wizard.

Figure 6-15: Configuring BizTalk Server messaging ports
Instead of delivering a document to BizTalk Orchestration or a file, you can configure a messaging port to deliver documents using any of the supported protocols, including HTTP(S), SMTP, and Message Queuing. You can also configure a messaging port with extra security features that optionally encrypt documents and/or include digital signatures.
Binding an Application Integration Component to a Message Port
Binding a new messaging port to an AIC is similar to binding to a new XLANG schedule. In the New Messaging Port Wizard, click the Application radio button as the port destination. Enter the destination application name by clicking the New button and adding a new logical application name, such as IssueTracker . Next, specify the primary transport by clicking the Browse button and then selecting Application Integration Component in the Primary Transport dialog box. Specify the component name by clicking the Browse button and selecting IssueTrackerAIC.IssueTrackerAIC in the Component Selection dialog box. Finally, complete the remaining wizard steps to create the AIC new message port.
| Note | If the IssueTrackerAIC component does not appear in the list, make sure it has been properly deployed as a COM+ application. The most common reason for a registration failure is that an assembly does not have a strong name. |
Defining Channels
A channel contains a set of properties, which identifies the source that has sent the document and defines the specific steps performed by BizTalk Server before the document is delivered to the messaging port. Figure 6-16 shows the relationship between the receive functions, channels, and messaging ports.
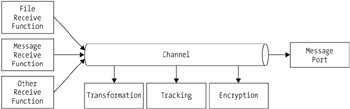
Figure 6-16: The relationship between the receive functions, channels, and messaging ports
After the New Messaging Port Wizard completes in BizTalk Messaging, the New Channel Wizard begins. You can also start the New Channel Wizard by selecting the message ports view and selecting the message port that needs to be associated with a channel. Next, select File ˜ New ˜ Channel ˜ From an Application from the menu. In the New Channel Wizard, enter New Issue as the channel name. Select Next and specify Application as the information source for this channel. Select New and enter IssueTracker for the application name, as shown in Figure 6-17. Later, this name will be associated with a receive function that polls for new documents. Select the default organization identifier and click the Next button. Specify the Inbound document format as New Issue and the Outbound document format as Recorded Issue.
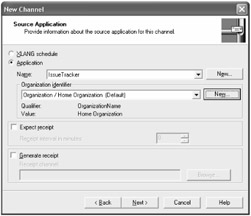
Figure 6-17: Creating a new channel in the BizTalk Messaging Manager
Click Finish to complete the wizard. This creates a new channel definition that defines the documents to be processed, defines they will originate from the IssueTracker application, and defines these documents will be in a format described by the document definition New Issue.
You can instruct a channel to translate a document from one document format into another. Channels can also specify which information must be logged for tracking purposes as the channel delivers a document.
Defining Receive Functions
If BizTalk Server needs to process a file created by an internal application, it uses a file receive function. A file receive function polls a specific directory for the existence of a specific file. If the file is discovered , it is read into an XML document, passed into BizTalk Messaging, and removed from the directory.
One advantage of working with an output file is that an internal business application that creates this file does not need to know anything about BizTalk Server. It simply creates a file containing the document somewhere on a file system, and BizTalk Server instantly picks it up.
File receive functions introduce an element of asynchronous execution into the business process. Asynchronous execution is important in a distributed environment because it allows each part in the solution to stand by itself without being affected by the temporary unavailability of another part. If a brief network failure arises, the overall business process is not affected because the documents produced would simply accumulate on the hard drive. Once the network is available again, BizTalk Server picks up and processes all the files it finds in its source directory. Also, you can add and configure additional BizTalk Servers to process documents from the same directory to scale up performance.
To create a file receive function, start the BizTalk Server Administrator. Expand the BizTalk Server Group tree node and select the Receive Functions node. Select Action ˜ New ˜ File Receive Function. A dialog box appears, as shown in Figure 6-18. Enter the file receive function's name, the type of files to poll for, and the directory that should be polled. The type of file to poll for can either be a complete filename or a partial filename with wildcards, such as *Issue.xml.
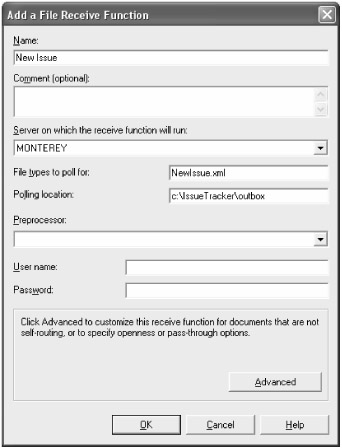
Figure 6-18: BizTalk Server components
File receive functions are not the only way to submit documents to BizTalk Server. BizTalk Server can also receive documents from Message Queuing, through SMTP e-mail, from HTTP(S) Web pages, and from COM components within an application.
The IssueTracker application interacts with external business processes through message queuing. This requires a new message queuing receive function to be added. Create a new receive function as specified earlier; however, specify a new message queuing receive function instead of a file receive function. Enter a name for the function and point the polling location to the message queue created in Chapter 4, "Applying Reliable Messaging." In the Advanced options, select the IssueTrackerChannel and close both dialog boxes to create the receive function.
Compiling the XLANG Schedule
When the business process definition is completed by the business analyst and the process implementation is completed by the developer and both diagrams are bound together, work with BizTalk Orchestration is complete. Next, the process diagram needs to be compiled into a file with which the BizTalk Server process engine can work.
As mentioned earlier, an XLANG schedule is a plain-text document that is coded in XML. This document contains the sequence of activities, rules, and components that were mapped in the BizTalk Orchestration Designer.
To create an XLANG schedule, open the process diagram in BizTalk Orchestration and select File ˜ Make XLANG. This command translates the Orchestration diagram saved as a *.skv file and produces the *.skx XLANG file.
EAN: 2147483647
Pages: 119