Filtering Status Messages
|
| < Day Day Up > |
|
SMS components and site systems generate a constant stream of status messages. Most of these messages will prove to be extremely helpful in resolving issues or troubleshooting problems you might be having with your SMS site. Some messages, however, might simply be flooding the Status Message Viewer with interesting but not particularly useful information, or too much information, or not the kind of information you’re looking for.
There are several ways to filter status messages and display just the status information of interest. We looked at one technique in the section entitled “Setting Status Message Viewer Options” earlier in this chapter. You can also accomplish status filtering in a more global fashion by modifying the status reporting properties or by defining status filter rules.
Configuring Status Reporting Properties
To configure the status reporting component properties, in the SMS Administrator Console, expand the Site Settings node and then select the Component Configuration node. Right-click Status Reporting and choose Properties from the context menu to display the Status Reporting Properties dialog box, as shown in Figure 5.28.
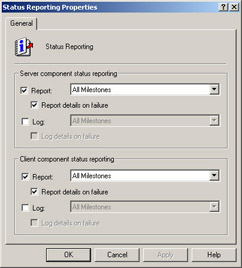
Figure 5.28: The Status Reporting Properties dialog box.
By default, reporting is enabled for both the site server and the client components for the following types of messages:
-
All milestones
-
All milestones and all details
-
Error and warning milestones
-
Error milestones
By selecting the appropriate message types from the drop-down lists, you can control how much data is reported. For example, to only show milestone messages that are errors or warnings, select the Error And Warning Milestones option from the drop-down list in the Server Component Status Reporting frame of the dialog box.
| Caution | The default settings for message reporting are considered appropriate for most SMS sites. Enabling too many messages or filtering out too much information can make the status message system less effective as a problem-solving tool. |
The Report Details On Failure option is also selected by default. This powerful feature ensures that when a failure occurs or an error is reported, the affected component reports details as to the nature of the failure as well as possible causes and remedies. You will probably not want to disable this feature— unless, of course, you can troubleshoot without knowing the details of a problem.
You can also enable logging for the same message types to the Windows Event Log and include failure details in the log by selecting those options.
Status Filter Rules
The second way to globally affect how status messages are reported is by using status filter rules. SMS creates 15 status filter rules of its own to control how status messages are reported and viewed, as shown in Figure 5.29. In the SMS Administrator Console, expand the Site Settings node, then select the Status Filter Rules node to display these status filter rules. These default filter rules are used to control how many, and which, status messages are reported and displayed in the Status Message Viewer.
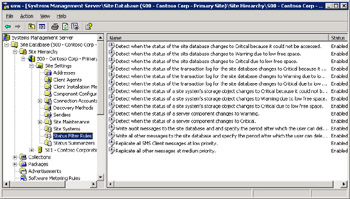
Figure 5.29: The SMS default status filter rules.
When an SMS component generates a status message, the SMS Status Manager tests the message against these status filter rules to determine how that message should be handled. The SMS Status Manager then performs one or more of the following actions.
-
Writes the message to the SMS database
-
Writes the message to the Windows Event Log
-
Replicates the message to the parent site
-
Sends the message to a status summarizer
-
Executes a program
Most of the default status filter rules generate a system message that’s displayed on the site server using a NET SEND command. You should not modify any of these default status filter rules. Each has been created for a reason, and they’re all significantly useful. But you might find that you want to create additional filter rules. You can customize status filter rules to discard certain types of messages that you don’t want or don’t need to see, to replicate certain types of messages to a parent site at a higher priority than others or not replicate certain messages at all, and to execute a program based on a message type.
Begin by deciding just what messages you need to see and what messages you don’t need to see. For example, if your site participates in a parent-child relationship but is fully administered within the site—that is, no administration occurs at the parent site—it might be unnecessary to replicate any status messages to the parent site. Eliminating this replication would certainly decrease the amount of network traffic generated between the parent site and your site.
| Caution | Do not modify existing status filters or define any new filter rules until you’re fully comfortable with and knowledgeable about the status message system. If you make a change without knowing its full effect, you could render the status message system useless to you as a troubleshooting tool. |
Follow these steps to create a new status filter rule:
-
In the SMS Administrator Console, expand the Site Settings node.
-
Right-click Status Filter Rules, choose New from the context menu, and then choose Status Filter Rule to display the Status Filter Rule Properties dialog box, as shown in Figure 5.30.
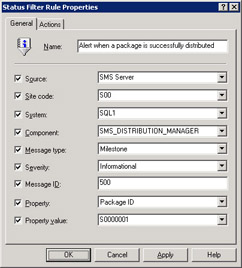
Figure 5.30: The General tab of the Status Filter Rule Properties dialog box. -
In the General tab, enter a descriptive name for your filter.
Tip The status filter name should adequately explain the function and purpose of the status filter rule you’re creating. Use the default filter names as a guideline for creating your own.
You can narrow your filter criteria further by selecting any combination of options available in the General tab. These options are described below in Table 5.1.
-
Select the Actions tab, as shown in Figure 5.31, and specify what Status Manager should do when the message criteria defined in the General tab are met.

Figure 5.31: The Actions tab of the Status Filter Rule Properties dialog box.In this example, Status Manager has been instructed to write the message to the SMS database as well as to the Windows Event Log. By default, the message will also be forwarded to the appropriate status summarizer to be included in the Status Message Viewer. Other actions available to you are described below in Table 5.2.
-
Choose OK to save the new filter rule.
Table 5.1: Status filter rule options Filter Option
Description
Source
The source of the status message: SMS Server, SMS Client, or SMS Provider
Site Code
The site code corresponding to the source of the status message
System
The name of the SMS client or server that generates the status message
Component
The name of the SMS component that generates the status message
Message Type
The status message type: Milestone, Detail, or Audit
Message Severity
The message severity: Informational, Warning, or Error
Message ID
The specific status message ID you’re reporting on—for example, an ID of 500 generally relates to a component starting up
Property
The name of a specific property, such as Advertisement ID, Collection ID, Package ID, Policy Assignment ID, or Policy ID, that might be present in some status messages you want to report on
Property Value
A specific property attribute for the property name you specified, such as Advertisement ID, Collection ID, Package ID, Policy Assignment ID, or Policy ID, that might be present in some status messages you want to report on
Table 5.2: Status filter action options Action Option
Description
Write To The SMS Database
Includes the status message as a record in the SMS database. By default, messages are kept in the database for seven days and then deleted, unless this value is modified.
Report To The Event Log
Writes the status message to the Windows Event Viewer application log.
Replicate To The Parent Site
Sends a copy of the status message to the site’s parent.
Run A Program
Directs SMS to execute the command entered in the Program text box when the status message is generated.
Do Not Forward To Status Summarizers
Prevents the status message from being handled by any status summarizer. This means that it might not be included in determining warning or error thresholds in the status viewer.
Do Not Process Lower-Priority Status Filter Rules
Effectively ends any further processing of this status message. This means that it won’t be evaluated by any additional filter rules.
The new status filter rule will be added at the end of the list of existing rules. However, the actual order in which the rules are listed is determined by their relative priority. Status messages will be passed through all the filters if you don’t select the Do Not Process Lower-Priority Status Filter Rules check box for a filter in the Actions tab. If you do select this option for a filter, the message won’t pass through any filters below this one in the filter list. You can change the order of filter processing by right-clicking a filter, choosing All Tasks from the context menu, and then choosing Increment Priority to move the filter up in the list or Decrement Priority to move the filter down in the list.
| Tip | The Run A Program option in the Actions tab can be a useful alert tool if you’re using a Windows-compatible paging application or some other notification tool that can be executed through a command line. For example, you can enter the command-line sequence for executing a page to notify you when a specific status message is generated. |
Chapter 14 of the Microsoft Systems Management Server 2003 Operations Guide, available from the Microsoft SMS Web site (http:// www.microsoft.com/smserver), contains several useful example filter rules in the section titled “Sample Status Filter Rules.” The filter rule on how to discard status messages from a component that’s flooding the system is particularly useful. After you’ve become comfortable with the status message system and the way in which the various SMS components work and interact, you might want to filter out simple informational messages, such as messages generated when a component starts or wakes up. Follow the steps outlined earlier to define this simple filter. In the General tab, specify a name in the form “Discard message xyz from component abc on server 123.” Fill in the System, Component, and Message ID fields, as shown in Figure 5.32. For this example, we’re excluding startup messages for Site Control Manager that are generated on the system SQL1.
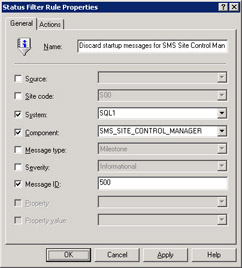
Figure 5.32: Defining a sample status filter rule.
In the Actions tab, select the Do Not Forward To Status Summarizers check box. This setting ensures that the message is disregarded and that it won’t be displayed in the Status Message Viewer. Depending on where this new rule sits in relation to the other rules, you might also want to select the Do Not Process Lower-Priority Status Filter Rules check box to prevent any subsequent filters from picking this message up and possibly writing it to the database or displaying it in the Status Message Viewer.
|
| < Day Day Up > |
|
EAN: 2147483647
Pages: 178