6.10 Custom Actions
| Although Visual Studio .NET Setup projects handle the most common installation requirement, some applications will need to perform some extra steps at installation time. For example, your application might install custom performance counters or create a message queue. To enable operations such as this, Windows Installer supports custom actions. A custom action is a piece of code supplied by you that will be invoked during the installation process. As Figure 6-18 shows, the Custom Actions view presents four folders. These represent various stages of the installation phase. Remember that the user sees the installation progress through three phases: information collection, installation, and confirmation. The installation phase itself, however, can go through up to four different stages, described later. You can add a custom action to any or all of these stages. Figure 6-18. Custom Actions view Items placed in the Install stage will be run after Windows Installer has completed all other installation work, which means that by the time your custom action runs, all files and registry settings will be in place. Custom actions in the Install stage are allowed to abort the installation (see details later). If you want to run a custom action only after it is certain that the installation has completed successfully, you can place it in the Commit stage. Of course, actions in the Commit stage are not able to abort the installation. Actions in the Rollback stage will be run if the application installation aborts before completing. Actions in the Uninstall stage will be run when the user uninstalls the application.
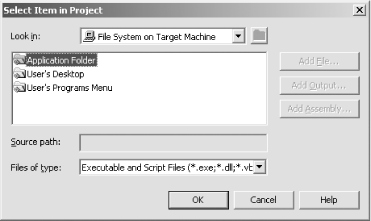
You can add items to a stage with the context menu's Add Custom Action... item. If you select this item from the Custom Action item's context menu (instead of one of the four stages), the action will be added to all four phases. When adding an action, you will be shown the usual item selection dialog shown in Figure 6-19. You can select any .exe , .dll , or script file in any of the folders from the File System view. Figure 6-19. Adding a custom action If you specify an .exe file, Windows Installer will run the program at the chosen stage. You can specify command-line parameters with the Arguments property. You can pass installer properties by putting them in square brackets (e.g., [EDITA1] will pass the contents of the first textbox on the Textboxes (A) screen). Remember to put quotes around any properties whose values might have spaces in them. If your custom action is in the Install phase, you can abort the installation by returning a nonzero exit code. This will cause the installation to go through the rollback procedure, undoing any work the installer has done so far. If you specify a DLL, you must also tell Visual Studio .NET what entry point it should call, using the EntryPoint property. You can give the method whatever name you like, but it must use the _ _stdcall calling convention, and take an MSIHANDLE as its sole parameter. Example 6-1 shows a suitable function declaration. You should also set the custom action's InstallerClass property to false. (If you set it to true, Visual Studio .NET will presume that the DLL is a .NET assembly and will look for an installer class. See Section 6.10.2 for details on how to write a .NET custom action.) Example 6-1. A custom action in a DLLint _ _stdcall CustomAction(MSIHANDLE hInstall); You can pass data to the action by setting the CustomActionData property in Visual Studio .NET. The DLL will be able to retrieve this using the MsiGetProperty API. Any installer properties passed in square brackets will be expanded by Windows Installer before being passed to the DLL via the CustomActionData property.
DLL-based custom actions should return a status code. ERROR_SUCCESS indicates that the action succeeded. It can indicate a failure in two ways: ERROR_INSTALL_USEREXIT means that the user decided to terminate the installation process during the custom action. ERROR_INSTALL_FAILURE means that the custom action was unable to complete for some reason. If you write a custom action as a script file, it will also have access to the CustomActionData property. When Windows Installer launches a script, it makes a global object named Session available. This has an indexed property named Property , which you can use to retrieve the CustomActionData property. Example 6-2 shows a snippet of VBScript illustrating this technique. Example 6-2. Retrieving CustomActionData in script data = Session.Property("CustomActionData") Custom actions in scripts cannot abort the installation process. This is a Visual Studio .NET limitationalthough Windows Installer supports this functionality, it relies on the script being contained in a function so that it can have a return code. Unfortunately, Visual Studio .NET provides no way of specifying the name of the function, so only global code can be executed, which has no means of returning a value. Scripts will be run inside a special scripting host supplied by the Windows Installer. This means that your script will not have access to the normal intrinsics that would be available in the WSH (Windows Scripting Host) host. However, it is easy enough to get hold of the standard WSH objects if you need them. Example 6-3 shows how to retrieve a registry setting using the WSH shell RegRead function from within an installer script. Example 6-3. WSH functions from an installer script Dim WSHShell, CLSIDRegPath, CLSID Set WSHShell = CreateObject("WScript.Shell") CLSIDRegPath = "HKCR\EvilCorp.Engine\CLSID\" CLSID = WSHShell.RegRead(CLSIDRegPath)
6.10.1 Example custom actionThe code in Example 6-4 shows an example custom action DLL written in C++. It creates a text file containing the installation date of the application. The location of the file created by this installer is determined by a GetInstallFilename function, not shown here. This could use the MsiGetProperty API to retrieve the CustomActionData property, allowing installer properties to be passed in. For example, if the custom action's CustomActionData property were set to [ProgramFilesFolder][Manufacturer]\[ProductName] , the custom action could create the file in the program's installation directory. Example 6-4. Custom action extern "C" _ _declspec(dllexport) int _ _stdcall Install(MSIHANDLE hInstall) { std::string fileName; if (!GetInstallFilename(hInstall, fileName)) return ERROR_INSTALL_FAILURE; FILE* f = fopen(fileName.c_str( ), ("w")); if (f = = NULL) { return ERROR_INSTALL_FAILURE; } else { SYSTEMTIME sysTime; ::GetSystemTime(&sysTime); fprintf(f, "Installed on %d/%d/%d\n", (int) sysTime.wYear, (int) sysTime.wMonth, (int) sysTime.wDay); fclose(f); } return ERROR_SUCCESS; } static int RemoveFile(MSIHANDLE hInstall) { std::string fileName; if (!GetInstallFilename(hInstall, fileName)) return ERROR_INSTALL_FAILURE; // Silently ignore errors--it is possible that we might // not have successfully created the file during installation, // in which case deleting it won't work either... ::DeleteFile(fileName.c_str( )); return ERROR_SUCCESS; } extern "C" _ _declspec(dllexport) int _ _stdcall Rollback(MSIHANDLE hInstall) { return RemoveFile(hInstall); } extern "C" _ _declspec(dllexport) int _ _stdcall Uninstall(MSIHANDLE hInstall) { return RemoveFile(hInstall); } This particular custom action DLL provides Install , Rollback , and Uninstall methods . You would therefore add this DLL three times in the Custom Actions view, under the Install, Rollback, and Uninstall phases. (This particular code doesn't have anything useful to do at Commit time.) Each place the DLL appears in the Custom Actions view, you would set its EntryPoint property to be the name of the appropriate DLL entry point (i.e., Install, Rollback, or Uninstall). 6.10.2 .NET Installation ComponentsIf you are writing a .NET project, automated support is available for certain operations that would normally require you to write code. If you need to configure a message queue, an event log source, or a performance counter on the target system, Visual Studio .NET can add installation components to your project that will do all of the necessary work for you. All three of the supported installation component types use the same basic model. They assume that you will configure your development system so that it has whatever message queues, event log sources or performance counters your application requires. Visual Studio .NET is then able to examine the items you have created and add an installation component to your project that can create an identically configured item on a target machine. You can add as many installation components as you like to a project, but they are all managed by a single Installer class. The Installer class will be invoked at installation time and will run each installation component in turn , in order to configure the target machine to your application's needs. This mechanism relies on installer custom actions. You must add a project that uses .NET installation components as a custom action in the usual way, but you must set the custom action's InstallerClass property to true. This changes the way that Windows Installer will use the component. Instead of executing the program (or calling a named entry point in the case of a DLL), it will search for the Installer class and allow that to control the custom action.
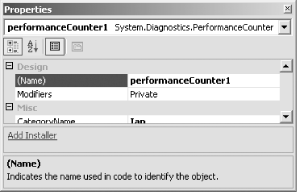
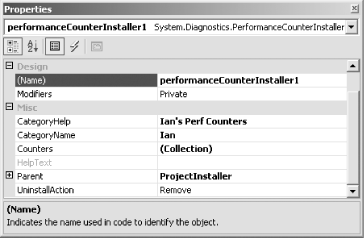
Installer classes live in the main application project. You can add an Installer class to your application with the usual Add Project Item dialog. Simply choose Installer Class from the Code category. This will add a new class that derives from the Installer class (which is defined in the System.Configuration.Install namespace). It also marks it with the RunInstaller custom attribute, which enables Windows Installer to locate the class at installation time. A newly added Installer class will not do anything at installation time. If you want to add some code of your own, you can override any of the Install , Commit , Rollback , or Uninstall methods, which will get called at the relevant phases. But since the main point of using this mechanism is to automate the configuration of certain system resources, you will normally want to add installation components to the installer. To add an installation component for a message queue, event log source, or performance counter, your main project must be using a component that represents the item in question. If you don't already have such a component in use in your project, you could drag the relevant item from the Visual Studio .NET Server Explorer onto, say, a Form. (Any design view will do.) When you select an object, if it can have an associated installation component in the designer, the Properties window will show an Add Installer method in the verb panel. Figure 6-20 shows the Properties page for a PerformanceCounter component, with the Add Installer method visible in the middle. Figure 6-20. A component that supports installation components If you have not yet added an Installer class to your project, clicking on Add Installer will create one for you, calling it ProjectInstaller . It will then add an installation component to the Installer and will show you the Installer class's design view. (The Installer 's design view consists of just the component tray.) The Installer will now contain an entry for the installation component you just added. This item's properties will contain enough information to create a new item on the target machine. (Either a message queue, event log source, or performance counter, depending on what type of component you added an Installer for.) The item it creates on the target will have all the same characteristics as the original, unless you edit its settingsinstaller components let you modify all of the information they contain, just like any other component, as Figure 6-21 shows. Figure 6-21. Installer properties for a performance counter The Installer class will automatically install any components that you add in this fashion. You do not need to write any code; you simply need to make sure that the executable is added as a custom action for all installation phases and that its InstallerClass property is set to true. (When you add a custom action for a binary that contains an Installer class, Visual Studio .NET automatically sets the InstallerClass property to true, so you should find that the defaults are correct.) If you want to add code of your own to the Installer class, you may want to pass information such as the value of properties selected by the user earlier in the installation. Once again, the CustomActionData property should be used. However, it must use a certain format, because it will be parsed by the Installer class. It should take the form of name-value pairs, specified as /name=value. Pairs should be separated with a space. If the value contains a space, it should be enclosed in quotes. These name-value pairs are available through the Installer class's Context property. The Context has a Parameters property, which is a dictionary of strings containing the name-value pairs passed in CustomActionData . The way that we pass user input to the custom action is to place it in the CustomActionData property. For example, if the installation user interface uses the Textboxes (A) page, the installer property EDITA1 will contain the string the user entered in the first edit box on that page. Custom actions don't have access to most installer properties, so, by default, a custom action will not be able to retrieve this information. However, we can set the CustomActionData property to /FavoriteColor=EDITA1 , enabling the custom action to retrieve this value using the code shown in Example 6-5. You can pass multiple values if necessary. For example, you might set the CustomActionData property to /FavoriteColor=EDITA1 /Weapon=BUTTON4VALUE to pass in a text field and a radio button setting. Example 6-5. Retrieving CustomActionData propertiesstring somePropVal = Context.Parameters["FavoriteColor"]; |
EAN: 2147483647
Pages: 147
