Installation Methods
Just as several discovery methods are available for adding resources to the SMS database, several client installation methods are available for loading the SMS client components on computers that have been assigned to the SMS site. The three client installation methods are as follows:
- Logon client installation (Windows Networking Logon Client Installation, NetWare Bindery Logon Client Installation, and NetWare NDS Logon Client Installation)
- Windows NT Remote Client Installation
- Manual client installation
As we saw in Chapter 7, some discovery methods are paired with a client installation method—meaning simply that certain installation methods are more likely to use a corresponding discovery method to generate a DDR for the resource. For example, Windows Networking Logon Discovery is paired with Windows Networking Logon Client Installation, and Network Discovery is paired with Windows Remote Client Installation.
It's interesting to note, however, that it is not necessary for a resource to have been discovered before it can be installed. The installation process will automatically generate a DDR for the client if Heartbeat Discovery is enabled or when inventory is collected. The client will be fully functional whether or not a DDR has been generated.
While not essential to the successful installation of an SMS client, it would be productive to configure the client agents that you intend to enable prior to installing the client computers. Doing so will ensure that all the agents and their properties will be installed at one time. If you enable a client component later, the client update process will update the client on its next polling cycle—every 23 hours—or when the update is forced on the client.
These client agents include:
- Advertised Programs Client Agent
- Event to Trap Translator Client Agent
- Hardware Inventory Client Agent
- Remote Tools Client Agent
- Software Inventory Client Agent
- Software Metering Client Agent

TIP
Client agents are enabled by default when you install SMS using the Express Setup option. No client agents are enabled if you performed a Custom installation.
The process of enabling and installing each of these agents on your SMS clients will be covered in later chapters, with the exception of the Event to Trap Translator Client Agent, which is installed by default and was discussed in Chapter 6.
Logon Client Installation
There are three types of logon client installation: Windows Networking Logon Client Installation, NetWare Bindery Logon Client Installation, and NetWare NDS Logon Client Installation. All are configured similarly, and all follow pretty much the same process flow to install the SMS clients. These installation methods rely on the execution of the SMSls script commands for initiating the installation process. Windows NT servers will use the SMSls.bat file; NetWare servers will add a call statement to existing NetWare scripts to the SMSls.scr file.
We've discussed how to enable logon client installation methods in Chapter 3. Let's review briefly. To enable one of the logon client installation methods, follow these steps:
- In the SMS Administrator Console, expand the Site Settings folder and then expand the Client Installation Methods folder.
- Right-click on the appropriate logon client installation method (Windows Networking Logon Client Installation, NetWare Bindery Logon Client Installation, or NetWare NDS Logon Client Installation), and choose Properties from the context menu to display its Properties window. In the example in Figure 8-5, we'll use the Windows Networking Logon Client Installation option.
- On the General tab, select the Enable Windows Networking Logon Client Installation check box. (This option will change depending on the installation you've chosen.)
- If you've enabled the corresponding discovery method—Windows Networking Logon Discovery, NetWare Bindery Logon Discovery, or NetWare NDS Logon Discovery—select the Keep Logon Point Lists For Discovery And Installation Synchronized check box. This option will ensure that the logon point lists maintained for both the installation and discovery methods are the same. In other words, any changes made to the list in one method will be reflected in the other method's list.
- To add logon points, click the New button to display the New Windows Networking Logon Point dialog box. Enter the appropriate information (server name for Windows NT and NetWare Bindery servers; volume, organizational unit, and so on for NetWare NDS servers), and then click OK to return to the Properties window.

Figure 8-5. The Windows Networking Logon Client Installation Properties window.
![]()
NOTE
SMS 2.0 supports the creation of SMS logon points on NTFS partitions only, not on FAT.
- Click on the Logon Settings tab, as shown in Figure 8-6. Select the Modify User Logon Scripts check box if you want SMS to automatically use the SMSls.bat file as the default logon script for users who do not have a logon script specified in their user profiles, or to append the SMS script to the top or bottom of the existing logon script.
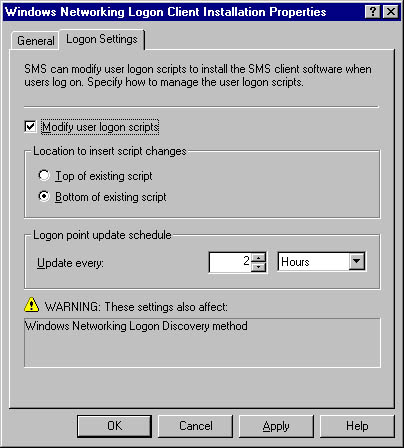
Figure 8-6. The Logon Settings tab.
Existing logon scripts are often well planned and can be complex. Therefore, it may not be practical or desirable to let SMS simply add its script changes to the top or bottom of an existing logon script. In this case, do not enable the Modify User Logon Scripts option. Instead, modify the logon scripts yourself to call the SMS script as appropriate.

CAUTION
SMS will ignore existing logon scripts that do not include a file extension.
- Enter an appropriate schedule for updating the logon scripts.
- Click OK to begin the site update process.
![]()
NOTE
When these installation methods or their corresponding discovery methods are enabled, SMS will first implement the logon points. Refer to Chapter 3 for a complete discussion of this process.
With Windows Networking Logon Client Installation, the account that is used to install the SMS components on Windows NT clients must have administrative privileges because DLLs and agents are installed and loaded. More frequently than not, the user logged onto the Windows NT computer will not have administrative privileges. In these instances, the client configuration cannot continue because CCIM initially runs in the same security context as the logged on user.
This scenario is illustrated in Figure 8-7. In this case, CCIM will create a Client Configuration Request (CCR) for the Client Configuration Manager service on the site server to restart CCIM using an account that does have appropriate administrative privileges on the Windows NT client. CCIM writes the CCR file to Client Configuration Manager's inbox on the CAP (CAP_site\Ccr.box). Inbox Manager Assistant in turn moves that file to Client Configuration Manager's inbox on the site server (SMS\Inboxes\Ccr.box). Client Configuration Manager then initiates an update process, which starts CCIM on the client using an account that has appropriate administrative privileges.
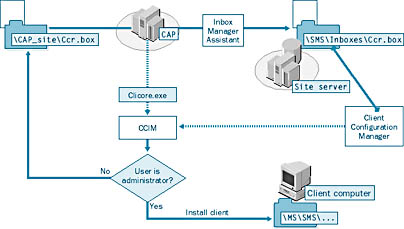
Figure 8-7. The Client Configuration Manager process flow.
By default, Client Configuration Manager will use the SMS Service account to run CCIM. That account, as you no doubt recall, is a member of the Domain Admins global group for the Windows NT domain. Domain Admins is automatically made a member of the local Administrator's group on every Windows NT computer that joins the Windows NT domain. So the SMS Service account will have appropriate privileges to complete the SMS installation on the client. If the Windows NT clients are not members of the domain, or if for reasons of security the Domain Admins global group is not a member of the local Administrator group, the installation will fail. You need to ensure that the SMS Service account is a member of the local Administrator group on every Windows NT client that needs to be installed as an SMS client.
One way to accomplish this is to create a separate client installation account, called the SMS Client Remote Installation account, for SMS to use when installing the SMS components on a client. You must first create an account through User Manager For Domains and ensure that it is made a member of the local Administrator group on the Windows NT client in question. After you create this account, you need to tell SMS to use the account when installing the SMS components on Windows NT clients. To do so, follow these steps:
- In the SMS Administrator Console, navigate to your site entry in the Site Hierarchy folder.
- Right-click on your site entry, and choose Properties from the context menu to display the Site Properties window, shown in Figure 8-8.
- Click on the Accounts tab, shown in Figure 8-9.
- In the SMS Client Remote Installation Account section, click the Set button to display the Windows NT Account dialog box, shown in Figure 8-10.
- Enter the user name for the account you created, in the form Domain\User. Enter and confirm a password for the account, and then click OK.
- Click OK again to begin the site update process.

Figure 8-8. The Site Properties window.
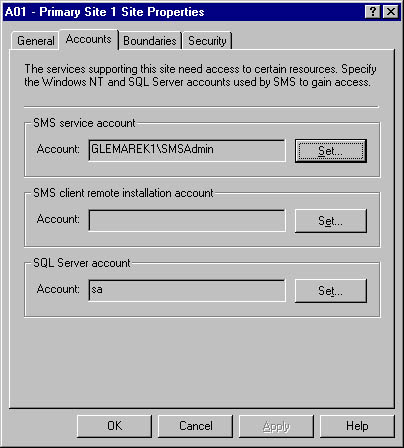
Figure 8-9. The Accounts tab.
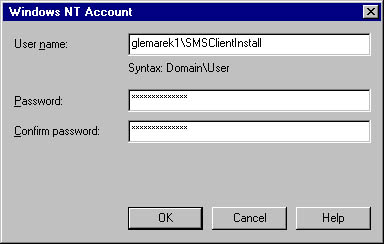
Figure 8-10. The Windows NT Account dialog box.
TIP
If your SMS site includes Windows NT domains that do not participate in trust relationships, you will need to create a matching installation account and password for each Windows NT domain in which you are installing SMS clients. SMS will use Windows NT's pass-through authentication process to connect to clients in untrusted domains, so the installation accounts and passwords must be duplicated in each domain.
Windows NT Remote Client Installation
This installation method is more of a push-type installation. It is meant to facilitate the installation of SMS components on clients running Windows NT for which no other installation method is appropriate. For example, Windows NT servers generally are not left in a logged-on state, and therefore they would probably not be effectively installed using the Windows Networking Logon Client Installation method. Perhaps some users do not execute the SMS logon script—or any logon script, for that matter. This installation method could be used to ensure that their Windows NT computers become SMS clients.
By default, Windows NT Remote Client Installation is not enabled. This is a good thing, actually, because this method is designed to find every Windows NT client that has not already been assigned and installed and install SMS on it. The process is relatively straightforward, but it can also result in Windows NT computers that you did not intend to become clients being set up as SMS clients, such as servers in other administrators' domains. You can configure the method to find and install Windows NT servers, workstations, or domain controllers. The Windows NT Site System Discovery method uses Windows NT Remote Client Installation to install SMS site systems as SMS clients.
To enable Windows NT Remote Client Installation, follow these steps:
- In the SMS Administrator Console, expand the Site Settings folder and then expand the Client Installation Methods folder.
- Right-click on Windows NT Remote Client Installation, and then choose Properties to display the Windows NT Remote Client Installation Properties window, shown in Figure 8-11.
- Check the Enable Windows NT Remote Client Installation check box.
- The System Types section offers three options: Windows NT Server, Windows NT Workstation, and Domain Controllers. All are enabled by default. Clear the check boxes for options you do not require.
- Click OK.
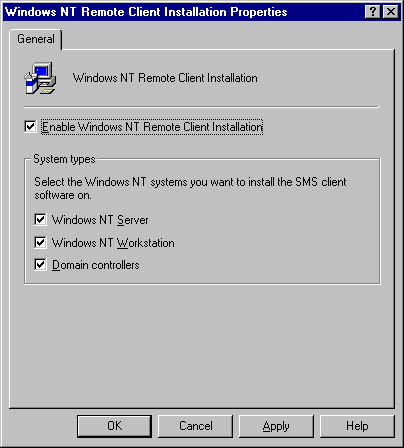
Figure 8-11. The Windows NT Remote Client Installation Properties window.
As with the other installation methods, you must provide SMS with administrative-level access on all the Windows NT computers that you intend to install using this method, either by creating and assigning an SMS Client Remote Installation account or by using the SMS Service account. Also, the client must have already been discovered using one of the discovery methods described in Chapter 7.
When an appropriate client is found using this method, Discovery Data Manager generates a CCR for the Client Configuration Manager service on the site server. The CCR is written to Client Configuration Manager's inbox on the site server (SMS\Inboxes\Ccr.box). Client Configuration Manager initiates an update process, which starts CCIM on the client using an account that has appropriate administrative privileges and then installs the SMS components on the client as described earlier in this chapter.
Manual Client Installation
The third method of installing SMS components on a client is manual client installation. You need to use this installation method for those clients that cannot be installed using any other installation method. Using this method, you or the user must manually connect to a logon point for the SMS site from a client machine and execute a setup program. There are two setup programs: SMSMan16.exe for 16-bit operating systems (Microsoft Windows 3.1 and Windows for Workgroups), and SMSMan.exe for 32-bit clients (Windows 95, Windows 98, Windows NT, and Windows 2000). You may recall from Chapter 7 that these setup programs are located in the SMSLogon\platform.bin\00000409 folder on the logon point, where platform represents either Alpha or X86.
Both programs initiate the Systems Management Server Installation Wizard. SMSMan16.exe requires the user to specify the name of the logon point or Windows NT domain to connect to. SMSMan.exe allows the user to specify the name of the logon point or Windows NT domain, but it can also choose a logon point for you. SMS can also be uninstalled from 32-bit clients using SMSMan.exe.
The two setup programs can be scripted using the command-line switches listed in Table 8-1. When either program is started, it launches the SMSboot1.exe program, and the installation proceeds just as described earlier in this chapter. The syntax for running SMSMan.exe or SMSMan16.exe from a command line is shown here:
SMSMAN.EXE [switch option] [/Q]
or
SMSMAN16.EXE [switch option] [/Q]
TIP
If the client needs to become a member of multiple SMS sites, it will be necessary for you or the user to connect to a logon point for each SMS site.
Table 8-1. SMSMan.exe and SMSMan16.exe command-line switches
| Switch | Description |
|---|---|
| /A (SMSMan only) | Automatically selects an installation location and displays results to the user |
| /B [\\server\volume] | Specifies a NetWare Bindery server logon point |
| /C [tree.org.orgunit] | Specifies a NetWare NDS volume as a logon point (SMSMan only) |
| /D [domainname] | Specifies a Windows NT domain that contains a logon point |
| /H or /? | Displays a Help screen |
| /Q | Quiet mode; no messages are displayed on the screen during installation or removal |
| /S [servername] | Specifies the name of a Windows NT server assigned the logon point role |
| /U | Uninstalls SMS components from the client |
EAN: 2147483647
Pages: 167