Communicating Through Senders
As we've seen, SMS uses a sender to connect to another site and transfer information to that site. A sender is a highly reliable and fault-tolerant communication mechanism that transfers data in 256-KB blocks, making it more efficient than dragging and dropping or using an XCOPY command. Senders can communicate using the standard LAN/WAN connection that exists between two sites, or they can use one of four RAS sender types: Asynchronous RAS Sender, ISDN RAS Sender, X.25 RAS Sender, or SNA RAS Sender. There is also a Courier Sender type, which enables you to create and send package information to another SMS site if you have a slow or unreliable link between a site and its parent. You will use the RAS sender types for most intersite communication.
Sender Process Flow
Three main SMS components are involved in sending data from one site to another: Replication Manager, Scheduler, and a sender. With the exception of Courier Sender, the sender component wakes up when it receives a send request file in its outbox. The process begins earlier than that, however, as illustrated in Figure 4-35. When a request to send data is made, an SMS component will create a replication file and place the file in Replication Manager's inbox. When the parent-child relationship is established, for example, the Inventory Data Loader places an .MIF file in Replication Manager's inbox (in the SMS\Inboxes\Replmgr.box\Outgoing directory) so that it can send the child site's inventory data to the parent site. As another example, when a package is identified for distribution to another site, Distribution Manager places a replication object file (.RPL or .RPT) in Replication Manager's inbox.
Replication Manager will in turn bundle the data if necessary and then create a minijob for Scheduler. Scheduler creates packages, the instructions needed for sending the data in question, and a send request file (.SRQ) for the sender. The package and instruction files are placed in the SMS\Inboxes\Schedule.box\Tosend directory. The send request file is an instruction file for the sender that contains information such as the priority of the request, the site code and preferred address of the target site, a job identifier, the location of the sender's outbox, the location and names of the package and instruction files, action codes, and routing information if a direct address to the target site does not exist. This file is written to the preferred sender's outbox (SMS\Inboxes\Schedule.box\Outboxes\sender, where sender is the sender folder, such as LAN, RASAsynch, RASISDN, and so on).
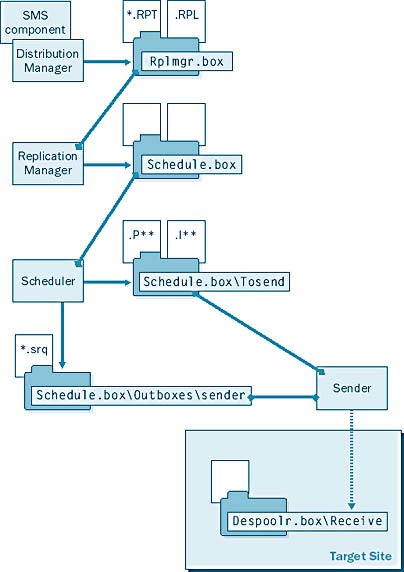
Figure 4-35. The sender process flow, showing the flow of information among SMS components.
When this file is written, the sender wakes up and reads the send request file. It also checks to see whether the address properties have placed any restrictions on when requests of this priority can be sent and whether any bandwidth limits have been set. The sender then changes the extension of the send request file to .SRS and writes status information to the file, including when the sending process started, when it ended, and how much data has been transferred at a particular point in time.
![]()
NOTE
The Total Bytes To Send and Bytes Left To Send values in the send request file serve an important fault-tolerance role. If the sending process is interrupted for any reason—for example, if a send request of higher priority is created—the sender knows how to pick up where it left off.
The sender connects to the target site's SMS_SITE share—the SMS\Inboxes\Despoolr.box\Receive directory—where the Despooler component will complete the processing of information at the target site. If the sender comes across an error while transferring the data, it will write an error status message to the .SRS file. When the data has been completely transferred, the send request file is updated to Completed status and is then deleted.

TIP
As always, monitor the appropriate SMS component status messages and log files to follow the progress of a send request. The SMS CD includes a utility named Dumpsend.exe that can be used to display the contents of a send request file. You'll find this utility in the Support\Reskit\Bin\Platform\(I386 or Alpha)Diagnose folder. You'll need to make a copy of the send request file (.SRQ or .SRS) and then execute the command dumpsend filename.srq|more at a command prompt to display the file's contents.
Defining a Sender
When the SMS site server is first installed, Setup creates Standard Sender and Courier Sender by default. The SMS administrator can then choose to install additional senders as necessary. As mentioned, only one sender of each type can be installed on the same server. However, you can install multiple instances of the same sender type on individual servers. These servers will become SMS component servers when you install a sender on them.
There is nothing special involved in adding an additional Standard Sender on an SMS component server. The only requirement is that you have an existing LAN or WAN connection between the Standard Sender component server and the target site server. Then, of course, you must configure an additional address to the target site using the new Standard Sender.
Enabling the use of one or more of the other four RAS sender types—Asynchronous RAS Sender, ISDN RAS Sender, X.25 RAS Sender, and SNA RAS Sender—assumes that you have already established a RAS server at each site installed with the appropriate hardware and software support. That is, a modem, ISDN, X.25, or SNA connection. It is not necessary or even desirable that the site server itself be installed as a RAS server; it is only necessary that the site server for each site have access and connectivity to a RAS server (appropriately configured) on their local networks.
Senders on Other ServersWhen you install a sender on another server, such as the Asynchronous RAS Sender on a RAS server, that server becomes an SMS component server. SMS Executive, the support files, and the directories for the sender are installed as well. Since the sender does not reside on the site server, it will not wake up when a send request file is created. Instead, the sender wakes up on a 5-minute polling cycle.
This polling cycle will require some additional resources on the sender's server. Also, network traffic will be generated between the site server and the sender server to transfer send request, package, and instruction data. The ultimate effect on the network's and sender server's performance will depend on the amount of usage the sender will experience and, of course, the current usage of the server itself. Alternative senders do provide a means for Scheduler to improve sending performance from one site to another. The SMS administrator will need to determine the significance of any trade-offs between having an alternative sending mechanism and the network and server performance hits that may occur.
New senders are added to the site through the SMS Administrator Console as a site setting. To establish a new sender, follow these steps:
- In the SMS Administrator Console, navigate to the Site Settings folder and expand it, and select the Senders folder. One sender will be displayed—Standard Sender installed by default. (Note that Courier Sender isn't displayed. Although Courier Sender is installed by default, it can't be modified. For details, refer to the section "Courier Sender" later in this chapter.)
- Right-click on the Senders folder, and choose New from the context menu to display the five sender type options, as shown in Figure 4-36. Select the type of sender you want to establish.
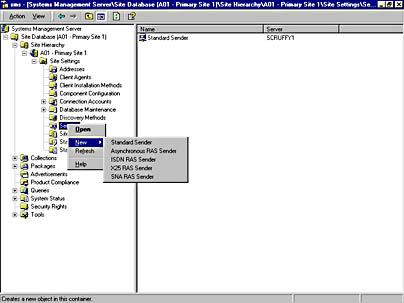
Figure 4-36. The list of sender type options.
![]()
NOTE
Because all the sender types will display a similar series of Properties window screens, we'll show only the screens for Asynchronous RAS Sender here.
- On the General tab of the Sender Properties window, shown in Figure 4-37, enter the name of the server on which you want to create the sender—in this case, the name of the RAS server. (By default, the site server runs the sender.)
- Select the Advanced tab, as shown in Figure 4-38, and enter values for the Maximum Concurrent Sendings and Retry Settings options.
- Click OK to begin the site configuration process.
Maximum Concurrent Sendings represents the number of concurrent transmissions that can be made to all sites via this sender or to any single site (Per Site). The Per Site setting is set to 1 and disabled for RAS senders by default. The Retry Settings options consist of the number of retries to attempt if a connection fails and the number of minutes to wait between retries (Delay Before Retrying). Your settings for these options will depend primarily on the kind of network connection you have between the sites. For example, if you have a fast, reliable network connection and the amount of bandwidth used is low, you might increase the Maximum Concurrent Sendings value and decrease the Retry Settings options.

Figure 4-37. The General tab of the Sender Properties window.
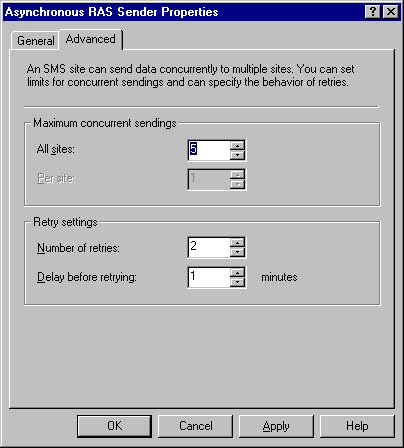
Figure 4-38. The Advanced tab.
Establishing a new sender initiates the same site configuration process we've seen in earlier examples. Part of this process includes creating an outbox for the sender in the SMS\Inboxes\Schedule.box\Outboxes directory. If the sender is being installed on another server, the process will include installing SMS Executive on the sender server (making it a component server), installing the sender support files and the sender's support directory, and then updating the site server's site control file appropriately. Status messages for the new sender will include a notice of successful installation, as shown in Figure 4-39. Of course, you can also follow the process by checking status messages and logs for Hierarchy Manager, Site Control Manager, and Site Component Manager.
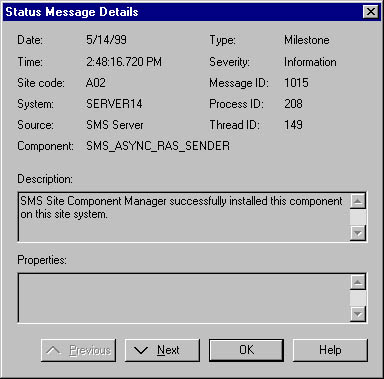
Figure 4-39. Status message indicating that the RAS sender has been successfully installed on the component server.
Courier Sender
As mentioned, Courier Sender enables you to create and send package information to another SMS site through non-network channels, such as regular postal service or a package delivery service, if you have a slow or unreliable link between a site and its parent. It can also be used to send packages that are so large an existing address might not provide adequate performance levels. It is not, however, meant to be used as a consistent alternative to existing network communications mechanisms.
As with other senders, to use Courier Sender as an alternative means of sending packages, you must create an address to the target site using Courier Sender as the sender type. We've seen how to create an address to the target site using other sender types in the section "Creating Address to Another Site" earlier in this chapter. A similar process is used here:
- In the SMS Administrator Console, navigate to the Site Settings folder and expand it.
- Right-click on the Addresses folder, and choose New from the context menu, and then choose Courier Sender Address to display the Courier Sender Address Properties window, as shown in Figure 4-40.
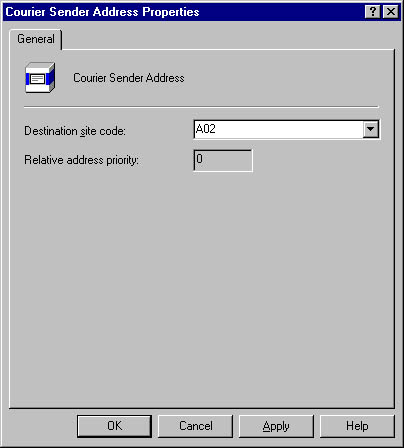
Figure 4-40. The General tab of the Courier Sender Address Properties window.
When you create the package, you can also identify Courier Sender as the preferred sender type for that package, as shown in Figure 4-41. (For details on creating packages, refer to Chapter 12.)
You will also need to identify the target site as a distribution point for the package. Refer back to Chapter 3 for details.
TIP
If you have more than one address to a target site and you want to send a package using Courier Sender, choose Courier Sender as the preferred sender type when you create the package.

Figure 4-41. The Distribution Settings tab of the Package Properties window.
When you use Courier Sender as the sending mechanism to transfer a package, the package files are compressed into a single package (.PCK) and placed in the SMS\Smspkg directory. A send request file is also created and placed in Courier Sender's outbox. Because no automatic connection needs to be made to the target site, you must next launch Courier Sender Manager from the Systems Management Server programs group on the Start menu. To create outgoing parcels, follow these steps:
- In Courier Sender Manager, choose Create Outgoing Parcel from the File menu.
- Select your package from the list and click Next.
- In the Parcel Properties section, enter the name of the package, a tracking name, the method you are using to send the parcel (for example, UPS or Federal Express), and a descriptive comment. Click Next.
- Enter the path where you want to save the parcel. The default is SMS\Inboxes\Coursend.box\Out. Click Next.
- Click Finish to create the parcel (.PCL) file.
You can now copy this parcel to some other medium, such as CD-ROM, and then send it on via some non-network method, such as the U.S. Postal Service. The SMS administrator at the target site will in turn copy this parcel to a directory on the target site server. (The default used by Courier Sender Manager is SMS\Inboxes\Coursend.box\In.) The SMS administrator will then launch Courier Sender Manager on the target site server, essentially reversing the sending process. To receive the parcel, follow these steps:
- In Courier Sender Manager, choose Receive Incoming Parcel from the File menu to display the Receive An Incoming Parcel screen of the Courier Sender Wizard.
- Click Browse, select the package from the list, and click Open.
- Click Next and then Finish to complete the package receiving process.
Courier Sender Manager will process this parcel as though a package had been sent using one of the other senders. If necessary, a SMSPkgx$ directory (where x stands for the drive letter) will be created, and the package files will be uncompressed and copied to a subfolder below the directory. When the process has been completed, you can check the parcel's status by choosing Parcel Status from Courier Sender Manager's File menu. (Refer to Chapter 12 for details on Distribution Manager status messages.)
EAN: 2147483647
Pages: 167