Page #49 (Chapter 6 - WebClass Debugging and Error Handling)

Chapter 6 - WebClass Debugging and Error Handling

Visual Basic Developers Guide to ASP and IIS
A. Russell Jones
  Copyright 1999 SYBEX Inc.

Exploring the WebClass Event Sequence
Create a new IIS project. Rename the project WebClassDebug. Change the name of WebClass1 to debugTest. In each event stub available to the WebClass, write a response to the browser as follows:
Private Sub WebClass_BeginRequest()
    Response.Write "Entered BeginRequest<br>"
End Sub
Private Sub WebClass_EndRequest()
    Response.Write "Entered EndRequest<br>"
End Sub
Private Sub WebClass_FatalErrorResponse(SendDefault _
    As Boolean)
SendDefault=False
    Response.Write "A fatal error occurred.<br>"
    Response.Write "Error# " & Err.Number & ", " & _
      "Source: " & Err.Source & ", " & "Description: " & _
      Err.Description
    Response.Write "WebClass Error# " & _
      WebClass.Error.Number & _
      ", Source: " & WebClass.Error.Source & _
", Description: " & WebClass.Error.Description
End Sub
Private Sub WebClass_Start()
    Response.Write "Entered Start<br>"
End Sub
Private Sub WebClass_Initialize()
    Response.Write "Entered Initialize"
End Sub
Private Sub WebClass_Terminate()
    Debug.Print "Entered Terminate"
End Sub
Now press F5 to run the project. You should immediately get an error in VB. If you continue (as if you had compiled the project), you will see an error message in the browser window. (By the way, you can compile this application with no compile errors and get the same error—it's a runtime error.)
  Warning The mswcrun.dll file that comes with Visual Studio Service Pack 3 (sp3) has some serious problems with tag replacement. When running in design mode, the WebClass truncates the HTML returned to the browser. This behavior does not occur at runtime. To solve this problem, you need to replace the sp3 version of the DLL with an earlier version. For more information, see the Microsoft Knowledge Base article Q234317.
WebClassDebug error '800a005b'
Object variable or With block variable not set
/debugTest/debugTest.ASP, line 14
The first thing experienced ASP programmers will notice is that this is a typical ASP error message, and properly so, as the error occurred because an external object (your WebClass) encountered a fatal error. The second thing you'll notice is that the error message is not very helpful—it includes little useful information. Some object couldn't be instantiated. If a user calls you up and says, "I'm getting an error when I try to reach your site," this is all the information you'll have to go on unless you add some extra error trapping to your application.
Look at the debugTest.asp file. Line 14 contains the call that instantiates your WebClass object:
Application("~WC~WebClassManager").ProcessNoStateWebClass _
    "WebClassDebug.debugTest", _
      Server, _
      Application, _
      Session, _
      Request, _
      Response
Some other object must have failed. You know it isn't the WebClassManager object, or the failure message would refer to the previous line in the ASP file, where the WebClassManager object is instantiated. Your application doesn't create any objects—it doesn't use New anywhere, so the program must not be able to start an instance of the WebClass, right? Actually, that's not correct. The WebClass object was created properly.
Try again. This time, press F8 to start the application. You will reach the Initialize event code, but the program fails on the only code line in the routine:
Private Sub WebClass_Initialize()
    Response.Write "Entered Initialize"
End Sub
Why? Because the Response object—a global object—doesn't yet exist when the WebClass_Initialize event occurs. So you can't use Response.Write to print messages from the Initialize event. Before you try again, change the Response.Write statement to Debug.Print.
Private Sub WebClass_Initialize()
    Debug.Print "Entered Initialize"
End Sub
While you're at it, note that the code in the WebClass_Terminate event contains Debug.Print also, because the Response object has been destroyed when this event executes, and you will get an error if you try to use the Response object.
This time, you should be able to step through all the code. The browser should list three events:
  Entered BeginRequest
  Entered Start
  Entered EndRequest
  Note Sometimes, the debugger refuses to step through WebClass code (although the code runs fine) after errors occur, or after you have repeatedly run the project. Stopping and starting the Web server will usually solve this problem. You can start and stop the Web server from within the WebClass Designer by clicking the black, square Stop icon on the Designer toolbar (see Figure 6.1).
At any time, you can press F5 to continue program execution. When the debugger reaches a breakpoint in your code, it will bring up the VB development environment, and you can step through your code. To reach the browser to view the output, you must press Alt+Tab to get back to the browser window—VB will not automatically switch back to the browser even if you press F5.
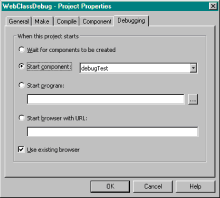
At present, you should always start your WebClass with only one browser window open. If more than one browser is open, the debugging environment has trouble determining which one to use for output. If you start the program with no browser open, VB will launch an instance of the browser and use that for output. There's a project option to tell the VB environment to use an already open browser instance for output. You can select that option by checking the Use Existing Browser option at the bottom of the Debugging tab in the Project Properties dialog box (see Figure 6.2).
It can be useful to spend a short time experimenting in the debugger with new VB features such as WebClasses. Although most features are documented, it's often unclear exactly how they fit together, or when events occur relative to each other.
For example, the WebClass has a NextItem property. When you set this property, the WebClass calls the Respond event for the specified WebItem. Let's watch that happen in the debugger. First, you'll need to modify the project slightly. Add two custom WebItems, called TestItem1 and TestItem2. If you don't remember how to do that, review Chapter 5, "Securing an IIS Application." From now on, I'll assume that you know how to work with the environment to add HTML templates and custom WebItems, and to modify code.
Add the following code to the Respond event for the two WebItems:
Private Sub TestItem1_Respond()
    Set NextItem = TestItem2
    Response.Write "Got to TestItem1<br>"
End Sub
Private Sub TestItem2_Respond()
    Response.Write "Got to TestItem2<br>"
End Sub
You also need to tell the WebClass to use the two new items, so change the Start event so it sets the WebClass NextItem property to TestItem1:
Private Sub WebClass_Start()
    Set NextItem = TestItem1
    Response.Write "Entered Start<br>"
End Sub
In the Start event, you set the NextItem property to TestItem1. In the Respond event for TestItem1, the code directs the WebClass to immediately set the Next-Item property to TestItem2. In each routine, the code commands the Response object to write a message. By following the messages, you should get a good idea of the order in which the WebClass executes the commands. Because you set the NextItem property before issuing the Response.Write, you should get this output if the code works as expected:
Entered BeginRequest
Got to TestItem2
Entered EndRequest
Instead, you get output from all five of the event routines:
Entered BeginRequest
Entered Start
Got to TestItem1
Got to TestItem2
Entered EndRequest
What happened? It turns out that the NextItem command doesn't take effect until after the routine in which it is set has completed. In other words, the program doesn't execute the commands in the order in which they appear in the code; instead, it executes as follows:
Initialize event
BeginRequest event
Start event
   Set NextItem
   Write Response
   Fire Respond event for TestItem1
TestItem1_Respond
Set NextItem
Write Response
   Fire Respond event for TestItem2
TestItem2_Respond
   Write Response
EndRequest event
Terminate event
So, to call another WebItem or method in a WebItem after a response has begun, you need to use VB's standard Call syntax. Change the code in TestItem1_ Respond to call TestItem2_Respond explicitly, then run the program again.
Private Sub TestItem1_Respond()
    Call TestItem2_Respond
    Response.Write "Got to TestItem1<br>"
End Sub
Now you'll see the output you expected:
Entered BeginRequest
Entered Start
Got to TestItem2
Got to TestItem1
Entered EndRequest
So, unlike standard VB calls, setting the NextItem property causes an indirect and possibly out-of-sequence or deferred execution (depending on where you put the code). It turns out that other events also execute in ways you might not expect. For example, you can set the ReScanReplacements property of a WebItem at either design time or at runtime. In Chapter 5, Table 5.2 shows that the ReScanReplacements property controls whether the tag replacement engine scans once for replacement tags or whether it scans continuously until it has replaced all the tags. Regardless of when you set it, it doesn't work exactly as you would expect. The documentation states that "The ReScanReplacements property causes the WebClass to make an additional pass through the replacement tags during the ProcessTag event."
Let's explore it with the debugger. Tag replacement begins when the WebClass fires the ProcessTag event. The event never fires for custom WebItems, so you'll need to change one of the custom WebItems into an HTML template. Delete TestItem1 and replace it with an HTML template containing this HTML content:
<html>
<head><WCHead></WCHead></head>
<body><WCBody></WCBody></body>
</html>
  Tip Remember to place the original copy of the HTML template in a directory other than your project directory; otherwise, VB will make a copy of the file and call it TestItem11.htm rather than TestItem1.htm.
Be sure to change the TagPrefix property to WC instead of WC@.
Leave the ReScanReplacements property set to the default False value. You'll also need to change the TestItem1_Respond event to display the template:
Private Sub TestItem1_Respond()
    TestItem1.WriteTemplate
End Sub
Finally, you need to add code to the ProcessTag event to designate the replacement text:
Private Sub TestItem1_ProcessTag(ByVal TagName As String, _
TagContents As String, SendTags As Boolean)
   Select Case lcase(TagName)
    Case "wchead"
        TagContents = "<title><WCTitle></WCTitle></title>"
    Case "wcbody"
        TagContents = "This is the body of the document"
    Case "wctitle"
        TagContents = "Test RescanReplacements"
    End Select
End Sub
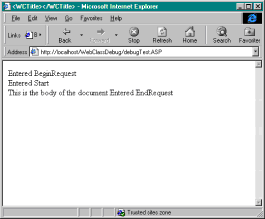
Now step through the project. Figure 6.3 shows the output you should get.
  Warning The HTML parser often changes the case of replacement tags. It does this inconsistently and always (so far) changes them to uppercase. There are three workarounds: Make sure to write your replacement tags in uppercase; force the TagName parameter in the ProcessTag event to a known state, either uppercase or lowercase; or use the TagContents property to differentiate between tags. Notice that the title bar contains an HTML tag. That's because the ProcessTag event returned a TagContents value containing another replacement tag. The browser interprets the tag as title text and places it in the title bar of the browser.
Set ReScanReplacements to True and run the project again; you don't need to step through it this time. Now, the title bar should show Test ReScanReplacements. Setting the ReScanReplacments property works as advertised. Stop the project, set a breakpoint on the line Select Case Lcase(TagName) in the ProcessTag event, and run the project again. This time, pay close attention to the order in which the tags get replaced. From the description in the documentation (an "additional pass"), I would have expected the program to replace the tags in this sequence: WCHead, WCBody, and WCTitle. Instead, the WebClass finds and replaces the tags in this sequence: WCHead, WCTitle, and WCBody. Apparently, the WebClass reads the contents of the HTML template into a string, then always searches from the beginning of the string each time for replacement tags. So, after the first replacement, the string looks like this:
<html>
<head><title><WCTitle></WCTitle></title></head>
<body><WCBody></WCBody></body>
</html>
Therefore, during the second pass, the WebClass finds the WCTitle tag before it finds the WCBody tag. This sequence affects the way you think about recursive tag replacement. Remember, you can set the ReScanReplacements property at runtime. Let's try setting the property to True after the WebClass has replaced the WCBody tag. Change the ReScanReplacements design-time setting back to False and add this line to the Case statement in the ProcessTag event:
Case "wcbody"
    TagContents = "This is the body of the document"
    TestItem1.ReScanReplacements=True
Doesn't work, does it? Apparently, the WebClass also keeps track of whether the current item being replaced is the last one. You might be able to force the WebClass to replace the title tag if you also add one last replacement tag to the WCBody replacement text:
Case "wcbody"
    TagContents = "This is the " & _
       "<WCIgnore></WCIgnore>body of the document"
    TestItem1.ReScanReplacements=True
Still doesn't work. You can make it work only by setting the ReScanReplacements property to True either at design time or immediately after replacing the WCHead tag. Try that if you like. You've learned one more thing about the way tag replacements work: The WebClass will rescan for replacement tags only in the portion of the response that occurs after the ReScanReplacements property has been set to True.
I wouldn't go so far as to call this behavior a bug, but I first ran across this "feature" at my company when adding some processing in the ProcessTag event to select a graphic based on a user's input. I wanted to write an <img> tag to the browser that contained one image or another. There was a <WCImg></WCImg> tag at the top of the template that I would replace with the <img> tag.
The problem was, I didn't know which image to use until after my code reached a <WCTotal> replacement tag further down in the template file. During processing, that replacement calculated and displayed a total. The totaled values were themselves embedded in still other replacement tags. If the total was greater than a certain value, I'd use one image, if less, a different image. I decided the order of the tags wouldn't matter; I'd replace the <WCImg> tag with another replacement tag, then replace that secondary tag by setting ReScanReplacements to True after performing the replacement on the <WCTotal> tag. As you've seen, that didn't work. Fortunately, I was dealing with only version 4.x browsers. For that particular template, because I was under time pressure to deliver the application, I used cascading style sheet (CSS) absolute positioning to move the HTML reference to the graphic further down in the file. That way, the WebClass tag scanner found the tags in the sequence I needed—the <WCTotal> tag first, then the <WCImg> tag.
Before we leave this topic, note that you don't have to place the replacement tags right next to each other; you can put default text between the tags. In fact, you don't even have to use unique names for the replacement tags. Instead, you can differentiate the tags based on the TagContents property. As an example, edit the TestItem1 template and replace its contents with this HTML:
<html>
<head><WC>Head</WC></head>
<body><WC>Body</WC></body>
</html>
Also, add another Case statement to the ProcessTag event:
Case "WC"
    Select Case TagContents
    Case "Head"
        TagContents = "<title><WCTitle></WCTitle>" & _
            "</title>"
        TestItem1.ReScanReplacements = True
    Case "Body"
        TagContents = "This is the " & _
            "<WCIgnore></WCIgnore> body of the document"
    End Select
End Select
Run the project again. It should run identically. So which value should you use to differentiate tags, the TagName or the TagContents? I don't think there's a tremendous difference. All of Microsoft's documentation references the TagName property, but it might be easier and less subject to error to decide on a standard TagPrefix, then use that for all replacement tags in conjunction with a unique TagContents value. For absolute safety, you can create the initial TagContents as an HTML comment, much like the getHTMLTemplate function in Chapter 5. As a side benefit, the HTML parser doesn't seem to change the case of the text between tags, only that of the tags themselves. In either case, as is true with all Web processing, you'll need to match up the names between the HTML and the WebClass.


Visual Basic Developer[ap]s Guide to ASP and IIS
ISBN: 782125573
EAN: N/A
Year: 2005
Pages: 98

flylib.com © 2008-2017.
If you may any questions please contact us: flylib@qtcs.net