Redirection
Let s first look at a basic topic in GNU/Linux shell use, that of input or output redirection.
The concept of redirection is simply that of redirecting our input or output to something other than the default. For example, the standard output of most commands will be redirected to the shell window. We can redirect the output of a command to a file using the > output redirection symbol. For example:
ls -la
will generate a file listing and emit the results to the shell window. We could instead redirect this to a file as:
ls -la > ls-out.txt
What would have been emitted to the shell window will now be present in the output file ls-out.txt .
Rather than accept input from the keyboard, we can accept input from another source. For example, the command cat will simply emit its standard input (or files named on its command line) to its standard out. We can redirect the contents of a file to cat using the < input redirection symbol.
cat < ls-out.txt
We can also build more complicated redirection structures. For example, using the pipe symbol, we can chain a number of generators and filters together. For example, consider the following command sequence:
find . -name '*.[ch]' -print xargs grep "mtj" more
This is actually three different commands that stream their output from left to right. The first command searches the subdirectory tree (from the current directory) looking for all files that fit a certain pattern. The pattern defined is ˜ *.[ch] , which means all files that end in .c or .h . These are passed to the next command, xargs , which is a special command to read from standard input and pass to the embedded command. In this case, it s grep . The grep command is a text search utility that will search all files passed to it from the previous stage for the string term mtj . For files that pass the search criteria, the lines that contain the search term are emitted to the next stage, the more command. The more command simply ensures that the user is able to see all output before it scrolls by. When a screen full of output is present, the user must type return for more to continue and potentially present a new screen s worth of data.
Standard In/Out/Error
For each application, three special file descriptors are automatically created. These are called standard-input, standard-output, and standard-error (see Figure 19.1).
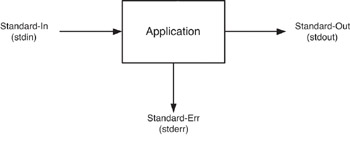
Figure 19.1: Program input and output.
Herein, we ll refer to these by their shortened names for brevity. The stdin descriptor is commonly the keyboard. Descriptors stdout and stderr are the terminal or window attached to the shell ( stdout for program results, stderr for program errors, warnings, and status). The output descriptors are split to provide greater flexibility for emitting information to the user. While stdout and stderr share the same default output device, they can be split as desired by the developer.
Recall from our previous discussion that we can redirect stdout to a file as:
prog > out.txt
where the output of prog would be redirected to the file out.txt . Note that if we wanted to append our output to out.txt rather than replace the file altogether, we would use the double redirect, as:
prog >> out.txt
We could redirect only the error output as:
prog 2> error-out.txt
Note that we re using a constant number here to represent stderr . The file descriptors that are defined for our three standard I/O descriptors are shown in Table 19.1.
If instead we wanted to redirect both the stdout and stderr to a file ( out.txt ), we could do the following:
prog 1> out.txt 2>&1
| Descriptor | Description |
|---|---|
|
| Standard input ( stdin ) |
| 1 | Standard output ( stdout ) |
| 2 | Standard error ( stderr ) |
For the opposite scenario, we could redirect the stdout output to the stderr descriptor as:
prog 1>&2
We could also redirect output to unique files. For example, if we wanted our stdout to go to out.txt and stderr to go to err.txt , we could do the following:
prog 1>out.txt 2>err.txt
To verify that descriptor routing is working the way you expect, the script in Listing 19.1 can be used to test.
| |
1: #!/bin/bash 2: echo "stdout test" >&1 3: echo "stderr test" >&2
| |
Finally, consider another example that demonstrates ordering of redirection.
prog 2>&1 1>out.txt
In this example, we redirect stderr to stdout and then redirect stdout (not including stderr ) to the file out.txt . This has the effect of consolidating both the stdout and stderr to the file out.txt .
Environment Variables
An environment variable is a named object that contains information for use by the shell and other applications. A number of standard environment variables exist, such as the PWD variable, but the user can create his own for his applications (or change existing variables). We can inspect the PWD variable by echoing its contents with the echo command:
| Note | A process can be viewed as an environment and inherits the environment variables from its parent (such as the shell, which is also a process). A process or script may also have local variables. $ echo $PWD PWD=/home/mtj $ |
The PWD environment (or shell) variable identifies our current (present) working directory. We could create our own using the declare or export bash built-in command.
A script can make environment variables available to child processes, but only by exporting them. A script cannot export back to the parent process. Let s look at a couple of examples. The declare built-in command can be used to declare variables with specific attributes. The export built-in command is used to create a variable and mark it to be passed to child processes in the environment. These commands are illustrated as:
$ declare -x myvar="Hello" $ echo $myvar Hello $ export myothervar="Hi" $ echo $myothervar Hi $
A number of other useful environment variable commands exist. For example, if no argument is provided to export , then it will emit all of the variables available to the environment (which can also be done with the declare and set commands).
Script Invocation
When we invoke a command or script, the command or script must be in our binaries path ( PATH environment variable) in order for it to be found. We can view our path by echoing the PATH environment variable as:
$ echo $PATH /usr/local/bin:/bin:/usr/bin:/usr/X11R6/bin:/home/mtj/bin
If we ve created a script that does not exist in the path defined (for example, in our current working directory), then we will have to invoke it as:
./script.sh
The ./ tells the interpreter that the shell script we re invoking is located in the current directory. Otherwise , we d get an error message telling us that the script could not be found.
| Note | Two special directory files exist that are important in Linux development. The . file represents the current directory, while the .. file represents the parent directory. For example, if we provide the command cd . , there s no visible change because we ve changed our current directory to the current directory. More interesting, the |
If this is undesirable, we could easily update our path environment variable to add our current working subdirectory as:
$ export PATH=$PATH:./ $ echo $PATH /usr/local/bin:/bin:/usr/bin:/usr/X11R6/bin:/home/mtj/bin:./
The script script.sh can now be invoked directly without needing to prefix ./.
| Note | File links are special files that are used to provide a reference to another file. Two types of links exist: hard links and soft links (otherwise known as symbolic links). A hard link is a new entry in the directory file that points to an existing file. The hard link is indistinguishable from the original file. The problem with hard links is that they must reference files within the same filesystem. Soft links are regular files themselves and simply contain a pointer to the actual file. Soft links can be absolute (point to a file with a full path) or relative (the path being relative from the current location). Soft links can be moved, while retaining their linkage to the original file. Note that the special files . and .. are in fact hard links to the absolute directories. |
Basic GNU/Linux Commands
Now that we have some basic understanding of redirection and the standard I/O descriptors ( stdin , stdout , and stderr ), let s explore the more useful of the GNU/Linux commands. We ll take an interactive approach for investigating these commands, compared to simply telling you what the command does and all the available options for it. The commands are in no particular order, and therefore you can explore each command independently of any other if desired.
| Note | Every command in GNU/Linux is itself a process. The shell manipulates the stdin , stdout , and stderr for commands that are executed in it. |
tar
The GNU tar command (named for Tape ARchive) is a useful and versatile archiving and compressing utility. Targets for tar can be files or directories, where the directories are recursed to gather the full contents of the directory tree. Let s look at uses of the tar utility, investigating a variety of the options as we go.
We can create a new archive using tar as follows :
tar cf mytar.tar mydir/
We specify two options for creating an archive of directory mydir . The c option instructs tar to create a new archive with the name (identified via f option) mytar.tar . The final arguments are the list of files and/or directories to archive (for which all files in mydir will be included in the archive).
Now let s say we want to take our tar file (also called a tarball) and re-create the subdirectory and its contents (otherwise known as the extract option). We could do this (in another subdirectory) by simply typing:
tar xf mytar.tar
If we d like to know the contents of our tarball without having to unarchive the contents, we could do this:
tar tf mytar.tar
which lists all files with their directory paths intact.
By adding the v , or verbose option, we can view the operation of the tar utility as it works. For both creating and extracting archives, we use the verbose option as:
tar cvf mytar.tar mydir/ tar xvf mytar.tar
One of the most important aspects of the tar utility is the automatic compression of the tarball. This is performed using the z option and works symmetrically for both creation and extraction of archives, as:
tar czf mytar.tgz mydir/ tar xzf mytar.tgz
A compressed tarball can take more time to create and extract, but this can still be beneficial, especially if the set of files is intended to be transferred over the Internet.
cut
The GNU/Linux cut utility can quickly cut elements of each line in a file using one of two types of specification. The user can define the desired data in terms of fields in the file or based upon numbered sequences of characters .
Let s first look at the basic format of the cut utility and then look at some examples of how it can be used. As we discussed, the cut utility can operate in two modes. In the first mode, cut extracts based upon field specifications using a delimiting character:
cut -f[spec] -d[delimiter] file
In the second mode, cut extracts based upon character position specifications:
cut -c[spec] file
The spec argument is a list of comma-separated ranges. A range can be represented as follows (base 1) as shown in Table 19.2.
| Range | Meaning |
|---|---|
| n | Nth character (-c) or field (-f) |
| n- | Nth character (-c) or field (-f) from the end of the line |
| n-m | From n th to m th character (-c) or field (-f) |
| -m | From first to Mth character (-c) or field (-f) |
Let s now look at some examples of the cut utility. We ll explore the field-based cut first, using the sample file in Listing 19.2.
| |
bob:x:500:500::/home/bob:/bin/bash sally:x:501:501::/home/sally:/bin/sh jim:x:502:502::/home/jim:/bin/tcsh dirk:x:503:503::/home/dirk:/bin/ash
| |
We ll experiment with cut interactively, looking now only at the command but also exactly what cut will produce given the field specification. First, let s say we want to cut and emit the first field (the name). This is a simple case for cut , demonstrated as:
$ cut -f1 -d: passwd bob sally jim dirk $
In this example, we specify to cut field 1 ( -f1 ) using the colon character as the delimiter ( -d: ). If we wanted to know the home directory rather than the user name, we simply update the field to point to this element of passwd (field 6), as:
$ cut -f6 -d: passwd /home/bob /home/sally /home/jim /home/dirk $
We could also extract multiple fields, such as the user name (field 1) and the preferred shell (field 7):
$ cut -f1,7 -d: passwd bob:/bin/bash sally:/bin/bash jim:/bin/tcsh dirk:/bin/ash $
Ordering is important to the cut utility. For example, if we had specified -f7,_1 instead in the previous example, the result would have been the same (ordering of fields in the original file is retained).
Let s now look at some examples of character position specifications. In these examples, we ll pipe our input from another command. The ls command lists the contents of a directory, for example:
$ ls -la total 20 drwxrwxr-x 2 mtj mtj 4096 Feb 17 20:08 . drwxr-xr-x 6 mtj mtj 4096 Feb 15 20:47 .. -rw-rw-r 1 mtj mtj 6229 Feb 16 17:59 ch12.txt -rw-rr 1 mtj mtj 145 Feb 17 20:02 passwd
If we were interested only in the file size (includes the date and name of the file), we could do the following:
$ ls -la cut -c38- 4096 Feb 17 20:08 . 4096 Feb 15 20:47 .. 6229 Feb 16 17:59 ch12.txt 145 Feb 17 20:02 passwd $
If we re interested only in the size of the file and the file s name, we could use the following:
$ ls -la cut -c38-42,57- 4096. 4096.. 6229ch12.txt 145passwd $
Note in this example that the two cut regions include no space between them. This is because cut simply segments the regions of the file and emits no spaces between those regions. If we were interested in a space, we could have updated the command as follows (taking a space from the data itself):
$ ls -la cut -c38-43,57- 4096 . 4096 .. 6229 ch12.txt 145 passwd $
The cut utility is very simple, but it s also a very useful utility with quite a bit of flexibility. The cut utility isn t the only game in town; later on we ll look at sed and awk and their capabilities for text filtering and processing.
paste
The paste command takes data from one or more files and binds them together into a new stream (with default emission to stdout ). Consider the files shown in Listing 19.3 and 19.4.
| |
Apple Orange Banana Papaya
| |
| |
Hammer Pencil Drill Level
| |
Using the paste utility, we can bind these files together as demonstrated below:
$ paste fruits.txt tools.txt Apple Hammer Orange Pencil Banana Drill Papaya Level $
If we wanted some delimiter other than tabs between our consecutive elements, we could specify a new one using the -d option. For example, we could use a : character instead, using:
$ paste -d: fruits.txt tools.txt Apple:Hammer Orange:Pencil Banana:Drill Papaya:Level $
Rather than pair consecutive elements in a vertical fashion, we could instead pair them horizontally using the -s option:
$ paste -s fruits.txt tools.txt Apple Orange Banana Papaya Hammer Pencil Drill Level $
Note that we could specify more than two files if desired.
Let s now look at one final example to illustrate the paste utility. Recall from our discussion of cut that it wasn t possible to alter the order of fields pulled from a file. The following short script provides the utility of listing the filename and then the size of the file (see Listing 19.5).
| |
#!/bin/bash ls -l cut -c38-42 > /tmp/filesize.txt ls -l cut -c57- > /tmp/filename.txt paste /tmp/filename.txt /tmp/filesize.txt
| |
In this example, we first cut the file sizes from the ls -l command and store the result to /tmp/filesize.txt . We grab the filenames next and store them to /tmp/filename.txt . Next, using the paste command, we merge the results back together, reversing the order. Executing this script on a small directory results in the following:
$ ./newls.sh fruits.txt 27 newls.sh 133 tools.txt 26 $
| Note | Note that the use of the /tmp directory in Listing 19.5 is useful for temporary files. Temporary files can be written to /tmp because they are not persistent across system boots. In some cases, files are removed from /tmp as part of a daily or weekly cleanup process. |
sort
The sort utility is useful for sorting a data file in some defined order. In the simplest case, where the key for sort is the beginning of the file, we specify the file. Take for example our ![]() tools.txt file shown in Listing 19.4. We can easily sort this as:
tools.txt file shown in Listing 19.4. We can easily sort this as:
$ sort tools.txt Drill Hammer Level Pencil $
We could reverse sort this file by simply adding the -r (reverse) option to the command line.
We can also sort based upon a key defined by the user. Consider the sample text file shown in Listing 19.6. This file contains five lines with three columns, with none of the columns being presorted.
| |
5 11 eee 4 9 ddd 3 21 aaa 2 24 bbb 1 7 ccc
| |
To specify a column to sort, we use the -k (or key) option. The key represents the column for which we desire the file to be sorted. We can specify more than one key by simply separating them with commas. To sort based upon the first column, we can specify the key as column one (or not, as it will be the default):
$ sort -k 1 table.txt 1 7 ccc 2 24 bbb 3 21 aaa 4 9 ddd 5 11 eee $
To sort the second column, another option is required to perform a numeric sort. The space character that comes before the single-digit numbers is significant and therefore will preclude a numeric sort. Therefore, we ll use the -n option to force a numeric sort. For example:
$ sort -k 2 -n table.txt 1 7 ccc 4 9 ddd 5 11 eee 3 21 aaa 2 24 bbb $
One other useful option allows the specification of a new delimiter, in the event spaces or tabs are not used. The -t option allows us to use a different delimiter, such as -t: to specify the colon character as the field separator.
find
The find utility is a powerful but complex utility that permits searching the filesystem for files based upon given criteria. Rather than walk through the plethora of options available for find , we ll demonstrate some of the more useful patterns.
To find all files that end in .c and .h in the current subdirectory, the following command can be used:
find . -name '*.[ch]' -print
The . specifies that we wish to start at the current subdirectory. The -name argument refers to what we re searching for, in this case any file (˜ * ) that ends in either c or h . Finally, we specify -print to emit the search results to standard-out.
For each of the search results, we can execute a command using - exec . This permits us to invoke a command on each file that was found based upon the search. For example, if we wanted to change the file permissions of all of the files found to read-only, we could do the following:
find . -name '*.[ch]' -exec chmod 444 {} \; We can also restrict the type of files that we ll look at using the type modifier. For example, if we wanted to look only at regular files (a common occurrence when searching for source files), we could do the following:
find . -name '*.[ch]' -type f -print
The f argument to -type represents regular files. We could also look specifically for directories, symbolic links, or special devices. Table 19.3 provides the type modifiers that are available.
| Modifier | Description |
|---|---|
| b | Block Device |
| c | Character Device |
| d | Directory |
| p | Pipe (named FIFO) |
| f | Regular File |
| l | Symbolic Link |
| s | Socket |
One final useful find use is identifying files within a directory that have been changed within a certain period of time. The following command (using mtime ) identifies the files that have been modified in a given time range ( multiples of 24 hours). The following command identifies files that have been modified in the last day.
find -name '*' -type f -mtime -1 -print
To find files modified in the last week, we could update the mtime argument to -7. The atime argument can be used to identify recently accessed files. The ctime argument identifies files whose status was changed recently.
wc
The wc utility is very useful to count the number of characters, words, or lines within a file.
The following samples illustrate the possibilities of the wc utility.
wc -m file.txt # Count characters in file.txt wc -w file.txt # Count words in file.txt wc -l file.txt # Count lines in file.txt
All three counts can be emitted by accumulating the arguments, as:
wc -l -w -m file.txt
Regardless of the order of the flags, the order of count emission is always lines, then words, and then characters.
grep
The grep command permits searching one or more files for a given pattern. The format of the grep command can be complex, but the simpler examples are quite useful. Let s look at a few simple examples and discuss what they achieve.
In its simplest form, we can search a single file for a given search string, as:
grep "the" file.txt
The result of this example is each line emitted to stdout that contains the word the . Rather than specify a single file, we can use the wildcard to check multiple files, as:
grep "the" *.txt
In this case, all files in the current subdirectory that end in .txt are checked for the search string.
When the wildcard is used, the filename from which the search string is found is emitted before each line that s emitted to stdout .
If the line location of the file where the search string is found is important, the -n option can be used.
grep -n "the" *.txt
Each time the search string is found, the filename and line number where the string was found are emitted before the line. If we re interested only in whether the particular string was found in a file, we can use the -l option to simply emit filenames, rather than the lines from which the string was found:
grep -l "the" *.txt
When we re searching specifically for words within a file, the -w option can be helpful in restricting the search to whole words only:
grep -w "he" *.txt
This option is very useful as when searching for he; we ll also find occurrences of the word the . The -w option restricts the search only to words that match, so the and there will not result in a match to he .
EAN: 2147483647
Pages: 203
- Chapter III Two Models of Online Patronage: Why Do Consumers Shop on the Internet?
- Chapter IV How Consumers Think About Interactive Aspects of Web Advertising
- Chapter X Converting Browsers to Buyers: Key Considerations in Designing Business-to-Consumer Web Sites
- Chapter XIV Product Catalog and Shopping Cart Effective Design
- Chapter XVI Turning Web Surfers into Loyal Customers: Cognitive Lock-In Through Interface Design and Web Site Usability