Cluster Service
| The Cluster Service is a special piece of software that runs on Windows Server 2003 and manages the relationships between the servers in the cluster, which are referred to as nodes. You don't manually install Cluster Service like you did in prior versions of Windows; you simply use the Cluster Administrator console to create a new cluster. We'll walk through that procedure later in this chapter. Windows Server 2003 clusters are a bit picky about who they'll allow in a cluster. If you've built the first cluster node on Windows Server 2003, Enterprise Edition, all other nodes that are running Windows Server 2003 must also be running Enterprise Edition. The same restriction applies to the Standard and Datacenter editions; the edition of the first cluster node sets the edition that all other Windows Server 2003 nodes must follow. However, you can have clusters that have a mix of nodes running Windows Server 2003 and Windows 2000 Server. You can build the following three types of clusters:
The next section discusses some of the basic concepts you'll need to start building your own clusters. Cluster Service ConceptsImagine you have a single server you want to make into a SQL Server computer. You can simply install Windows and then install SQL Server. Suppose that, for reasons of your own, you install Windows on one hard drive and install SQL Server onto a completely separate RAID array. Now imagine that you make that RAID array an external array, connected to the computer by a small computer system interface (SCSI) cable or by fibre channel. This shouldn't be that hard to imagine; most database servers are set up in this fashion. Conceptually, all you need to do now to build a cluster is attach a second server to the external drive array. You'll install Windows and SQL Server on that server, too. However, SQL Server's services will remain stopped , and the two servers will communicate via a special service, sending a heartbeat signal to one another. If the first server stops sending the heartbeat, the second server knows that something has gone wrong. It immediately seizes control of the external drive array, starts the SQL Server services, and takes over where its failed companion left off. Clustering DetailsEven though this example omits a few crucial details, it's essentially how an active-passive cluster operates. Active-active clusters are more difficult to conceptualize. Imagine that you have two servers, each running SQL Server and each connected to two external drive arrays. One server owns a single external drive array and stores the SQL Server databases there. If one server fails, the other one detects it and seizes control of its external drive array (now owning two drive arrays total). The second server starts a second copy of SQL Server and takes over where the failed server left off. Now, the remaining server is effectively two SQL Server computers, all running in one box.
Each cluster, then, is comprised of a variety of resources, which can include the following:
Each resource can be owned by only one node at a time. Each resource does, however, have a list of all nodes that could possibly own the resource. When the node that owns a resource fails, the resource's other possible owners detect the failure and one of them takes ownership of the resource. Administrators can also manually transfer resource ownership from one node to another. This enables you to transfer workload off of one node, letting you shut down the node for maintenance without interrupting your users' work. Resources can have dependencies. For example, most clustered applications require TCP/IP (other network protocols aren't supported under clustering), so a node can't own an application resource unless the node already owns the shared TCP/IP address the application requires. To keep dependencies easy to manage, Windows lets you organize resources into groups. Resource groups can be transferred from node to node as a single unit, so you don't have to worry about forgetting a dependency when transferring ownership of an application to another node. Creating a New ClusterTo create a new cluster, first make sure your hardware is ready. Then, launch Cluster Administrator on any Windows Server 2003 computer and follow these steps:
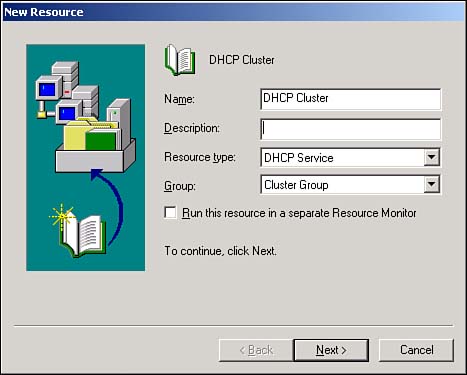
After your first cluster node is fully functional, you can add more nodes to the cluster. Simply right-click the cluster in Cluster Administrator. Then, from the pop-up menu, select New, Node . Cluster AdministratorYou'll use Cluster Administrator to manage your clusters. With it, you can add and remove cluster resources and resource groups, add and remove nodes, and transfer resource ownership from one node to another. To add a new resource group , just right-click a cluster and select New from the pop-up menu; then select Group . Enter the name and details for the new group, and you're ready to go. To add a new resource to an existing group, right-click the group and select New ; then select Resource from the pop-up menu. You'll see a dialog box similar to the one in Figure 12.2, which allows you to specify the type of resource you want to add. Figure 12.2. You can add any type of new resource from this dialog box. In the New Resource dialog box, you'll specify the following:
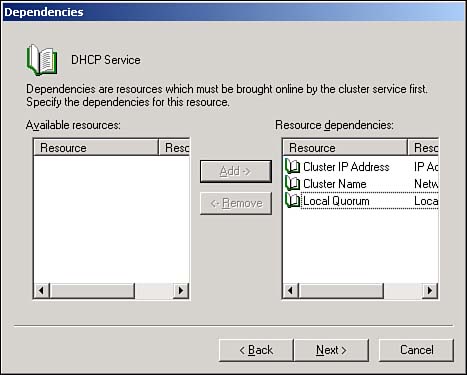
After clicking Next, you can specify the nodes that are allowed to own the resources. For example, the DHCP Service resource can be owned only by nodes that have the DHCP Service already installed, so you use that condition to limit the potential owners for a DHCP Service resource. After specifying the potential owners, click Next . Last, you'll specify any resources on which your new resource depends. As shown in Figure 12.3, you can choose from all existing resources as possible dependencies, and you typically must specify at least one resource of the Storage type. That's because most resources, especially applications and services, have to store their data somewhere. In a cluster, that data must be on a cluster-owned (shared) storage location, making the application or service dependent on the availability of that storage location. Figure 12.3. Specify only the resources necessary for your new resource to run properly.
Transferring resources from one node to another is easy. If you want to perform a transfer that tests your resources' capability to fail over from one node to another, simply right-click a resource group and select Initiate Failure from the pop-up menu. The resource will immediately fail and transfer to another possible owner.
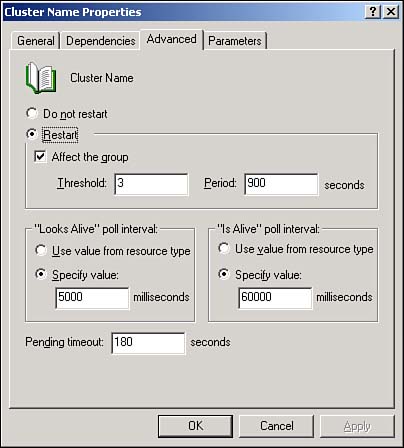
Note that resources have their own properties that affect their behaviors. To access these properties, right-click a resource and select Properties from the pop-up menu. The Properties dialog box enables you to change the resource's name, description, and list of possible owners; you can also change the resource's dependencies. As shown in Figure 12.4, you can also configure advanced properties. For example, you can configure the Cluster Service to automatically try to restart a service any time it stops, and you can configure how often the Cluster Service checks a service to see whether it's responding. Figure 12.4. The default values for the advanced properties are sufficient in most environments. Resource groups have properties, too, which you can access by right-clicking the group and selecting Properties from the pop-up menu. Group properties include failover and failback policies, which are defined as follows :
Cluster Administrator includes a comprehensive help file that can provide step-by-step instructions for other cluster operations. |
EAN: 2147483647
Pages: 136