Group Policy Management User Interface
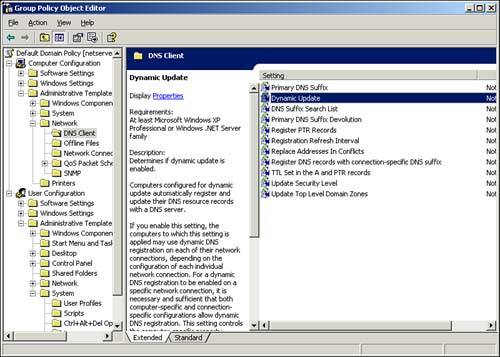
Group Policy Management User InterfaceIn Windows 2000 only one utility is available for managing Group Policythe Group Policy MMC snap-in. Windows Server 2003 not only expands on this utility, but also introduces some additional utilities for Group Policy management. Group Policy Object EditorThe old Group Policy snap-in has been renamed Group Policy Object Editor. The MMC interface has been improved to use a Web style interface. Two choices of view exist for the right policy list pane: Standard, which is the old Windows 2000 style, and Extended, which is the new style. When using the Extended style, an explanation of what the policy does is displayed when a policy listed in the right pane is clicked. This helps you more easily determine what each of the policies does. As shown in Figure 6.4, in addition to a description of the policy, a Requirements section lists the systems that support the policy (Windows 2000, XP, .NET, and so on). This enables you to easily tell which policies apply to particular systems. Figure 6.4. The Group Policy Object Editor (Formerly the Group Policy snap-in) displaying the OS requirements and descriptive information for the DNS dynamic update policy.
Because Group Policy is now supported by multiple operating systems (Windows 2000, Windows XP, and Windows Server 2003) and some policies are applicable only for some of these operating systems, a new Filtering option is available on the View menu for Administrative Templates. This option enables you to limit the policies that are displayed in the Group Policy Editor MMC. They can be filtered to do the following:
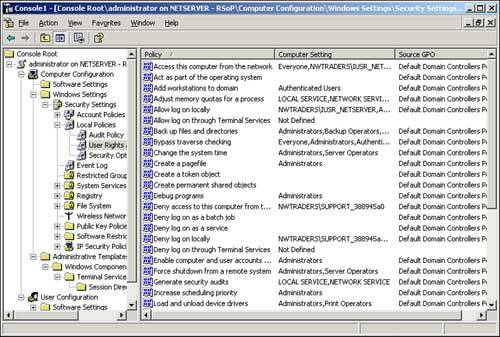
Resultant Set of PolicyBy now, you can probably get a sense for the bewildering array of Group Policy settings. Because of all the Group Policy application rulesinheritance, block inheritance, no override, filtering (by group or WMI filter), and so ontroubleshooting Group Policy applications can be a nightmare. A new utility can help: the Resultant Set of Policy (RSoP) MMC snap-in. RSoP enables you to see the effects of group policies. As shown in Figure 6.5, the RSoP console displays each Group Policy setting that applies as well as the source GPO from which the policy was obtained. Figure 6.5. The Resultant Set of Policy console displays effective user rights policy settings and the GPOs from which they were applied.
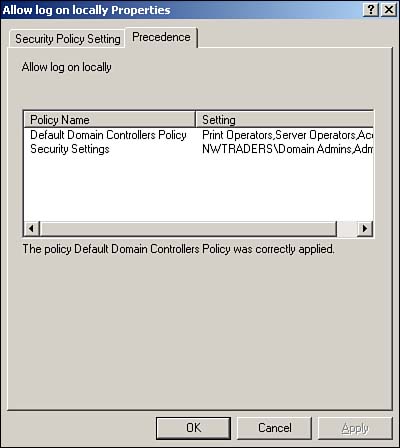
Additionally, youcan right-click any of these settings and select Properties . This brings up the configurable options for the policy setting, just like in Group Policy Editor. However, a Precedence tab is also available, as shown in Figure 6.6. This tab shows all the GPOs that apply that setting. This helps determine whether any kind of GPO conflict exists and whether policies are being applied as expected. In this case, two policies (Default Domain Controller Policy and Security Settings) configure the Allow Log on Locally setting. From Figure 6.6 you can see that the Default Domain Controller Policy wins the conflict. Figure 6.6. The Precedence tab for policy settings allows you to determine at a glance whether a policy conflict exists. The RSoP console has two modes for displaying policy data, Logging and Planning. Logging mode enables you to see the current policies applied to a particular user and machine. Planning mode, on the other hand, enables you to run what-if scenarios to see the effective policies. The variables that you can manipulate in the what-if scenarios are as follows :
By manipulating these variables, administrators can determine the effects of Group Policy changes without actually performing them. For example, how are policies affected if a user is moved from one OU to another? What if she accesses the network from a different site? What if you add her to a particular group or apply a WMI filter? And so on. Planning mode needs to query Active Directory to determine the policies applied in these various circumstances. Consequently, Planning mode is available only if the machine running the RSoP console is a member of an Active Directory domain. In the following example, you will use RSoP to examine the user configuration policy applied to a particular user. Then you will run RSoP again to see what would happen if you moved the user to a different OU.
First, let's see what settings are currently being applied to Mary. Do the following:
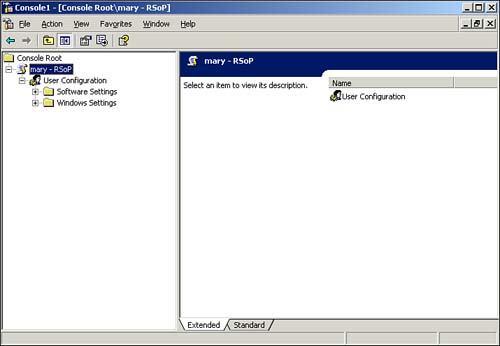
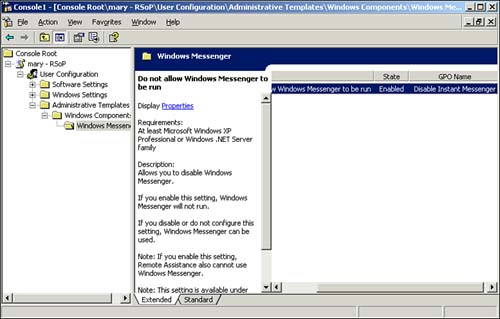
As shown in Figure 6.7, the RSoP console displays all the User Configuration policy settings that are being applied to Mary. There are no Administrative Template settings at all, so the user currently has no policy restricting Windows Messenger. Figure 6.7. The Resultant Set of Policy in logging mode displaying all the policies applying to the user. Next, let's look at what happens to the policy settings if you move Mary to the Employees OU. Follow these steps:
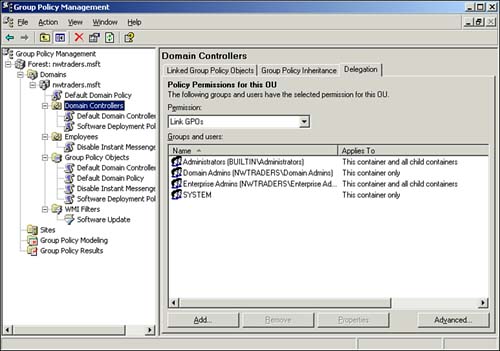
Now, as shown in Figure 6.8, RSoP displays the effective Group Policy settings when the user is moved to the OU. Note that there is now an Administrative Templates section. In addition, the Do Not Allow Windows Messenger to Run policy is enabled, and it was obtained from the Disable Instant Messenger GPO. Also, remember that you did not actually move Mary's accountthis just lets you see what would happen if you did. Figure 6.8. The Resultant Set of Policy in Planning mode displaying the policies that would be applied to Mary if you moved her account. Group Policy Management ConsoleYet another new utility is available for Group Policy managementthe Group Policy Management Console (GPMC) . Unfortunately, it is not included with Windows Server 2003. However, it is supposed to be available as a free download when Windows Server 2003 is released. Once installed, GPMC replaces the existing Group Policy Object Editor on the Group Policy tab objects (sites, domains and OUs) in Active Directory Users and Computer. GPMC provides a single console for managing GPOs across multiple forests. As shown in Figure 6.9, the tree pane view shows all the Group Policy objects throughout the entire forest. For each forest, there is a display of the domain, OU, and site hierarchies, which allow you to see all the GPOs linked at each level. Additionally for each domain, a Group Policy Objects and WMI Filters section shows all existing GPOs and WMI filters, respectively, whether they are linked or not. Figure 6.9. The Group Policy Management Console displaying GPOs for a single domain forest. In the tree-pane view of the hierarchy, you can see which policies are linked to each location simply by clicking the location, such as the Domain Controllers OU, and viewing the Linked Group Policy Objects tab. The Group Policy Precedence tab displays all the group policies that will be processed at the particular location, including those inherited from parent containers, and the order in which they will be processed . This enables you to see at a glance whether any conflicts might arise. The Delegation tab displays who has permissions (Link GPOs, Perform Group Policy Modeling Analysis, and Remotely Access Group Policy Results Data) to manage the GPOs at that particular level (site, domain, or OU). By selecting a GPO, you can see where it is linked, whether it is enabled at the linked location, any filters that might be applied (by group or WMI filter), as well as any other permissions for the GPO. You can also right-click the policy and edit it, just like in Group Policy Object Editor. However, be careful because editing a GPO affects all locations where the policy is applied, just like when you edit with Group Policy Editor (it actually launches the Group Policy Object Editor to perform the edits). Clicking a GPO in the Group Policy Objects container displays the same information as mentioned previously, but this section enables you to back up and restore your GPOs as well as import settings from previous backups into existing GPOs. Similarly, the WMI Filters container lists all the WMI filters configuredwhether linked or notand allows you to import and export them. GPMC also integrates with RSoP via the Group Policy Modeling and Group Policy Results sections to provide reporting of RSoP data and GPO settings. The Group Policy Modeling and Group Policy Results sections correspond to RSoP Planning and Logging modes, respectively (they actually launch the RSoP wizards). To top it all off, the GPMC is fully scriptable, so anything you can do in GPMC you can automate with a script. It also includes several sample scripts ( C:\Program Files\GPMC\Scripts ) for automating common GPO administrative tasks , such as creating and deleting GPOs. The Group Policy Management Console is a complete rework of the Group Policy user interface and extremely simplifies Group Policy management. I strongly recommend every Group Policy administrator download and install the GPMC when it is available. If nothing else, it provides a unified view and centralized console for running all your Group Policy management utilities. |
EAN: 2147483647
Pages: 136