Creating a Virtual Directory Using the Virtual Directory Management Utility
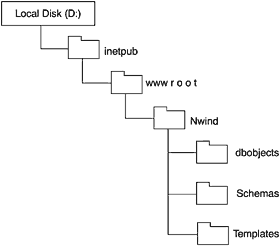
| If you are anything like me, you need to have a concrete example presented before you really understand not only what these new terms mean, but also how they fit together. The next topic, "The Virtual Directory Management Object Model" is difficult to understand if you haven't worked with a virtual root and its associated components and terms. Before we work with a virtual root and its associated components , we have some preparation to accomplish. This preparation consists of creating a small directory structure to hold our template and schema objects. We must link a virtual root to the directory structure we've created, and then specify where the various file types should be stored. I've made a couple of assumptions here: first, that your IIS root was installed to your D: drive; and second, that the Inetpub\ wwwroot directory is located directly off the root of the D: drive. These assumptions establish common ground from which to work. Remember throughout this discussion that you can set up this directory structure wherever you please . Moreover, you can call the directories any name you want. Now let's get to work. In the D:\inetpub\wwwroot directory, create another directory called Nwind. Next, in the Nwind directory, create three more directories called dbobjects, schemas, and templates, respectively. The directory structure should now look like that in Figure 3.1. Figure 3.1. Preliminary directory structure setup.
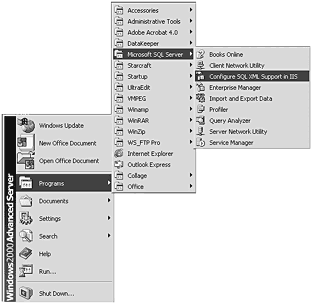
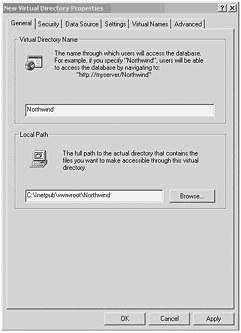
Use the following steps to configure the virtual directory using the Configure SQL XML Support in IIS option. Starting the Virtual Directory Management UtilityFrom the Start menu, select Programs, select Microsoft SQL Server, and then click Configure SQL XML Support in IIS (see Figure 3.2). Figure 3.2. Starting theVirtual Directory Management Utility. Naming the Virtual DirectoryExpand the server you'll be working with, and then right-click the Web site you want to configure. In the drop-down box, select New, and then Virtual Directory to display the General tab of the New Virtual Directory Properties dialog box (see Figure 3.3). Figure 3.3. The General tab of theVirtual Directory Management Utility. The options on the General tab are listed in Table 3.1. Table 3.1. The General Tab Options
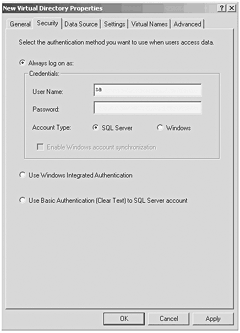
In the Virtual Directory Name box, enter a name for the virtual directory. For this example, type Northwind. (Remember you can call it any name you want, but we are using this configuration for all the examples in the book.) Enter the path to the directory Nwind that you created previously ( D:\inetpub\wwwroot\Nwind ). Remember that you also can use the Browse button to point to the directory. Specifying the LoginSelect the Security tab. On this tab, select SQL Server, and enter the valid SQL Server login information. When you go to the next tab, you are asked to confirm this password. See Figure 3.4. Figure 3.4. The Security tab of theVirtual Directory Management Utility. The options on the Security tab are given in Table 3.2. Table 3.2. The Security Tab Options
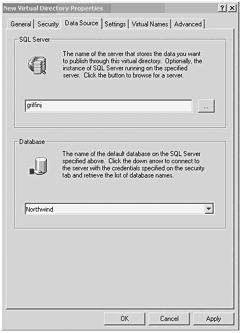
Mapping to the Data SourceSelect the Data Source tab. On this tab, in the SQL Server box, enter the name of a server running SQL Server 2000 and the name of an instance of SQL Server 2000, if more than one is running on the designated server. If SQL Server 2000 is running on the local server, you can enter (local) here. In the Database box, enter Northwind as the name of the default database or select it via the drop-down box (see Figure 3.5). Figure 3.5. The Data Source tab of theVirtual Directory Management Utility. The options on the Data Source tab are given in Table 3.3. Table 3.3. The Data Source Tab Options
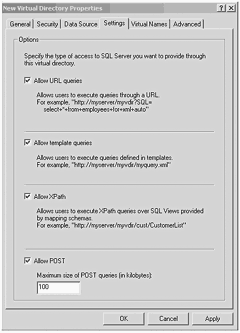
Specifying the Query SettingsSelect the Settings tab. On this tab, select the Allow URL queries, Allow template queries, Allow XPath, and Allow POST options (see Figure 3.6). This enables all forms of submission that are used in the examples. Figure 3.6. The Settings tab of theVirtual Directory Management Utility. The options on the Settings tab are given in Table 3.4. Table 3.4. The Settings Tab Options
Specifying the Virtual NamesAfter the virtual root has been configured, we need to create the virtual names that will point to the template files, schema files, and dbobjects, and associate them to the physical directories that house these entities. To accomplish this, perform the following steps:
Table 3.5. The Virtual Names Tab Options
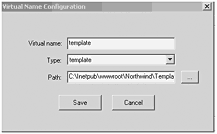
In the Virtual Name Configuration dialog box, enter Template in the Virtual Name box (you could put any name you want here, but let's use the same name in the example). In the Type list, select Template. In the Path box, enter the physical path to the Templates directory that was created earlier ( D:\inetpub\wwwroot\Nwind\Templates ). See Figure 3.7. Click Save to save the virtual name. Figure 3.7. TheVirtual Name Configuration dialog box of the Virtual Directory Management Utility. Warning: The program does not check the existence of the directory you enter, so you won't know if there was a mistake until you can't get anything to work. Moral of the story: Double-check your entry! This saves you from a lot of frustration. It's bitten me more than once.
That's it! You've created the virtual directory Northwind. All queries using the virtual directory will be against the database Northwind. The Advanced TabFor our purposes, the only setting that needs to be changed on the Advanced tab is Disable Caching of Mapping Schemas. Experienced developers know that caching in a development environment can cause innumerable headaches by preventing changes from appearing until the cache timeout period expires , so make sure this option is checked, so that changes we make are available immediately (see Figure 3.8). Figure 3.8. The Advanced tab of theVirtual Directory Management Utility. The options on the Advanced tab are given in Table 3.6. Table 3.6. The Advanced Tab Options
URLs,Virtual Directories, and Physical DirectoriesLet's take one final look at the relationship among URLs, virtual directories, and physical directories. To simplify things, we'll only talk about templates. Our example has a physical directory defined as the virtual root at D:\inetpub\wwwroot\Northwind with the name nwind. A physical subdirectory of this directory D:\inetpub\wwwroot\Northwind\templates is defined as a virtual directory with the name template. A URL would access a file in this directory with http://IISServername/nwind/template/filename.xml or servername/virtual root name/virtual directory name/filename.xml
If we had the virtual root dir3 deeper in the directory structure, for instance, D:\inetpub\wwwroot\dir1\dir2\dir3\virtual directory you would still use the URL D:\inetpub\wwwroot\dir3\virtual directory\filename.xml I hope the example helped to explain this relationship a little better. |