Creating Indexes
|
You have a number of ways to create indexes. At runtime, you can create indexes using SQL, and many of the Advantage data access mechanisms provide additional functions for this same purpose. At design time, it is easiest to use the Advantage Data Architect to add indexes to a table.
The following steps walk you through the process of creating indexes for the CUST.ADT table you created in Chapter 2.
Several expression indexes and a conditional index are created in the following steps. Custom and subindexes are not recommended for most applications, so those types of indexes will not be created in this section. (Subindexes are found in some legacy DBF database applications, and are supported by ADS, but are virtually unknown in modern applications, which is why they are not discussed in this chapter.) Creating FTS indexes is described later in this chapter.
Use the following steps to add four index orders to the table created in the section “Creating ADS Tables” in Chapter 2:
-
Launch the Advantage Data Architect if it is not already running.
-
Open the CUST.ADT table that you created in Chapter 2 in the Table Browser. If you have opened that table recently, you can select File | ReOpen Table | CUST.ADT from the Advantage Data Architect main menu. If not, select File | Open Table, and use the displayed dialog box to choose the CUST.ADT table. When you are done, the CUST table will appear in the Table Browser.
-
Click the Index Management button on the Table Browser toolbar. The Advantage Data Architect opens the Index Management dialog box shown in Figure 3-1.
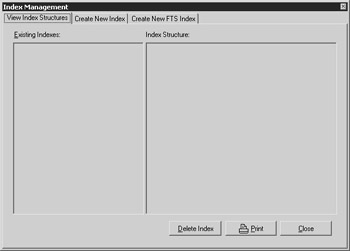
Figure 3-1: The Index Management dialog boxThe Index Management dialog box has three tabs: View Index Structures, Create New Index, and Create New FTS Index. If you had already created one or more index orders for this table, you can select the View Index Structures tab to see their names and properties. You add a new index using the Create New Index or Create New FTS Index pages.
-
You create an expression index by using the Create New Index page of the Index Management dialog box, shown in Figure 3-2. If this page is not currently selected, click the Create New Index tab.
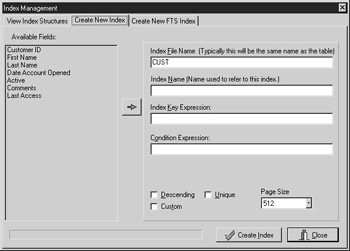
Figure 3-2: Use the Create New Index page to define indexes. -
Leave Index File Name set to CUST. This will result in the creation of an index file named CUST.ADI, which is the structural index for the CUST.ADT table. As you learned earlier in this section, the structural index is automatically opened when you open its associated table.
-
We will begin by creating a unique expression index that will guarantee that every customer will have a different ID. Double-click Customer ID in the Available Fields list. This sets the Index Name field to Customer ID, and sets the Index Key Expression field to Customer ID. In other words, the index order will be named Customer ID, and it will be based on the Customer ID field. If you wanted to give the index a different name, you can do this using the Index Name field.
To make this index unique, click the Unique checkbox at the bottom of the Index Management dialog box. Finally, click the Create Index button to create this index.
-
You are now ready to create another index. Note that the Create New Index page still contains the values you used to create the Customer ID index, including the Unique checkbox, which is still checked. The first thing you should do is uncheck the Unique checkbox.
-
The next expression index you are going to create is based on the customer’s full name. At Index Name, enter Full Name. Next, set Index Key Expression to First Name + ' ' + Last Name. When you are done, click Create Index.
-
You will now create another expression index that can be used to perform a case-insensitive sort of the table by Last Name and then by First Name. Set Index Name to By Customer and Index Key Expression to UPPER(Last Name);UPPER(First Name). When you are ready, click Create Index to create this index.
-
Finally, you will create a conditional index. Set Index Name to Active Customers and Index Key Expression to Date Account Opened. Next, set Condition Expression to Active=True. Finally, select the Descending checkbox to sort the Date Account Opened keys in descending order. Click Create Index.
An index file (with the .adi file extension) for an ADT table is created the first time you add an index order to an index file. You can set the Page Size field on Figure 3-2 at the time you create this index file. Unless your index order expressions are unusually large, you will typically not need to change the default page size. Also, the Page Size option will not appear after the index file has been created and you close the Index Management dialog box. If you need to change the index page size in the future, you can do this programmatically with ACE API functions. Or, in the Index Management dialog box, you will need to delete the ADI index file, re-create it, and add your index orders back to it.
If you want to view or remove an index, you do this from the View Index Structures tab. While this tab is selected, you can select a particular index to view information about it in the Index Structure pane. Figure 3-3 shows how this page of the Index Management dialog box looks with the Active Customers index selected.
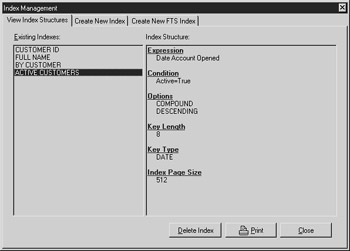
Figure 3-3: You can view and remove indexes using the View Index Structures page of the Index Management dialog box.
Deleting or Changing Index Orders
To delete an index order, use the View Index Structures page of the Index Management dialog box, shown in Figure 3-3. Select the index that you want to delete in the list of Existing Indexes, and then click Delete Index.
You cannot change an existing index; you can only remove it. If you are unhappy with a particular index definition, you need to delete it as just described. You then add the new index with the modifications you want using the Create New Index page of the Index Management dialog box.
|
EAN: 2147483647
Pages: 129