Other Table Support Features
|
In addition to viewing and editing data, the Table Browser is your primary tool for controlling a number of features of a table. These include data security and table maintenance. Using these features is discussed in the following sections.
Data Security
ADS provides security for your data in a number of important ways. Some of these are associated with how ADS transmits data across the network, and others are associated with access rights conferred by a data dictionary. But the most fundamental of data security features is provided at the table level. Specifically, individual tables can be encrypted with a password.
When a table is encrypted with a password, both the table and its memo file are encoded using the password. The effect of this encoding is that the raw table and memo files appear scrambled to anyone who attempts to view their contents. Without encryption, it would be possible for someone with a file viewer, or even Windows Notepad (for small tables), to open the table and read its contents.
Once the table is encrypted, you must provide the password for the table before you attempt to use it for the first time. For database tables, which can only be accessed through a data dictionary, the data dictionary supplies the password automatically. Note, however, that a data dictionary itself provides security, and when the data dictionary is configured correctly, you will not be able to access the data dictionary without supplying a user name and password. The data dictionary user name and password are separate from a table’s password.
If you want to view an encrypted free table using the Advantage Data Architect, you will be prompted for the password when you open the table. Similarly, before an encrypted table can be accessed from a client application, your code will be responsible for submitting the password.
How you submit a table’s password from a client application depends on the data access mechanism you are using. For example, if you are using the ACE API, you must make a call to AdsEnableEncryption (for ADS tables) or AdsStmtSetTablePassword (for executing SQL statements against the table), passing the table name and the password as the arguments to the function call. You need to make one of these calls once per ADS table, prior to accessing it for the first time.
The following section describes how to encrypt and decrypt a free ADS table. For information about encrypting database tables, see Chapter 4.
| Note | You must be able to obtain exclusive access to a table in order to encrypt or decrypt it. Specifically, if a table is already in use by at least one other user, you will not be permitted to either encrypt or decrypt that table. |
Encrypting ADS Tables
To encrypt an ADS table, open that table in the Table Browser, and then click the Encrypt button in the Table Browser toolbar. Use the following steps to encrypt the CUST.ADT table created earlier in this chapter:
-
If the CUST.ADT table is not currently open in the Table Browser, open it.
-
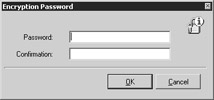
Click the Encrypt Table button in the Table Browser toolbar, located on the left side of the Table Browser. This toolbar button displays a picture of a padlock. The Table Browser responds by displaying the Encryption Password dialog box:
-
You use this dialog box to enter the table encryption password twice, the second time for verification purposes. In the Password field, enter the value password. Confirm this password by entering password in the Confirmation field. Click OK when you are done.
Note The simple password “password” is used throughout this book since it is one that is easy to remember. This password would be a very poor choice for use in a real application since it is also easy to guess. Proper passwords should be difficult to guess.
Caution You should take steps to protect and remember any passwords you use to encrypt your tables. If you forget the password for a free table, the data encrypted in it will be inaccessible. You might want to write your passwords down, and place them in a secure location, such as a safety deposit box or safe that only trusted individuals have access to.
Once a table is encrypted, a picture of a padlock will appear in the status bar of the Table Browser when you are viewing the table.
Use the following steps to see the effects of encryption:
-
If the CUST.ADT table is currently open in the Table Browser, close it.
-
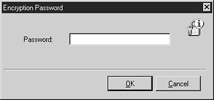
Select File | ReOpen Tables | CUST.ADT from the Advantage Data Architect main menu. The Advantage Data Architect displays the Encryption Password dialog box:
-
Click Cancel without entering a password. While the CUST.ADT table is opened in the Table Browser, it contains scrambled data, as shown in Figure 2-5.
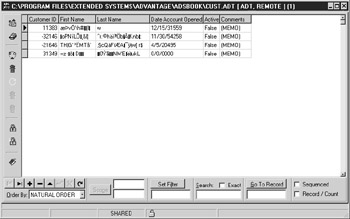
Figure 2-5: If you do not supply a valid password for an encrypted free table, its data is scrambled. -
Close the Table Browser. Select File | ReOpen Tables | CUST.ADT once again from the Advantage Data Architect main menu. This time enter password into the Encryption Password dialog box. Now when the Table Browser opens the table, the unencrypted data is visible and can be edited, as shown in Figure 2-6.
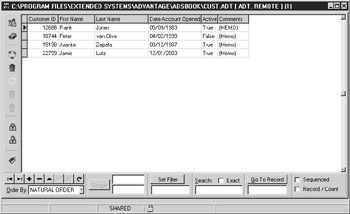
Figure 2-6: The Table Browser displaying data after a valid password has been entered.
Decrypting ADS Tables
If you want to remove the password from a previously encrypted table, open that table in the Table Browser and click the Decrypt Table button in the Table Browser toolbar. When you do, the Encryption Password dialog box is displayed. Enter the table’s current password into this dialog box to decrypt the table. Note that you need exclusive access to a table to decrypt it.
Since the CUST.ADT table is one that we are using for demonstration purposes only, the following steps demonstrate how to remove the encryption. This will permit you to work with this table without having to continually provide a password.
-
If the CUST.ADT is not currently open in the Table Browser, open it.
-
Click the Decrypt Table button in the Table Browser toolbar. The Encryption Password dialog box is displayed.
-
Enter password in the password field of the Encryption Password dialog box, and click OK to decrypt the CUST.ADT table.
Table Maintenance
Depending on the type of ADS table you are working with, and whether or not you are using ADS versus ALS, there are a couple of maintenance tasks that you will have to perform periodically on tables.
For example, if you are using DBF tables, you will probably need to pack them from time to time, in order to recover space occupied by deleted records. With ADT tables, packing is rarely necessary.
Similarly, if you are using ALS, there exists a real possibility that a hardware or software problem may cause one or more of a table’s indexes to become corrupt. If this happens, you will have to rebuild the table’s indexes. Index corruption is very rare when you are using ADS.
The following sections describe how to perform these basic table maintenance tasks from the Advantage Data Architect. Note, however, that these same tasks can be performed at runtime from a client application. See the documentation for the particular data access mechanism you are using for information on how to add these maintenance tasks to your client applications.
Changing a Table’s Structure
A table’s structure consists of its field definitions, and you design this structure based on your application’s storage needs. Unfortunately, these needs tend to change over time. In a simple case, while testing your client application, you might find that you did not allocate enough space for one or more of your character fields. For example, you might find that 20 characters is insufficient for your Last Name field, making it necessary for you to increate this field’s size to 28 characters.
A more complicated situation may require you to add one or more fields to a table. As an application enters its prototype stage, it is not unheard of to discover that data essential to the application was not considered in the original design. Such a realization may require you to add one or more fields to one or more of your application’s tables.
Fortunately, the Advantage Data Architect makes it relatively easy to modify the structure of an existing table, whether you need to simply change the size or precision of an existing field, or to add fields to or remove fields from the table.
The following steps show you how to change the structure of the CUST.ADT table you created earlier in this example:
-
If you do not currently have the CUST.ADT table open in the Table Browser, open it now.
-
Click the Table Management button in the Table Browser toolbar to open the View\Modify Table Structure dialog box, shown in Figure 2-7. This dialog box is essentially the same as the Creating Table dialog box shown in Figure 2-1.
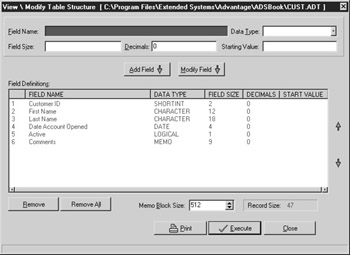
Figure 2-7: You change an existing table’s structure using the View\Modify Table Structure dialog box. -
Select the Last Name field in the Field Definitions section of the View\Modify Table Structure dialog box. When the field is selected, its currently defined parameters appear in the Field Name, Data Type, Field Size, Decimals, and Starting Value fields. Change the Field Size value from 18 to 28, and click the Modify Field button. In response, a dialog box is displayed, asking you to confirm the modifications to the field. Select Yes to save the new definition for the Last Name field in the table’s structure.
-
Now enter Last Access in the Field Name field, and set Data Type to TIMESTAMP. Click Add Field. The newly added field will be placed at the end of the table structure. Your View\Modify Table Structure dialog box should look something like that shown in Figure 2-8.
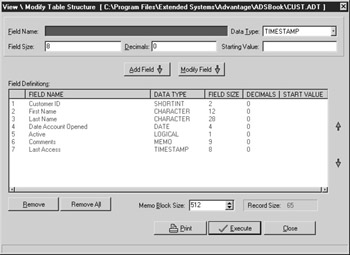
Figure 2-8: The View\Modify Table Structure dialog box after the size of the Last Name field was changed and the Last Access field was added.In addition to changing field definitions and adding fields, you can remove fields, as well as change the order of fields in the table’s structure. To remove a field, select the field you want to remove and click the Remove button. To change a field’s position in a table’s structure, select the field whose position you want to change, and click the Up or Down buttons to the right of the Field Definitions area (Move Field Definition Up and Move Field Definition Down, respectively) to move the selected field.
-
When you are done, click Execute to apply the changes to your table’s structure. When asked to confirm that you want to continue with the restructure, select Yes from the displayed dialog box.
Note ADS also creates backup files of table, index, and memo files. They are given names identical to your original files but with the extensions .~adt, .~adi, and .~adm, respectively.
A couple of comments about restructuring a table are in order. First, you must be able to obtain exclusive access to a table before you can restructure it.
The second point is related to your client applications. Changing the structure of a table will often have an impact on the client applications that use the table. It is very important that you test all client applications following the restructuring of a table to ensure that the applications are running correctly, and to correct any problems that the restructuring may have introduced.
Adding Indexes
Indexes play a very important role in the design of ADS tables. Not only do they permit you to view a table sorted by one or more fields, but they also are the source of much of ADS’s performance. Consequently, once you create a table, you will nearly always add one or more indexes to it.
You add one or more indexes to a table by clicking the Index Management button in the Table Browser toolbar. Creating indexes is discussed in detail in Chapter 3.
Restoring Deleted Records
With DBF tables, records that have been deleted may be recoverable. With DBF tables, deleted records are simply marked as deleted, and can be restored, or recalled, so long as you have not packed a table since the records were deleted.
The Table Browser actually provides you with two options for recalling deleted records for DBF tables. The first is to recall a deleted record that is currently active in the Table Browser. To recall the currently active deleted record, click the Recall Deleted Record button in the Table Browser toolbar. If you want to recall all recoverable records in a DBF table, select the Recall All Records button in the Table Browser toolbar. These toolbar buttons are disabled if no recallable records exist in the DBF table.
With ADT tables, you cannot recall deleted records in the Table Browser, and the recall toolbar buttons are disabled. This is consistent with deleted record management in other mainstream DBMSs (Database Management Systems). However, with ADS 7.0 and later, you can use the ACE API AdsRecallAllRecords to programmatically recover the desired deleted data to your table (such as situations of accidentally executing the SQL statement DELETE * FROM TABLE). See the ADS help for more information on AdsRecallAllRecords.
Packing Tables
As you have learned, records deleted from a DBF file are marked for deletion, but continue to occupy space in the underlying table. Unlike ADT tables, which reuse the space occupied by deleted records when new records are added, you must take explicit steps to recover the space occupied by deleted records with DBF files. This process is referred to as packing.
To pack a table, open it in the Table Browser, and click the Pack Table button in the Table Browser toolbar. You must be able to obtain exclusive access to a table in order to pack it. Also, if the table has a large number of records, packing can be a time-consuming operation.
While packing is a process often associated with DBF files, you can also pack an ADT table. As with DBF tables, packing an ADT table removes all records that have been deleted. Since an ADT table can reuse deleted records automatically, packing an ADT table is usually only necessary if you have deleted a large number of records, do not plan to add many new records, and want to recover available space in the underlying ADT file.
One very specific scenario in which you may want to pack ADS tables occasionally occurs if you are using memo files. A memo file will have orphaned memo pages if a memo field’s contents for a record (any binary, image, or memo data) are added and are then deleted, and that record’s memo field now has no data in it. Packing an ADS table with frequent changes of this type to a memo file will recover disk space.
| Note | If you delete an entire record with data in binary, image, or memo fields, the space in the memo file will be available for reuse when future data is written to the memo file. |
| Caution | Packing a table permanently destroys any records deleted prior to the packing, making them unrecallable. |
Re-Indexing Tables
Re-indexing a table rebuilds the table’s indexes from scratch. In most cases, there are three conditions under which you will need to re-index a table. First, you need to re-index a table if you have changed the ANSI collation or the localized OEM character set that your server and all of its client applications are using. The rebuilt indexes will then use the new collation sequence or OEM character set.
The second condition under which you will want to re-index is when your current indexes become highly fragmented. An index can become fragmented over time if the fields involved in one or more of an index’s tags, or index orders, have had unusual patterns of data. For example, if an indexed field of a large table has a great variety of different values, and then over time that same field becomes somewhat homogenous, and then later becomes varied again, the index can get fragmented.
The effect of a fragmented index is that operations using that index are slow compared to when the index was originally built. If you suspect that your database performance is being hurt by fragmented indexes, you should rebuild the indexes to restore your database’s performance.
The third condition under which re-indexing is indicated is when one or more of your index files become corrupt. This can happen when you fail to open all index files for a free table prior to editing the table. (With database tables, all index files are auto-open indexes, thereby preventing index corruption from this source.) Index files can also become corrupt if there is a failure in a workstation or the network when a client application is accessing data using the Advantage Local Server. Re-indexing rebuilds the indexes, removing any corruption in the process.
To re-index a table, open the table in the Table Browser, and then click the Re-Index button in the Table Browser toolbar. Note that you must obtain exclusive access to a table to re-index it. Also, if your table has many records and/or many indexes, re-indexing may be a time-consuming process.
Emptying Tables
When you empty, or zap, a table, you permanently remove all records from that table, losing the data forever. In order to empty a table, open it in the Table Browser and click the Empty Table of ALL Data button in the Table Browser toolbar. When you do, the Table Browser will display the following warning dialog box asking you to confirm that you want to remove all data from the table:
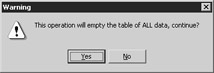
Select Yes on the Warning dialog box. A second dialog box is displayed, asking you to repeat your confirmation. Select Yes to permanently remove all data from the table. Note that you must be able to obtain exclusive access to a table to zap it.
Importing and Exporting Data
Earlier in this chapter you learned how to create a table from scratch. But that is not always necessary if your data already exists. For example, if you are converting an old Paradox application to ADS, you can import your existing data, creating an ADT table with a structure based on the existing table. Better still, the newly imported table will be populated with the data from the existing table.
Data can go the other way, as well. The Advantage Data Architect permits you to export data to a wide variety of formats. This permits you to share your data with other applications. For example, you can export data from an ADS table to an Excel spreadsheet, permitting you to use the business graphing capabilities of Excel to create a pie chart, a bar chart, or whatever kind of chart is suitable for your data. Alternatively, you can export your data in HTML format, permitting you to quickly publish it on your company’s Web site.
The following sections describe how to import and export data using ADS. This discussion begins with importing.
Importing Data into ADS Tables
When you import data, you are making a copy of an existing data source, placing that copy into one or more ADT tables. Whether you get one or more tables depends on what you import. If you are importing a Microsoft Access database (an MDB file), you will end up with one ADT table for each table in the Access database. By comparison, if you are importing from Paradox tables using the Borland Database Engine, you will get one ADT table for each Paradox table you select to import.
The Advantage Data Architect permits you to import data using a wide variety of data access mechanisms. One of the most flexible involves ADO (ActiveX data objects), which you can use if you have the necessary OLE DB provider. This is the most flexible approach since most Windows databases have an OLE DB provider. There are also mechanisms to import Paradox tables, xBASE tables, Pervasive SQL (Btrieve) tables, and to import both fixed-length and CSV (comma-separated value) text files.
| Note | If you have an ODBC driver for a data format that you want to import, you can import that data using Microsoft’s OLE DB Provider for ODBC. |
You begin the import process by selecting Tools | Import from the Advantage Data Architect main menu. The Advantage Data Architect responds by displaying the Advantage Data Import dialog box shown in Figure 2-9.
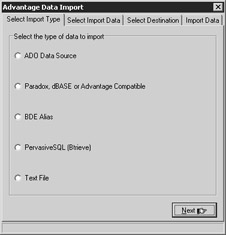
Figure 2-9: The Advantage Data Import dialog box
There are four tabs on the Advantage Data Import dialog box. You use the Select Import Type tab to identify which data import mechanism you want to use. Once you select the mechanism you want to use to import the data, either click Next or click the Select Import Data tab. The contents of the Select Import Data page depend on the data access mechanism you chose on the Select Import Type page. For example, if you selected ADO Data Source, you are asked to enter or build an ADO connection string, as shown in Figure 2-10.
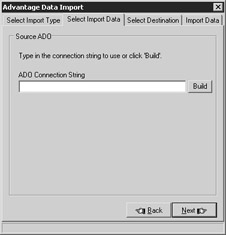
Figure 2-10: ADO requires an ADO connection string to connect to data.
If, on the other hand, you choose to use the Borland Database Engine and select BDE Alias on the Select Import Type page, you are asked to identify the BDE alias from which to import the data, as shown in Figure 2-11.
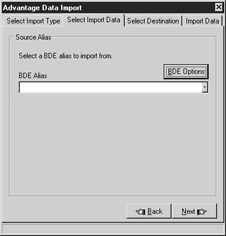
Figure 2-11: The BDE requires a BDE alias to connect to data.
After you provide the Advantage Data Import dialog box with the information it needs to connect to your original data source, click Next or select the Select Destination tab to display the Destination page shown in Figure 2-12. Select the directory where ADS should create the table or tables to hold the data you are importing.
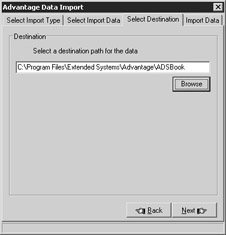
Figure 2-12: Use the Select Destination page to specify the directory path where imported table(s) are stored.
You can either type the path of the directory into which you want these tables stored, or you can click Browse to select a directory using the Browse for Folder dialog box.
Click Next or select the Import Data tab. The Import button shown in Figure 2-13 initiates the data importation. Once you click Import, the Advantage Data Import Utility will begin the data importation, displaying its progress as the importation proceeds.
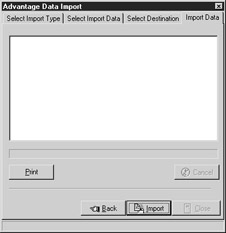
Figure 2-13: Click Import to begin the data importation.
Once importation is complete, you can review the importation progress log and even print it out. This log sometimes includes valuable comments about the data it imports. For example, it notes that tables imported from indexed Paradox tables, which necessarily have a primary key index, will be given an index named PRIMARY. It goes on to warn you that if you want the imported index named PRIMARY to be designated as the primary index in a data dictionary, you must set that property manually.
Note that importation is a two-step process if you want to bind the imported tables to a data dictionary. In the first step, you import your data into ADT free tables. Once you have your free ADT tables, you can add them to a data dictionary. Adding existing free ADS tables to a data dictionary is discussed in Chapter 4.
Exporting Data from ADS Tables
The Advantage Data Architect permits you to export data from ADS tables using either the Table Browser or the Native SQL Utility. Using the Table Browser, you can either export the entire table’s contents, or you can set either a scope (an index- based range) or a filter (a Boolean selection expression) to export only a subset of records from the table. Using the Native SQL Utility, you can execute a SQL SELECT statement to select some or all records and columns from a table, and then export only the selected data. Only by using the Native SQL Utility can you export fewer than all columns of your data.
Whether you use the Table Browser or the Native SQL Utility, there are three general categories of export options. The first is to export your data to another, new ADT table, and the second is to export your data to an existing ADT table. If you want to export to an existing ADT table, the existing table must have a structure that is compatible with the table from which you are exporting. These first two export options make it easy to copy and append data, but are not useful if you want to make your data available to other programs.
The third export option is to export to a non-ADS format. This export option permits you to export your data into a variety of useful formats, including Excel, comma- delimited text, tab-delimited text, and HTML, among others. Most applications that you might want to use your data with will likely support at least one, if not more, of the export format options provided for by this feature.
Use the following steps to demonstrate the export feature of the Advantage Data Architect:
-
Open the Native SQL Utility by selecting Tools | Native SQL Utility from the Advantage Data Architect main menu.
-
Set Connection Type to Path, and then enter or select the path to the directory into which you stored your CUST.ADT table you created earlier in this chapter.
-
Click Connect. When you successfully connect, the Connect button label will change to Disconnect.
-
Enter the following SQL statement into the SQL editor:
SELECT "First Name", "Last Name", "Date Account Opened" FROM CUST WHERE "Customer ID" = 12688
-
Click the Execute SQL button to execute the entered query. The query results will be displayed in the Results pane.
-
Right-click in the Results pane to display a popup menu with the following three options for exporting the result set: Export Results To New Table, Export Results To Existing Table, Export Results To HTML, Excel, …. Select Export Results To HTML, Excel,…. The Native SQL Utility responds by displaying the Export Items dialog box:
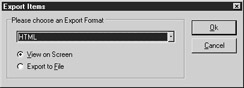
-
Select Comma-Delimited Text (CSV) from the Export Format dropdown list, and set the radio button group to Export to File. Click OK.
-
You will now see a browser window that you can use to provide the filename and directory to which to export the data. Use this browser to navigate to the directory where your CUST.ADT table is stored, and set File Name to CUST.CSV. Click Save.
-
Now use Windows Notepad, or any other text file viewer, to open the CUST.CSV file you just exported. This file should look like that shown in Figure 2-14. Close this window or viewer.
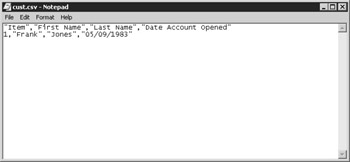
Figure 2-14: The exported data from the CUST.ADT in CSV format. -
Click Disconnect on the Native SQL Utility to drop your connection, and then close the Native SQL Utility window.
The preceding example demonstrated how to export specific rows and columns from an existing ADS table using the Native SQL Utility. To export using the Table Browser, set a scope or a filter if you want to export fewer than all rows of data, and then right-click the grid. Select the export option that you want from the displayed popup menu, and then proceed as you did with the Native SQL Utility.
Exporting Table Structures as Code
At the beginning of this chapter, you learned that you can either create tables at design time using the Advantage Data Architect, or you can create tables in code at runtime. As mentioned during that discussion, creating tables in code at runtime requires that you create, debug, and maintain the code that defines the table structures.
Fortunately, the Advantage Data Architect can help. Specifically, so long as you have an existing ADS table structure, the Tables to Code dialog box of the Advantage Data Architect can generate code that will create that table at runtime, including indexes. You can then use that code in your client application to create the table and its indexes at runtime.
Use the following steps to generate a SQL script that can re-create your CUST.ADT table at runtime from a client application:
-
From the Advantage Data Architect main menu, select Tools | Export Table Structures as Code. The Advantage Data Architect responds by displaying the Tables to Code dialog box shown in Figure 2-15.
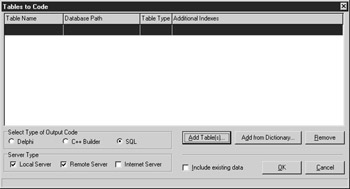
Figure 2-15: Use the Tables to Code dialog box to generate table and index creation code that you can use in your client applications. -
Click the Add Table(s) button to display a browser window. Navigate to the directory into which you saved your CUST.ADT, and select that table. (You can actually select two or more tables at a time if you want, but there is currently only one table in this directory.) Click Open to continue.
-
The name of your selected table appears in the Tables to Code dialog box. If your free table has more than one index file, you can right-click and select additional indexes to generate code for. Currently there are no index files for the CUST.ADT table, so skip this step.
-
You can generate code in one of three formats: Delphi, C++Builder, or SQL script. At Select Type of Output Code, select SQL.
-
The generated code can either create the table, or it can create the table and populate it with data. If you have selected to output the generated code using SQL scripts, you can check the Include Existing Data checkbox to populate the generated table with its current data. Leave this checkbox unchecked for this demonstration. Click OK to continue with your code generation.
-
After clicking OK, the Output Code window appears as shown in Figure 2-16. From this window you can copy the code to the Windows clipboard, or click Save As to save the code to a file. When you output your code as SQL, there is an additional button that will open the code in the Native SQL Utility, which permits you to test the code.
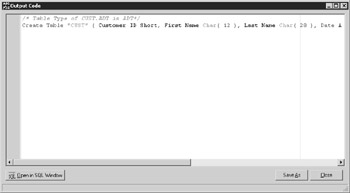
Figure 2-16: Use the Output Code window to save the generated code.Caution Testing the code output by the Table to Code generator may produce errors if you attempt to create a new table using the same name as your existing table. This code is normally intended to be executed from a client application to create a table where no table currently exists.
In the next chapter, you will learn about the importance of ADS indexes and how to create them for your tables.
|
EAN: 2147483647
Pages: 129