Creating ADS Tables
|
There are a number of ways that you can create tables for use by ADS. At runtime you can execute a CREATE TABLE SQL statement. Alternatively, if you are using either the Advantage TDataSet Descendant or the ACE (Advantage Client Engine) API, you can invoke AdsCreateTable.
The most convenient way to create an ADS table at design time is to use the Creating Table dialog box of the Advantage Data Architect. Actually, since you can execute SQL statements in the Advantage Data Architect, you can also create a table by executing a CREATE TABLE statement. However, the Creating Table dialog box provides a graphical user interface making it far easier to use than using SQL, which requires you to code a long SQL statement.
| Note | If your table already exists in another database format, the Advantage Data Architect provides you with an import facility that permits you to convert a wide range of table types into the ADT format. Using the import feature of Advantage Data Architect is described later in this chapter. |
The following steps demonstrate how to create a new ADT table using the Creating Table dialog box:
-
Launch the Advantage Data Architect if it is not already running by selecting Programs | Advantage Database Server | Advantage Data Architect from the Windows Start menu.
-
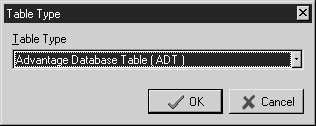
Select File | New Table from the Advantage Data Architect main menu, or alternatively, press CTRL-N. The Advantage Data Architect displays the Table Type dialog box shown here:
-
Leave the Table Type field set to Advantage Database Table (ADT) and click OK. The Advantage Data Architect opens the Creating Table dialog box shown in Figure 2-1.
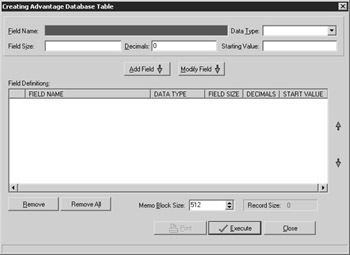
Figure 2-1: The Creating Table dialog box of the Advantage Data Architect -
You use the Creating Table dialog box to define the fields of your new table’s structure. You define each field by setting the Field Name, Data Type, Field Size, Decimals, and Starting Value fields, and then clicking Add Field. Not all field types require you to define values in Field Size, Decimals, or Starting Value fields. Table 2-2 describes the valid data types for ADT tables.
Table 2-2: The Allowable Field Types for ADT Table Fields Data Type
Size
Description
AUTOINC
4
A unique, four-byte, unsigned, internally generated integer from 0 to 4,294,967,296.
BINARY
10
Variable-length field containing binary data. Data is stored in the memo file.
CHARACTER
1 to 65530
Fixed-length text field.
CURDOUBLE
8
Same as DOUBLE, but designed to hold monetary values.
DATE
4
Integer representing a date.
DOUBLE
8
Floating-point value with 15 digits of precision. Field Size is ignored, and Decimals affects how the field value is handled in expressions.
IMAGE
10
Variable-length field containing a binary image. Data is stored in the memo file.
INTEGER
4
Four-byte integer with a range from –2,147,483,647 to 2,147,483,647.
LOGICAL
1
Boolean value. Valid case-insensitive values are T, True, F, and False.
MEMO
10
Variable-length text field stored in the memo file. Can hold up to 4 gigabytes of text.
MONEY
8
Use to store monetary data to an accuracy of four decimal places with a range from –922,337,203,685,477.5807 through 922,337,203,685,477.5807.
RAW
1 to 65530
Fixed-length raw data field.
SHORTINTEGER
2
Two-byte short integer with a range from –32,767 to 32,767.
TIME
4
Four-byte integer representing number of milliseconds since midnight.
TIMESTAMP
8
Eight-byte value where the high-order four bytes contain an integer representing a date, and the low-order four bytes contain the number of milliseconds since midnight.
Caution Auto-increment fields, such as the ADT AUTOINC field, automatically generate a unique value for the associated field. You specify a starting value in the Starting Value field of the Creating Table dialog box. Some developers use auto-increment fields to assign a unique value to a record, such as a customer ID number or a part number. However, auto-increment fields are notorious for creating headaches, since as a developer you have little control over the generation of the unique value. The problem is particularly noticeable when you add data from one table with an auto-increment field into another that also contains an auto-increment field. Most developers prefer to generate their own unique values, rather than relying on auto-increment fields, thereby influencing the unique values and eliminating potential conflicts.
-
Use the data in Table 2-3 to create six fields for your new table. Add these fields, one at a time, by entering the provided Field Name and Field Type, and optionally, Field Size and Decimals. Once you have defined a field’s parameters, click the Add Field button on the Creating Table dialog box. Each added field will appear in the Field Definitions area of the Creating Table dialog box.
Table 2-3: Use This Data to Add Six Fields to the Table Field Name
Field Type
Field Size
Decimals
Customer ID
SHORTINT
First Name
CHARACTER
12
Last Name
CHARACTER
18
Date Account Opened
DATE
Active
LOGICAL
Comments
MEMO
When you are done, the Creating Table dialog box will look something like that shown in Figure 2-2.
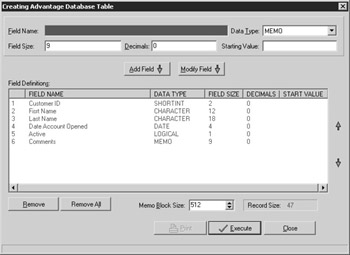
Figure 2-2: The Creating Table dialog box with the structure of a new table defined -
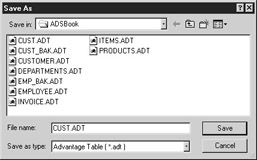
Click the Execute button. The Advantage Data Architect responds by displaying the Save As dialog box. Using this dialog box, either specify a directory or create a new directory into which you will store your database-related files. You can use any directory you like, but we recommend that you use the same directory in which the sample database described in Appendix B is stored: c:\Program Files\Extended Systems\Advantage\ADSBook. Save this new table using the name CUST.ADT in this directory, as shown here:
-
Once you have saved your table, the Advantage Data Architect displays an information message indicating that the table has been created. Accept this dialog box.
-
Now close the Creating Table dialog box by clicking Close. A new dialog box is now displayed, asking if you would like to open the newly created table. Select Yes to open the new table in the Table Browser, as shown in Figure 2-3.
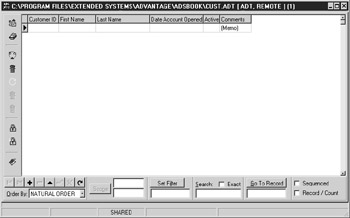
Figure 2-3: The newly created table in the Table Browser
|
EAN: 2147483647
Pages: 129