Laying Out Forms
Highlights
In this chapter, you will learn how to
- Establish a strategy to maintain consistency in overall form layout and design
- Set default view widths and specify the default font family and size for each control type
- Add a layout table with a standard title and empty row to contain other form design elements
- Add a layout table and insert controls in its cells
- Decorate layout tables with borders of varying widths
- Add a repeating table to a form, calculate default values, and format numeric cells for currency and percentage values
- Embed existing layout and repeating tables in a new layout table with a title
- Draw tables using a freehand pencil and eraser cursors
For more information
- See Chapter 7, Formatting Forms, for additional table and control design options.
- Review Navigating Documents with XPath in Chapter 3, Understanding Form Technologies, for an overview of XPath expressions.
- Refer to Calculating Values with the Expression Box in Chapter 6 for additional examples of XPath expressions.
Overview
To work through this chapter
- You need experience in creating data sources from XML data documents, which is explained in Chapter 4, Creating a Template from an XML Document.
- You should be familiar with manipulating Microsoft Office InfoPath 2003 tables, as described in Chapter 2, Adding Tables to Rich Text Boxes.
- You should have installed in your C:Microsoft PressIntroducing InfoPath 2003Chapter05 folder the sample files from the CD that accompanies this book. You will use the XML data documents in the subfolders as the data source for the forms you create in this chapter.
The Contacts and RSS 2.0 data entry forms you designed in Chapter 4, Creating Forms, didnt take advantage of the versatile layout features available in InfoPath. The labels and text box controls you added to form sections by choosing Section with Controls appear on individual lines. You can place label and text-box pairs in the same line by deleting line-feed equivalents and then align text boxes horizontally within a section by adding spaces and trimming widths. Its not easy to get the horizontal alignment right without changing the font size of the spaces you add, and inline labels for multi-line text boxes align at the bottom of the text box.
InfoPaths layout tables solve text alignment problems and enable you to establish a consistent form design strategy for your organization. Placing sections and controls within layout tables gives you the tools you need to tweak your design for better readability and improved data entry efficiency. Layout tables let you add outside borders to your form and its sections and, if you choose, controls contained in table cells . You can add individual layout tables for a form header and each section of the form. Alternatively, you can nest multiple layout tables within a single table that contains a heading.
This chapter deals with layout and repeating tables, along with the text box controls they contain; Chapter 7 delves into the details of table, section, and control formatting, including conditional formatting.
Adhering to Design Standards
Most organizations observe a set of graphic design standards for stationery, business forms, brochures , product specification sheets, Web pages, and other publicly accessible and internal media. These standards usually include logos and specific font families for the organization name and document text, and they often include layout guidelines for print publications and Web pages. The goal is to present a consistent, memorable corporate image to employees and the public at large, regardless of the organizations business, charitable, or governmental purpose. InfoPaths sample forms adhere to a standard design pattern that uses layout tables to maintain a consistent graphic flavor.
The forms you create probably will be for internal use only, and your employer might not have graphics standards for internal printed or electronic documents. In this case, work with your colleagues to establish standards for form design, such as form headings, font families and sizes, and section layout.
Adding Layout Tables from the Task Pane
Chapter 2 introduced you to working with InfoPath tables in data entry mode in the Adding Tables to Rich Text Boxes section. InfoPath provides a similar design mode capability for adding layout tables with cells to contain sections and controls, but extends the standard Table menu choices with a Layout task pane. Choosing the Layout task pane displays a set of standard layout tables. The Insert Layout Tables list s first selection, Table With Title, adds a default two-row, single-column table with placeholders for the title text and other form content. Figure 5-1 shows the master layout table for this chapter s first example.
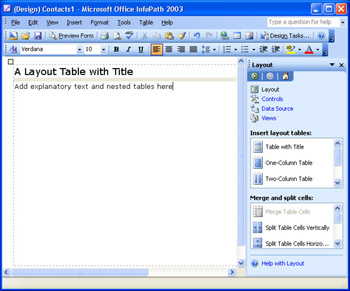
Figure 5-1: You add this single-column, two-row layout table by double-clicking the Table With Title item and replacing the placeholder for the title and optional text.
The remaining standard layout tables have one, two, and three columns and one row. You can specify a custom table with the number of rows and columns you set in the Insert Table dialog box that opens when you click the Custom Table. The Merge And Split Cells list offers selections that correspond approximately to the Table menu s choices. You use the Merge And Split Cells selections when you modify parent and nested tables in later sections.
The following sections show you how to add a master table with a title to a form, add a repeating section to the master table, and add a layout table with text box controls in the repeating section.
Creating the Initial Contacts1 Template
In this section, you create a simple form to understand the capabilities of basic layout tables. A modified version of the Contacts-WellFormed.xml data document from Chapter 4 is a good choice for the data source for the form. The Contracts1Source.xml sample file has two contact entries with required personal and optional business address sections.
To create the data source for the Contacts1 template and add the master (title) table to the form, follow these steps.
Add a data source and master layout table
- Start InfoPath, click the Design A Form link on the Fill Out A Form dialog box, and click New From XML Document Or Schema link to start the Data Source Wizard.
- Click the Browse button to open the Open dialog box, navigate to your C:Microsoft PressIntroducing InfoPath 2003Chapter05Contacts folder, and double-click Contacts1Source.xml.
- Click Next and then click Finish to create the data source. Click Yes when the message box asks if you want to use the values in the .xml file as the default data for your form.
- Choose Format, View Properties to open the View Properties dialog box, select the Use A Custom Layout Width For This Form check box, and set the default view width to 600 pixels, as shown here:

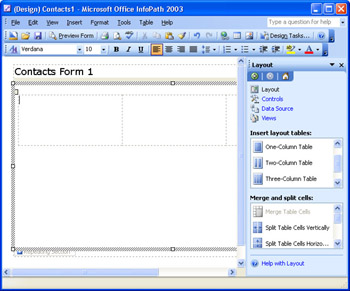
- Click the Layout link in the Data Source task pane, and click Table With Title to add the default two-row table.
- Replace the Click To Add Title placeholder with Contacts Form 1, and click the Click To Add Form Content placeholder to delete it.
- Delete the default empty line above the master table to minimize the form s top margin.
- You ll nest all other controls in this master table, so drag the table s lower dashed line to the bottom of the work area. (Refer to Figure 5-3 for sizing.)
- Save your template as Contacts1.xsn in a new subfolder of My DocumentsInfoPath.
- Choose File, Properties to open the Form Properties dialog box, type Contacts with Master Table Test as the Form Name , and click OK to close the dialog box.
Adding a Repeating Section, Layout Table, and Controls
Contacts1.xsn s data source has three basic form components : name, personal address (required), and business address (optional). For this example, you add the contacts group section to the empty cell of the master table, insert and size a three-column layout table, and then add First Name and Last Name labels and text boxes to the leftmost and rightmost table cells. Follow these steps to add the form elements.
Add a data source and master layout table
- Open the Data Source task pane, drag the contact repeating group from the Data Source list to the layout table s empty row below the title, and select Repeating Section from the shortcut menu that opens when you release the left mouse button.
- Click to select the section, drag its bottom sizing handle to the bottom of the table, and click inside the section to select it.
- Open the Layout task pane, scroll to the Three-Column Table item, and click it to add the table to the top of the repeating section. Click each of the three Click to add form content placeholders to remove them, as shown here.
- Right-click the left column (A) of the table, choose Table Properties to open the dialog box of the same name, and click the Column tab.
- Each column is 195 pixels wide, for a total of 585 pixels, because section and table margins occupy about 15 pixels of the master form s 600-pixel width. Set the width of column A to 285 pixels, as shown on the next page.

- Click Next Column, and set the width of column B to 15 pixels. The middle column acts as a separator for the two columns that will contain First Name and Last Name controls.
- Click Next Column again, set the width of column C to 285 pixels, and click OK to close the dialog box.
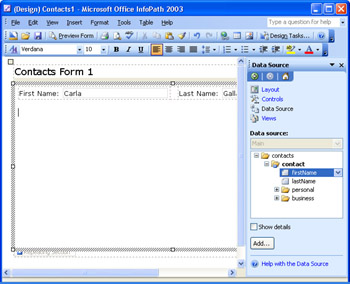
- Click the Data Source link, expand the contact node, drag the firstName node to column A, and drag the lastName node to column C to add labels and text boxes to the cells.
- Reduce the width of the text boxes to fit the labels and text boxes on a single line.
- Drag the bottom of the layout table up to remove the extra space below the text boxes.
- Select the First Name and Last Name text boxes, right-click one of the text boxes, and choose Properties to open the Properties (Multiple Selection) dialog box. On the Size tab, click Align to align the text vertically with the label.
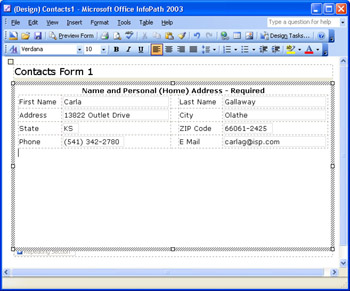
- Delete any empty lines above the single-row table. Your form appears as shown below.
- Press Ctrl+S to save your changes.
Adding Controls in a Layout Table
One approach to adding sections to a master table is to add a section without controls, insert an empty layout table in the section, and then drag the sections fields from the Data Source list to the tables cells . This method becomes tedious if the section contains many fields.
InfoPath offers a shortcut for adding a layout table with labels and controls to an entire section automatically. The only issue with this approach is that the controls insert a two- column table with a row for each field in the section. Most fields dont require the default text box width to display their data. Changing the table from two to four columns to halve the number of rows requires splitting cells, cutting and pasting cell content, and then removing the empty table rows.
Adding a Layout Table with Controls
To add the personal group as a nested layout table, with labels and text boxes in individual table columns, and prepare to split the table cells, follow these steps.
Add a layout table for the personal group
- Open the Data Source task pane, and drag the personal group from the Data Source list to a position to the right of the Last Name text box to insert it under the First Name and Last Name table.
- Choose Controls In Layout Table from the shortcut menu that opens when you release the left mouse button.
- Close the task pane, and drag the right border of the newly inserted table so that it aligns with the right border of the upper table, as shown here.
Splitting Table Cells and Moving Cell Contents
InfoPaths table-editing features ease the drudgery of redesigning layout tables with controls. The split cells feature lets you add as many new columns to a layout table as you need to move fields to the same row. If youre familiar with modifying Microsoft Office Word 2003 tables, youll find that InfoPaths table-reconfiguration process is similar.
To split the personal sections table so that it resembles the design of the first layout table you added and move content from columns to rows, follow these steps.
Rearrange the personal section layout table
- Click the Address label to select the table, move the mouse pointer slightly above the second column (where it turns into a downward-pointing arrow), and click to select all cells in the second column.
- Choose Table, Split Cells to open the Split Cells dialog box.
- Set the Number Of Columns to 4, and clear the Merge Cells Before Split check box, as shown here.

- Click OK to split the cells, and adjust the width of the columns to match approximately the width of the labels, text boxes, and empty column of the upper table.
- Select the City label and its text box, press Ctrl+X to cut the selection to the Windows Clipboard, click in row 1 of the fourth column (D), and press Ctrl+V to paste the two controls.
- Repeat step 5 for the Zip Code label and text box, but paste them below the City row.
- Repeat step 5 for the E Mail label and text box, but paste them below the Zip Code row.
- Cut and paste the State and Phone labels and text boxes into rows 2 and 3 of the left columns.
- Select the three empty table rows, and press Delete to remove them. Your table appears as shown here.

Adding a Row and Merging Content from Another Table
The firstName, lastName, and personal fields are required, so it makes sense to merge the contents of the first two tables. Moving the labels and controls of the first table to the second table also eliminates differences in text alignment between the tables.
To add a new top row to the second table, move the contents of the first table to the newly added row, and delete the first row, follow these steps.
Merge the names and personal tables
- Click the Address label, and choose Table, Insert, Rows Above to add a new row to the table.
- Cut the First Name label (without the colon ) from the first table, and paste it into column A of the second table.
- Repeat step 2 for the Last Name label, and paste it into column D.
- Cut and paste the First Name and Last Name text boxes into columns B and E.
- Click in the first table, and choose Table, Delete, Table to remove it.
- Select the two text boxes that you just moved, open the Properties (Multiple Selection) dialog box, on the Size tab, set the Bottom Padding and Bottom Margin value to 1 pixel, set the Width value to 100 %, and click OK to apply the settings. (Using the Align feature in a table with multiple rows reduces the row height, and text boxes and labels in separate columns align automatically.)
- Adjust the width of the State, Zip Code, and Phone text boxes to accommodate their content. The U.S. Postal Service probably will appreciate your observance of their trademark by changing Zip Code to ZIP Code.
- Add a caption in one of the empty rows above the table, as shown here.
- Delete any remaining empty lines above the table, and save your changes.
Using an Optional Section with a Layout Table
Adding the optional business group to the form shows you how to add an optional section without controls to the repeating section and then add a layout table with controls to the optional section.
To add an optional section with a layout table for the business group, follow these steps.
Add the optional section and controls
- Open the Data Source task pane, drag the business group node below the personal group table, and choose Section.
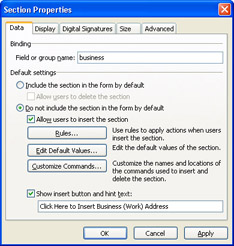
- Right-click the Section tab, and choose Section Properties to open the Section Properties dialog box.
- Select the Do Not Include The Section In The Form By Default option, and select the Allow Users To Insert The Section check box to make the section optional.
- Select the Show Insert Button And Hint Text check box, and type Click Here to Insert Business (Work) Address or something similar in the text box, as shown here. If you don t mark the check box, the optional section placeholder isn t visible. Click OK.
- Drag the business group node to the optional section, and choose Controls In Layout Table to add a two-column, nine-row table. Expand the width of the table to the full width of the optional section.
- Select column B, split the column into four columns (remembering to deselect the merge columns option), adjust the column widths, and relocate label/text-box pairs as you did earlier in the section Splitting Table Cells and Moving Cell Contents. Look ahead to Figure 5- 4 for layout guidance.
- State and ZIP Code labels and resized text boxes fit within a single right column, so split row 3, column E into three columns, and move these two label/text-box pairs to the split cells.
- Delete the four empty rows, add a caption, reduce the height of the optional section and repeating section, and drag the bottom of the master table to the bottom of the repeating section.
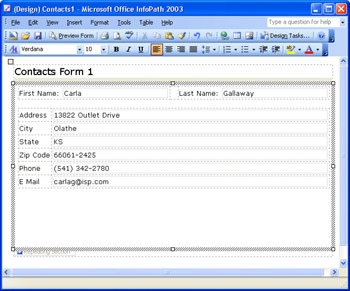
- Save your changes, and click Preview Form to check your work so far. Figure 5-2 shows the preview with the optional section added.
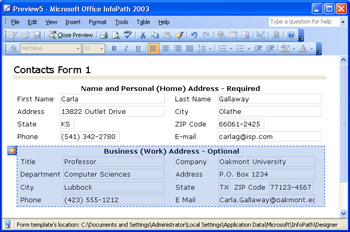
Figure 5-2: This preview shows the Contact1.xsn template s final design.
The examples in this chapter illustrate layout and formatting techniques but don t duplicate topic coverage in previous chapters, such as specifying required fields and testing templates. However, it s a good practice to verify that the forms you create with a new design methodology generate the data document you re expecting and that repeating sections merge correctly. To perform the test, create two forms using the default data, and then merge them to verify that all fields of repeating sections appear in the merged document.
| Note |
Using the sample source and merged files |
Adding Table Borders
At this point, the form you ve produced is short on graphic accouterments. You can spiff up the form a bit by adding borders to your tables. Adding borders, like adding dividing lines, aids users in identifying specific form sections. You also can add cell divider lines.
Following are methods for adding specific types of borders to the tables you added to the Contacts1.xsn template:
- To add a border around the master form, click the master table s selection handle at the upper left of the table, and choose Table, Borders and Shading. Then click the Outline button, and select a border width, such as 2 1/4 points. For each border that you want make different, click it and make the changes. (If you don t click the four outside border buttons , the width remains the default 1 point.) Borders around the entire table don t contribute to usability; add them only if they re needed to conform to graphic standards.
- Use the same technique to add an outside border to an individual table, but reduce the width to 1 1/2 points or fewer. To improve readability, set label cell Left Padding to 3 pixels.
- When you add the border around a master form with a title, the light gray border under the title disappears. To restore it, add a horizontal, 6-point, light gray inside border to the master form. It s also a good design practice to add a space in front of the title text.
- If you decide to add inside (cell) borders, accept the default 1-point width.
Figure 5-3, on the next page, illustrates that adding borders around all table elements leads to a harsh appearance and contributes little or nothing to the form s usability. (This version is Contacts1Borders.xsn.)
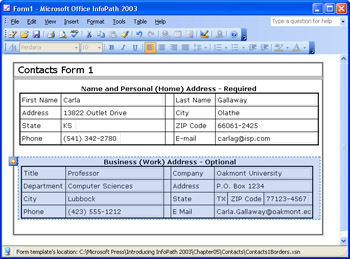
Figure 5-3: This version of the Contacts1 form has every possible border added.
Working with Repeating Tables
The Status Report form and most other sample InfoPath forms include repeating tables. The form examples you ve worked with so far in this book don t have sections that suit repeating tables well because most text boxes contain lengthy content. Sales orders, invoices, and similar business documents include line items that lend themselves to display in repeating tables. As an example, a sales order created from a query against the Access Northwind database s Orders and Order Details tables includes order-specific information and multiple line items. The line items include several numeric data types, which give you the opportunity to explore InfoPath s numeric formatting features and receive a preview of calculating sums with expression boxes.
Creating a Data Source from an Attribute Centric Data Document
The source document for the repeating table exercise is a modified data document generated by the Northwind Traders Order Entry and Editing Form that you saw in Figure 1-6 of Chapter 1, Presenting InfoPath 2003. InfoPath generates complex attribute-centric XML data documents from Microsoft Access and SQL data sources, as you ll discover in Chapter 13, Connecting Forms to Databases.
All data documents you ve seen so far are element-centric XML, which uses element values to hold the data and attribute values for metadata. (The common definition of metadata is data about data, such as the dateAdded and dateUpdated attribute values of the Chapter 4 ContactsCh4.xml data document.) Attribute-centric XML delivers the data as attribute name/value pairs. For this example and those in Chapter 13, the attribute name is the field name of the table specified by the element name . Figure 5-4 shows the 11072.xml data source document in Microsoft Internet Explorer 6.
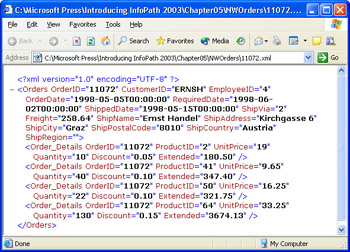
Figure 5-4: This attribute-centric data document was generated from the Northwind Orders and Order Details tables. An underscore substitutes for the space in the Order Details table name.
Compare the attribute-centric structure of 11072.xml with the element-centric version of the same Northwind database records in Figure 5-5. Access 2003 exported the records for order 11072 to the 10072EC.xml file. The _x0020_ element of the Order_x0020_Details repeating group substitutes for the space in the Order Details table name, and the field that s equivalent to the Extended attribute is missing. Both files are in the C:Microsoft PressIntroducing InfoPath 2003Chapter05NWOrders folder. The following example uses an attribute-centric source document to show you how to create a repeating table from an attribute-centric source document s repeating elements.
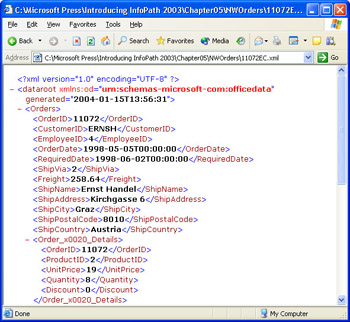
Figure 5-5: This is part of the element-centric version of the Orders and Order Details records for Northwind order 11072.
| Note |
Avoiding attribute-centric documents |
To create a data source from 11072.xml, follow these steps.
Create the attribute-centric data source
- Close and reopen InfoPath, click Design A Form in the Fill Out A Form dialog box, and in the Design A Form task pane, click New From XML Document Or Schema.
- Select C:Microsoft PressIntroducing InfoPath 2003Chapter05NWOrders 11072.xml as the source document for the form, and use default values for the form.
- From the Data Source list in the Data Source task pane, drag the Orders node, which represents an individual document, to the work area, and choose Controls In Layout Table. InfoPath adds controls from the Orders table fields in a sequence unrelated to their order in the source document and the Order_Details line items as an empty, unlabeled bulleted list.
- Delete the unusable Bulleted List in the bottom right table cell .
- In the Data Source list, right-click the Order_Details repeating field (element) node, and choose Repeating Table to add the repeating table below the Orders table. Friendly field names appear as bold labels in the repeating table s header row. Again, InfoPath adds the attributes in an apparently random sequence to the table.
- Delete the Order Details label and text box in the rightmost table cell. Removing the Order Details element in the table allows new line items to be added.
- Select and cut the Extended label, paste it into the header of the rightmost empty cell, and then cut and paste the text box under the label. You must cut and paste labels and text boxes of repeating tables in separate operations.
- Repeat steps 6 and 7 for the Order ID label and text box, but place them in the leftmost empty cells .
- Move the Unit Price label and text box one column to the right, and then do the same for the Product ID pair.
- Finally, move the Quantity pair to column B and delete the empty column.
- Readjust the column widths, as shown here.
- Choose File, Properties, to open the Form Properties dialog box, type Northwind Order Entry Test in the Form Name text box, and click OK.
- Press Ctrl+S or click Save, and save your form as NWOrderEntry.xsn in a new My DocumentsInfoPathNWOrders folder.
Changing Data Types and Rearranging the Orders Table
You read in Chapter 4 that, unlike the Microsoft XSD Inference 1.0 tool, InfoPath doesn t attempt to infer data types from the data in source documents. This means you must change the data type of each date and numeric field manually. When you change the data type, you lose default values, if present. You also have the option of applying the techniques you learned earlier in the chapter to coalesce the Orders table into fewer rows.
To change the field data types and add new default values, do the following.
Change the field data types
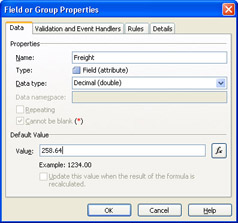
- In the Data Source list, right-click the Freight node and choose Properties to open the Field or Group Properties dialog box.
- Choose Decimal (double) from the Data Type list, type 258.64 as the Default Value (as shown here), and click OK. (You lose the original default values when you change the data type, and adding temporary default values makes designing and testing the form easier.)
- Repeat steps 1 and 2 for the Ship Via (Data Type = Whole Number (integer); Default Value = 2), OrderID (Data Type = Whole Number (integer); Default Value = 11072), and Employee ID (Data Type = Whole Number (integer); Default Value = 4) fields.
- Repeat steps 1 and 2 for the three date fields, selecting Date (date) as the Data Type, and typing 5/5/1998, 6/2/1998, and 5/15/1998 as the default values for the OrderDate, RequiredDate, and ShippedDate, respectively.
- Change Quantity and ProductID to Whole Number (integer) with defaults of 10 and 2, respectively. (InfoPath changed the data type of the OrderID field to integer when you completed step 3; don t add a default value to this field.)
- Change Unit Price, Discount, and Extended to Decimal (double) with defaults of 19.00, 0.05, and 180.50, respectively.
- Press Ctrl+S to save your changes.
If you have the patience, rearrange the Orders table to two sets of columns with labels and text boxes that match the sequence of the attributes in Figure 5-4, and change the three date text boxes to date picker controls. After about 10 minutes of heavy-duty cutting and pasting, your table appears as shown in Figure 5-6.
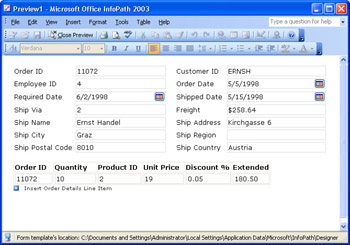
Figure 5-6: The Orders and Order Details tables appear as shown here after considerable time and energy spent moving cells.
Specifying a Default Value from Another Field Value
SP-1 The InfoPath Insert Formula feature lets you assign a value from one control (the source) as the default value of other controls for fields of the same data type (targets). When you update the source control s value, target controls update in unison . As an example, the Order ID values in the repeating table must correspond to the Order ID value of the Orders group. If you change the Order ID in the layout table, existing and added Order Details rows must receive the new Order ID value. The value you set in the source control overrides default text box and data source values. To give the Insert Formula feature a test, follow these steps.
Assign the master Order ID value to Order Details elements
- Right-click the empty Order ID text box in the Order Details repeating table, and choose Text Box Properties to open the Text Box Properties dialog box.
- Click the function (fx) button under the Default Values heading to open the Insert Formula dialog box.
- Click the Insert Field or Group button to open the Select A Field Or Group dialog box.
- Scroll to and select the OrderID attribute field of the Orders group, as shown on the next page.

- Click OK to close the dialog box and return to the Insert Formula dialog box, which displays an abbreviated XPath expression, @OrderID that points to the selected attribute field, as shown here.
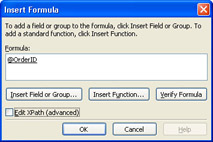
- Select the Edit XPath check box to display the full XPath expression for the attribute value, /../..@OrderID , click OK to close the dialog box and copy the abbreviated expression to the Default Value text box, and click OK again to close the Text Box Properties dialog box.
- Click Preview Form, and change the Order ID value in the layout table to another number to update the Order ID values in the repeating table.
- Click the Insert Item button or link to add a new Order Details item, and verify that the new row uses the same default value.
- Close the preview, and save your changes.
Using the Insert Formula Feature to Calculate Default Values
SP-1 The Insert Formula feature makes it easy to write XPath expressions for computing numeric field values, such as the extended amounts for order or invoice line items. The Extended field in the Order Details section is a good candidate for demonstrating this capability.
To add a calculated default value ”Quantity * Unit Price * (1 - Discount) ”for the Extended field, follow these steps.
Calculate the extended value of Order Details items
- Right-click the Extended text box in the Order Details repeating table, and choose Text Box Properties to open the Text Box Properties dialog box.
- Click the function button to open the Insert Formula dialog box, click the Insert Field or Group button to open the dialog box, and double-click the Quantity field to add it to the Formula text box.
- Type * after the @Quantity expression, and repeat step 2, but double-click the UnitPrice field.
- Type *(1- after the @UnitPrice expression, and repeat step 2, but double-click the Discount field, and type ) after the @Discount expression. Your Formula text box appears as shown here.
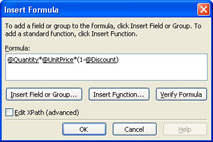
- Click Verify Formula to check your entry, click OK to insert the abbreviated XPath expression in the Default Value text box, and click OK to close the dialog box.
- Open a preview; alter Quantity, Unit Price, and Discount values to verify the calculated default value; and save your form design changes.
Additional decimal values that sometimes appear are the result of rounding errors, which you will learn to disguise in the next section.
Formatting the Repeating Table s Numeric Text Boxes
The XML Schema specification doesn t provide a currency or percentage data type, but InfoPath lets you format the text boxes for entering currency and percentage values. Special numeric formatting is available for the Decimal (double) data type only. Formatting doesn t affect the element or attribute values of the XML data document.
To format the Unit Price and Extended text box for currency (US$ for this example) and the Discount text box as percentage, follow these steps.
Format text boxes bound to decimal fields
- Right-click the Unit Price text box, choose Text Box Properties to open the Text Box Properties dialog box, and click Format to open the Decimal Format dialog box.
- Select the Currency option, and select 2 from the Decimal Places list, as shown here. (The Auto Decimal Places option doesn t add trailing zeros to integer values.) Click OK twice to close the dialog boxes.

- Repeat steps 1 and 2 for the Extended text box.
- Repeat steps 1 and 2 for the Discount text box, but substitute Percentage and 0 Decimal Places in step 2.
- Save your form.
Figure 5-7 shows the repeating table with numeric formatting added. InfoPath doesn t add a % symbol for percentage values; adding % before or after the Discount label lets users know the value is a percentage.
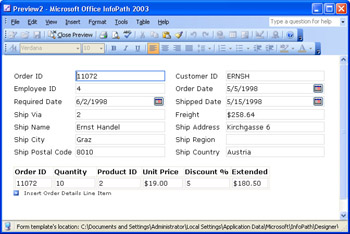
Figure 5-7: This preview shows text box values formatted for U.S. currency and percentage.
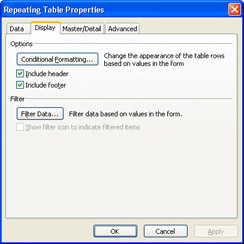
Summing Numeric Values in a Table Footer
Repeating tables have an optional footer that s useful for displaying summarized numeric data. You add a footer by selecting the Include Footer check box on the Display tab of the Repeating Table Properties dialog box. As you learned in Chapter 3, expression boxes use XPath sum( ) expressions to calculate the totals and aren t bound to fields. Chapter 6, Adding Basic Controls and Lists, covers expression box controls in detail.
To add a table footer and total the Quantity and Extended fields, follow these steps.
Add a table footer with total values expression boxes
- Right-click the Repeating Table tab, choose Repeating Table Properties to open the Repeating Table Properties dialog box, and click the Display tab.
- Select the Include Footer check box, as shown here, and click OK to add the footer row.
- Press Ctrl+F1 to display the task pane, if it s not open, and click the Controls link.
- Scroll to the Expression Box item in the Insert Control list, and drag the control to the Quantity footer cell. Field name identifiers appear for all form fields, and the Insert Expression Box dialog box opens.
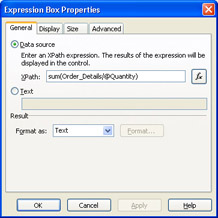
- Click the function button to the right of the text box to open the Insert Formula dialog box, click Insert Field or Group to open the Select A Field Or Group dialog box, select Quantity under the Order_Details node, and click OK to add the XPath expression that points to the Quantity field to the Insert Expression Box s XPath text box.
- Prefix the XPath expression with sum(, and add a closing parenthesis after @Quantity , as shown here. (XPath expressions are case sensitive; typing Sum(, for example, causes an error.) Click OK twice to close the two dialog boxes.
- Repeat steps 4 through 6 for the Extended field.
- Right-click the Extended expression box, choose Expression Box Properties to open the Expression Box Properties dialog box, select Decimal from the Format As list, click Format, select Currency, 2 Decimal Places, and click OK twice to format the Extended total.
- Save your form.
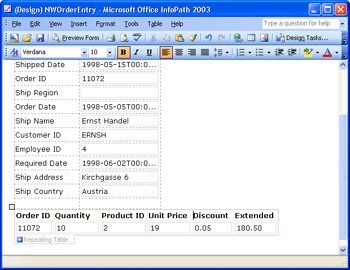
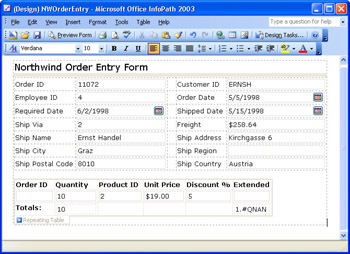
The generalized XPath expression sum(groupName/@attributeName) , which appears in the Insert Expression Box s text box, totals attribute values in repeating sections or tables. Omitting the @ symbol totals element values. Figure 5-8 shows your form with the two added expression boxes. The Extended total is 1.#QNAN, which is InfoPath s code for not a number, in design mode, because the individual values aren t calculated until you open a preview or a form.
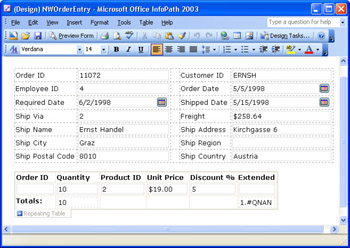
Figure 5-8: This repeating table footer contains expression boxes for summing the Quantity and Extended fields.
Test the expression boxes you added by clicking Preview Form, selecting the repeating table, and pressing Ctrl+Enter to add a few Order Details entries, as illustrated in Figure 5-9.
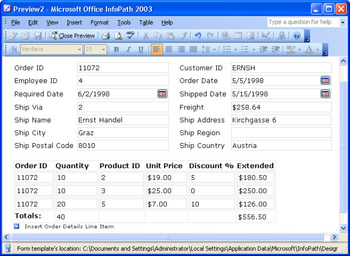
Figure 5-9: This form preview shows totals for the four default and one added Order Details entries.
Create, save, and use Notepad to compare a test form with the original data document to ensure that the two documents have identical structures. The test form opens with a single default Order Details item, so the number of OrderDetails elements will differ from the original. The only structural difference between the original and the InfoPath form (other than the PIs) is the substitution of element closing tags for the shortcut element closing syntax of the original document.
Adding a Master Table Ex Post Facto
The design of the NWOrderEntry form is decidedly bland , so you might want to spruce it up with a master table and title. This is a slightly chancy process, so save and make a backup copy of NWOrderEntry.xsn before you embed the existing tables and controls in a master table.
To add a master table and embed the tables and their controls, follow these steps.
Insert a table with a title and all form controls
- Open NWOrderEntry.xsn in design mode, press Ctrl+A to select all form elements, and press Ctrl+X to cut them to the Windows Clipboard, leaving an empty work area.
- Press Ctrl+F1 to open the task pane, if its not open, click the Layout link, click Table With Title to add a single-column table to the form, and close the task pane.
- Type Northwind Order Entry Form as the title.
- Click the bottom cell of the table to remove the prompt, and press Ctrl+V to paste the Windows Clipboard contents into the cell .
- Drag the right edge of the master table to the right edge of the embedded Orders table.
- Add finishing touches to your form, such as removing the empty line at the top of the form, formatting the Freight field as currency, and adding a Totals: label to the repeating tables footer, as shown here.
- Save your form.
Drawing a Table
SP-1 The InfoPath Tables toolbar contains a Draw Tables button that enables you to design specialized tables by drawing freehand. This feature is similar to the Draw Tables feature of Microsoft Word but the behavior of the pencil differs from the pencil in the Word version. As mentioned in the Adding Tables to Rich Text Boxes section in Chapter 2, drawing tables ” especially layout tables ”isn t an easy process for anyone other than professional Web page designers. One potential application for drawing freehand tables is to trace data entry locations from a temporary form background image that you create by scanning a paper form.
Following are basic instructions for drawing InfoPath tables:
- To add a table to the working area, click the Draw Table button to enable the pencil cursor, and drag the pencil diagonally to create a table in the overall size you want.
- To add a vertical cell divider, drag the pencil vertically. Once you ve added a table, dragging the pencil diagonally does nothing.
- To add a horizontal cell divider, drag the pencil horizontally.
- To disable the pencil cursor and return to the insertion point cursor, double-click the table twice or click the Draw Table button.
- To add borders as you draw the table, open the toolbar s Border Style list, select the type of border to add, and open the Border Width list to specify the thickness .
- To remove a cell divider, click the Eraser button, hold the left mouse button down and drag the mouse over the divider until you highlight it, and then release the mouse button.
- To delete a table, click its selection button with the selection (arrow) cursor, and press Delete.
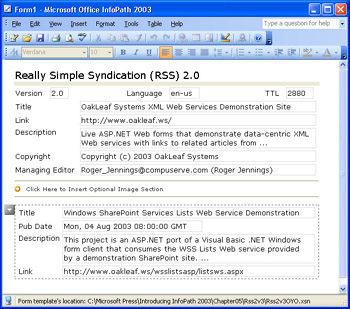
Other table-editing features, such as changing the size or position of cell dividers , are similar to those for layout tables. You also can apply split, merge, and other table-menu operations to freehand tables. Figure 5-10 shows a freehand table with a few sample RSS 2.0 labels and text boxes and the pencil cursor selected.
Figure 5-10: Use the Draw Tables pencil cursor to draw a table and add cell dividers.
Summary
Layout tables are one of InfoPaths most powerful form-design features. A single- column layout table with a heading row and a second row to contain all other form elements is the most common starting point in producing InfoPath forms.
Conventional sections with controls add labels and text boxes automatically but require manual formatting operations to place label/text-box pairs on a single line and align text box edges to achieve an attractive form layout. InfoPaths layout tables for data source groups automatically place labels and text boxes in adjacent cells, which eliminates vertical and horizontal text-alignment problems. Automatic label and text box insertion creates a row for each fields label and text box. Placing more than one label/text-box pair in a row requires splitting table cells followed by cut-and-paste operations to reduce the number of rows.
Repeating tables are preferable to repeating sections for entering numerical data stored in fields of repeating groups because they conserve valuable real estate in the form. Repeating table footers can hold expression boxes to display the sums of numeric columns . The Insert Formula dialog box simplifies calculating expression box and default field values using XPath expressions.
InfoPath lets you use a pencil tool to draw custom tables that arent easy to create by specifying the number of rows and columns of a custom layout table. In most cases, youll find that using standard or custom layout table selections from the Layout task pane are a better starting point for conventional InfoPath forms.
Q A
|
1. |
Is it better to use a separate one-row title table with individual layout tables or to embed layout tables in the second row of a title table? |
|
|
2. |
Is there any limit to the depth of nesting layout tables? |
|
|
3. |
Why is element-centric XML preferred over attribute-centric XML? |
|
|
4. |
Can I add controls other than text boxes to the data rows of a repeating table? |
|

Answers
|
1. |
The only advantages of a two-row title table with nested sections, layout, and repeating tables are the option to add a border around the entire form and apply a background color to only the active area of the form. An independent title table lets you copy it to the other forms you create and modify it as necessary. An independent title table probably is a better approach when you ve added a logo graphic or applied other special formatting to titles that are common to all or most forms. |
|
2. |
The only limitation on nesting depth is space on the form to accommodate controls at the lowest level in the nesting hierarchy. Assuming that group layout tables are embedded in a master layout table for the form, the practical limit is likely to be three or possibly four nesting levels. |
|
3. |
A basic purpose of XML is to create structured or semi-structured documents with human- readable content. Attributes, because they re contained within element tags, are considered part of the structure of documents, not their content. Human-readable content belongs between opening and closing element tags. The relatively minor reduction in size of an attribute-centric versus an element-centric document doesn t justify intermingling structural and content information. |
|
4. |
Yes, if the fields have appropriate XML schema data types, such as date , dateTime , or boolean , which bind to date picker or check box controls. Multiple numeric fields bound to a set of option buttons is another suitable choice. InfoPath s sample Applicant Rating form illustrates the use of option buttons in a layout table, but they re sometimes also useful in repeating tables to display and calculate total scores in footer expression boxes. |
On Your Own
Heres an additional exercise to test your layout skills:
- Create a new RSS 2.0 form based on the Rss2v3.xml source document in your C:Microsoft PressIntroducing InfoPath 2003Chapter05Rss2v3 folder that duplicates this form.
- Start by adding a single table with a title, and then add a layout table with controls for the channel group in the empty row of the master table.
- Add a horizontal line, an optional section for the image group, and a layout table with controls for the group.
- Add a horizontal line, a repeating section for the item group, and a layout table with controls for the group.
- Split cells , move the controls to positions shown in the step 1 screen capture, and delete empty rows and lines. Change the two Description text boxes from single-line to multi-line.
- Optionally, add borders to tables.
- Save and test your form.
Part I - Introducing Microsoft Office InfoPath 2003 SP-1
Part II - Designing InfoPath Forms
- Creating Forms
- Laying Out Forms
- Adding Basic Controls and Lists
- Formatting Forms
- Validating Form Data
- Working with Advanced Form Elements
- Adding Views to a Template
- Setting Form Template and Digital Signing Options
- Publishing Form Templates
Part III - Working with Databases and Web Services
Part IV - Programming InfoPath Forms
EAN: 2147483647
Pages: 248
- Integration Strategies and Tactics for Information Technology Governance
- Linking the IT Balanced Scorecard to the Business Objectives at a Major Canadian Financial Group
- A View on Knowledge Management: Utilizing a Balanced Scorecard Methodology for Analyzing Knowledge Metrics
- Measuring ROI in E-Commerce Applications: Analysis to Action
- Governing Information Technology Through COBIT
