Role-Based Security
| Security and authentication involve a lot more than encryption. How do you make sure that the user who is running your application is authorized to do so? What if only certain users are allowed to save, or to change specific settings (such as a discount rate), or to use some part of the application? Role-based security lets you establish who is running your application, determine whether they are in a particular group, or even prevent them from using parts of the application if they are not in the group you want. Determining IdentityThe System::Security::Principal namespace contains classes that hold information about the user who is running the application (the identity) and extended details, such as Windows groups, about that identity (the principal). You should know that not all applications run under the identity of the user who runs them; for example, when you load an ASP.NET Web page, the code might run with your identity, or might run with a general anonymous privilege. When you run a console or WinForms application, it runs under your identity unless the application has arranged otherwise . Here's a simple console application called Roles that demonstrates Windows identity and principal concepts: using namespace System; using namespace System::Security::Principal; // This is the entry point for this application int _tmain(void) { WindowsIdentity* Identity = WindowsIdentity::GetCurrent(); WindowsPrincipal* Principal = new WindowsPrincipal(Identity); //Print the values. Console::WriteLine("Principal Values for current thread:"); Console::WriteLine("Name: {0}", Principal->Identity->Name); Console::WriteLine("Type: {0}", Principal->Identity->AuthenticationType); Console::WriteLine("IsAuthenticated: {0}", __box(Principal->Identity->IsAuthenticated)); Console::WriteLine(); Console::WriteLine(); Console::WriteLine("Identity Values for current thread:"); Console::WriteLine("Name: {0}", Identity->Name); Console::WriteLine("Type: {0}", Identity->AuthenticationType); Console::WriteLine("IsAuthenticated: {0}", __box(Identity->IsAuthenticated)); Console::WriteLine("IsAnonymous: {0}", __box(Identity->IsAnonymous)); Console::WriteLine("IsGuest: {0}", __box(Identity->IsGuest)); Console::WriteLine("IsSystem: {0}", __box(Identity->IsSystem)); Console::WriteLine("Token: {0}", Identity->Token.ToString()); return 0; } The first line of this code gets the identity under which the application is running. That should be you, because the application doesn't contain any code to change the identity. Then it gets a principal based on that identity. The remainder of the code illustrates some useful properties of the identity and principal objects. Notice the use of __box to wrap up the Boolean values, and the ToString method to convert nonstring values to strings. When you run this application, the output should resemble this: Principal Values for current thread: Name: YOURDOMAIN\you Type: NTLM IsAuthenticated: True Identity Values for current thread: Name: YOURDOMAIN\you Type: NTLM IsAuthenticated: True IsAnonymous: False IsGuest: False IsSystem: False Token: 304 Once you know who is running your code, you can write security code of your own, comparing the name of the identity or principal with a list of authorized users that you have stored somewhere. But that will require you to write code to manage user lists: adding and deleting users, changing their authority code, and so on. It's a lot less work to leverage Windows groups. Even if they aren't in use by the people who'll be running the application, it's less work to teach people to use Windows groups than to write your own equivalent administration section. Testing for RolesA role is a general concept in identity-based authentication, and Windows groups are one way to assign and test roles. (There are others, such as COM+ roles, that are out of scope for this chapter.) A role generally corresponds to a job title, such as a manager, or a privilege level, such as an administrator. Some roles contain only one user, others many more. A user can be in any number of roles.
This code determines whether a user is in a particular Windows group: String* role = "YOURDOMAIN\Domain Users"; if (Principal->IsInRole(role)) Console::WriteLine("You are a domain user"); else Console::WriteLine("You are not a domain user"); role = "BUILTIN\Administrators"; if (Principal->IsInRole(role)) Console::WriteLine("You are an administrator"); else Console::WriteLine("You are not an administrator"); role = "YOURMACHINE\Experts"; if (Principal->IsInRole(role)) Console::WriteLine("You are an Expert on this machine"); else Console::WriteLine("You are not an Expert on this machine"); When this code runs, the output is similar to this: You are a domain user You are an administrator You are not an Expert on this machine Notice the three prefixes in the role strings:
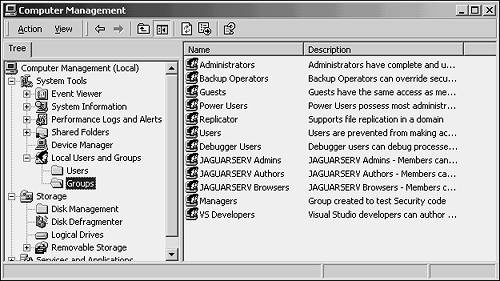
You can test this code by creating a local group using Computer Management, and adding yourself to it. Right-click My Computer on your desktop and choose Manage. Expand the Local Users and Groups section, and then click Groups. Figure 13.1 shows a list of groups on a typical machine. Figure 13.1. You can create users and groups on your own machine. Choose Actions, New Group to create a group. Name it Experts, and click Add to add users to it. Add yourself. Click Create to finish creating the group. Then log off Windows and log back on to update your security profile, and run the application again. Now you should be told you are an Expert. (And don't forget about the logging off and logging on. You'll do a lot of that when you're testing security code.) You can use tests of IsInRole() to decide whether to enable or disable a button in a graphical user interface, or to decide whether some action the user has taken should be logged. Once groups have been set up that represent that various kinds of users in your system, you can check to see which kind of user (what authority level) is running the code. One approach is to throw a security exception when the wrong kind of user tried to do something. If you want to do that, you're better off using permissions sets than coding the test and the throw by hand. Using Permissions SetsA permissions set is a representation of what a particular user or role is allowed to do. Permission sets can be used imperatively or declaratively , the documentation likes to say, which means you can either call a function or add an attribute. To demonstrate the imperative use of permissions set, add an unmanaged (generic C++) class to the Roles project and call it AccessControlled . That generates this class definition: class AccessControlled { public: AccessControlled(void); ~AccessControlled(void); }; Edit the implementation file to look like this: #include "StdAfx.h" #using <mscorlib.dll> #include "accesscontrolled.h" using namespace System; using namespace System::Security::Permissions; using namespace System::Security::Principal; AccessControlled::AccessControlled(void) { AppDomain::CurrentDomain->SetPrincipalPolicy( PrincipalPolicy::WindowsPrincipal); //String* role = "BUILTIN\Administrators"; String* role = "YOURMACHINE\Experts"; PrincipalPermission* p = new PrincipalPermission(0,role); p->Demand(); } AccessControlled::~AccessControlled(void) { } The first line of this constructor is vital : Without it the code will compile but will always react as though you are not in the group. The call to SetPrincipalPolicy() instructs the framework to create WindowsPrincipal objects by default. The code creates a PrincipalPermission object that represents being in a particular role. (The role names used in this example follow the same rules as those used for IsInRole() .) The first parameter is 0 here, to indicate that any user identity is acceptable. You can pass in a string representing a specific user if you want, in which case you are preparing to demand that a particular user be running the application and that the user be in the group. Having created a PrincipalPermission object, the code goes on to demand that the individual running this application meet the conditions in that object. If the demand fails, a security exception will be thrown. Add these lines to the main function in Roles.cpp to create an AccessControlled object, triggering a call to the constructor: AccessControlled* ac = new AccessControlled(); Console::WriteLine("created the access controlled object"); Remember to add an #include statement at the top of Roles.cpp (after the one already there) to bring in accesscontrolled.h. When you are a member of the Experts group on your machine, this code runs without incident. When you are not, it throws a SecurityException , like this one: Unhandled Exception: System.Security.SecurityException: Request for principal permission failed. at System.Security.Permissions.PrincipalPermiss ion.Demand() at AccessControlled.__ctor(AccessControlled* ) in e:\roles\accesscontrolled.cpp:line 15 at main() in e:\roles\roles.cpp:line 54 While testing, remember you must sign off and sign on again for your new group membership to take effect. The other way to use PrincipalPermission is as an attribute, declaratively. This requires the class to be garbage collected, because only managed classes can have attributes. Add another generic class called ManagedAccessControlled to the project and edit the class definition to read like this: using namespace System::Security::Permissions; [PrincipalPermissionAttribute(SecurityAction::Demand, Role = "BUILTIN\Administrators")] __gc class ManagedAccessControlled { public: ManagedAccessControlled (void); ~ManagedAccessControlled (void); }; Edit the main function again, but the call to SetPrincipalPolicy() can't be in the constructor, because it must be called before the attempt to construct the AccessControlled object. Add these lines to the main (and don't forget the #include at the top): AppDomain::CurrentDomain->SetPrincipalPolicy(PrincipalPolicy::WindowsPrincipal); ManagedAccessControlled* mac = new ManagedAccessControlled(); Console::WriteLine("created the managed access controlled object"); The constructor itself does not need any security code. No one can create or use a ManagedAccessControlled object unless they are in the specified role. You can use role-based security throughout your applications, determining whether a user is in a role or not, even preventing access to parts of the application by unauthorized users. Your class library will be more secure if you use the techniques from this section to control who uses the application. |
EAN: 2147483647
Pages: 141
- ERP Systems Impact on Organizations
- ERP System Acquisition: A Process Model and Results From an Austrian Survey
- The Effects of an Enterprise Resource Planning System (ERP) Implementation on Job Characteristics – A Study using the Hackman and Oldham Job Characteristics Model
- Distributed Data Warehouse for Geo-spatial Services
- Intrinsic and Contextual Data Quality: The Effect of Media and Personal Involvement