Flylib.com

Books Software


Unit Testing


Unit Testing

To test the Encoder/Decoder application:

  1. Set the path of the bin directory of J2SDK by executing the following command at the command prompt:

    set path=%path%;D:\j2sdk1.4.0_02\bin;
    
  1. Set the classpath of the lib directory of J2SDK by executing the following command at the command prompt:

    set classpath = %classpath%;d:\j2sdk1.4.0_02\lib;
    
  1. Copy the EncoderDecoder.java and EncodingSchemes.java files to a folder on your computer. On the command prompt, use the cd command to move to the folder where you have copied the Java files. Compile the files using the following javac command:

    javac *.java
    
  1. To run the Encoder/Decoder application, specify the following command at the command prompt:

    java EncoderDecoder
    

    The above code opens the main window of the Encoder/Decoder application, as shown in Figure 8-2.

  1. Click the Browse button and select the test.txt file from the C drive of the computer.

    Figure 8-4 shows the contents of the test.txt file:

    click to expand: this figure shows the contents of the test.txt file in the text to encode text area.
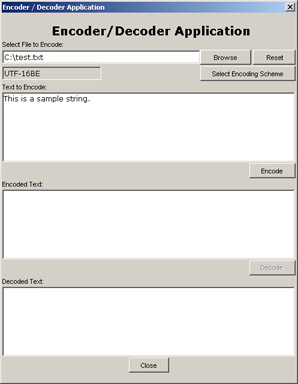
    Figure 8-4: Displaying test.txt File in the Encoder/Decoder Application

  1. Click the Select Encoding Scheme button to open the Encoding Schemes dialog box and select the UTF-16BE encoding scheme.

  2. Click the OK button of the Encoding Schemes dialog box.

  3. Click the Encode button to encode the test.txt file using the UTF-16BE encoding scheme, as shown in Figure 8-5:

    click to expand: this figure shows the encoded file in the encoded text text area of the encoder/decoder application.
    Figure 8-5: Displaying Encoded File in the Encoder/Decoder Application

  1. Click the Decode button to decode the encoded file, as shown in Figure 8-6:

    click to expand: this figure shows the decoded file in the decoded text text area of the encoder/decoder application.
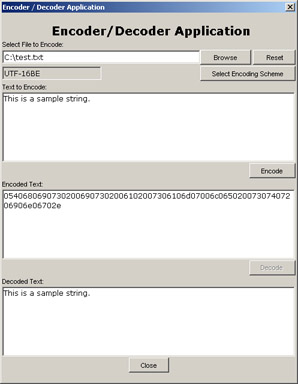
    Figure 8-6: Displaying Decoded File in the Encoder/Decoder Application

  1. Click the Reset button to reset the Encoder/Decoder application.

  2. Specify the text you want to encode in the Text to Encode text area, as shown in Figure 8-7:

    click to expand: this figure shows a sample string, this is an encoder/decoder application., in the text to encode text area.
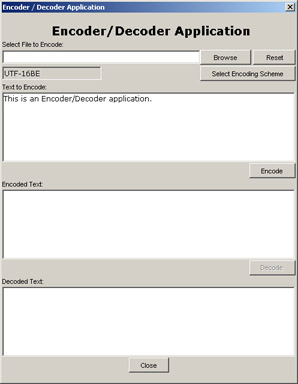
    Figure 8-7: Displaying Text to Encode in the Encoder/Decoder Application

  1. Repeat steps 6 through 9 to encode and decode the text specified in the Text to Encode text area. The results are displayed in Figure 8-8:

    click to expand: this figure shows the original, encoded, and decoded texts in the text to encode, encoded text, and decoded text text areas, respectively.
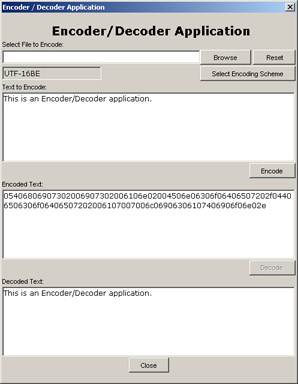
    Figure 8-8: Displaying Encoded and Decoded Text


Index

A-J

API, Chapter 1: Introduction to New Input/Output API, Chapter 2: Creating a Chat Application, Chapter 3: Creating a File Download Application, Chapter 4: Creating a File Search Application, Chapter 5: Creating a Printer Management Application, Chapter 6: Creating a Text Editor Application, Chapter 7: Creating a Network Information Application, Chapter 8: Creating an Encoder/Decoder Application

ByteBuffer, Chapter 2: Creating a Chat Application, Chapter 3: Creating a File Download Application, Chapter 5: Creating a Printer Management Application, Chapter 7: Creating a Network Information Application, Chapter 8: Creating an Encoder/Decoder Application

CharBuffer, Chapter 4: Creating a File Search Application, Chapter 5: Creating a Printer Management Application, Chapter 7: Creating a Network Information Application, Chapter 8: Creating an Encoder/Decoder Application

CLI, Creating the ChatServer.java File

Command Line Interface, Creating the ChatServer.java File

Encoder/Decoder application, Architecture of the Encoder/Decoder Application

Java New Input/Output, Chapter 5: Creating a Printer Management Application

Java SpecificationRequest, Chapter 1: Introduction to New Input/Output API

Java Virtual Machine, ByteBuffer, Chapter 3: Creating a File Download Application

java.awt.print, Chapter 5: Creating a Printer Management Application

java.nio, Chapter 2: Creating a Chat Application, Chapter 3: Creating a File Download Application, Chapter 4: Creating a File Search Application, Chapter 5: Creating a Printer Management Application, Chapter 6: Creating a Text Editor Application, Chapter 7: Creating a Network Information Application, Chapter 8: Creating an Encoder/Decoder Application

java.nio package, The java.nio Package

java.nio.channels, Chapter 5: Creating a Printer Management Application, Chapter 6: Creating a Text Editor Application, Chapter 7: Creating a Network Information Application, Chapter 8: Creating an Encoder/Decoder Application

java.nio.charset, Chapter 7: Creating a Network Information Application, Chapter 8: Creating an Encoder/Decoder Application

Java2 Platform, Standard Edition, Chapter 1: Introduction to New Input/Output API

JComponent class, Implementing the Print Functionality

JSR, Chapter 1: Introduction to New Input/Output API

JVM, ByteBuffer, Chapter 3: Creating a File Download Application

J2SE, Chapter 1: Introduction to New Input/Output API