Connecting with Network Configuration Utilities
Many graphical Red Hat utilities are available that help you connect your computer to a network. Some help you configure various network services. While these utilities are covered in detail in their respective chapters, let s take a brief look at each Red Hat network graphical tool.
This includes the utilities summarized in Table 19.3. Remember, this is an arbitrary list that summarizes the utilities in this section.
| Utility | Function |
|---|---|
| redhat-config-network- druid | Helps you configure a network connection |
| redhat-config-network-tui | Helps you configure a network connection from a text console |
| redhat-config-network | Lists settings associated with configured network adapters |
| redhat-config-httpd | Lets you configure an Apache web server |
| redhat-config-bind | Allows you to set up a DNS server |
| redhat-config-nfs | Helps you configure an NFS server |
| redhat-config-samba | Lets you configure a Samba server |
| Samba Web Administration Tool | Allows you to configure a Samba server through a web-based interface |
Basic Network Configuration
The two basic Red Hat graphical network configuration utilities are redhat-config-network and redhat-config-network-druid . These utilities control the configuration of network devices on your computer.
Start redhat-config-network-druid . Run that command from a graphical command-line interface, or select Main Menu ˜ System Tools ˜ Internet Configuration Wizard. This opens the Add New Device Type window, shown in Figure 19.10.
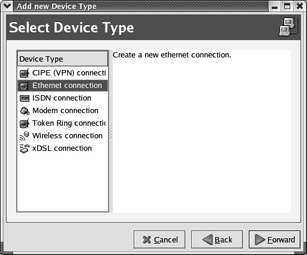
Figure 19.10: Adding a new network device
| |
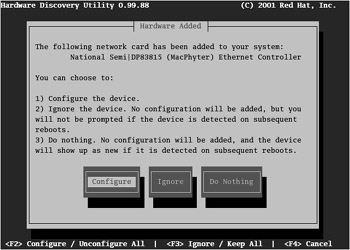
If Red Hat Linux did not detect your network card, try starting the Red Hat Hardware Discovery Utility, also known as kudzu . Sometimes kudzu can help you detect newly installed hardware, including network cards.
It runs automatically during the boot process. However, if you ve just installed a new network card such as a PC Card in a laptop computer PCMCIA slot, you may need to run kudzu again. If it finds something new, it will offer to configure the hardware for you, as shown here.
| Note | See Chapter 21 for instructions for using redhat-config-network-druid to set up a telephone modem. |
| |
In this section, we ll use it to configure a second (undetected) Ethernet connection. Highlight Ethernet Connection in the window and click Forward to continue. This brings you to the window shown in Figure 19.11, where you can review the detected Ethernet card. If Linux has already detected your second network card, you should be home free. Figure 19.11 assumes that Linux did not detect this card. Select Other Ethernet Card and click Forward to continue.
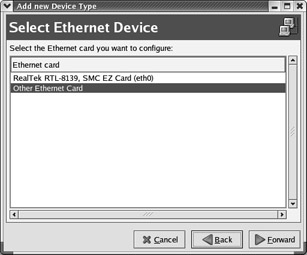
Figure 19.11: Selecting an Ethernet Card
Now you can set up the device driver and hardware addresses associated with this second Ethernet card. Figure 19.12 allows you to specify the driver and hardware resources associated with the new card.
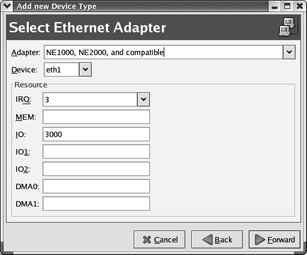
Figure 19.12: Selecting an Ethernet Card
Finally, you can configure the network settings for the new card. As shown in Figure 19.13, you can use a DHCP or BOOTP server. (For more information on DHCP and BOOTP, see Chapter 24 .) The Dialup option normally applies only if you re configuring a telephone modem, and is associated with a telephone modem connection to an ISP.
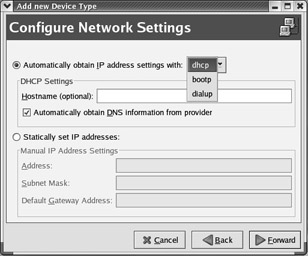
Figure 19.13: IP address settings
Alternatively, you can set up a static IP address. For more information on assigning IP addresses, see Chapter 20 .
Once you ve confirmed the changes, you re taken to the Network configuration window, shown in Figure 19.14. This is the redhat-config-network tool, which you can also access by selecting Main Menu ˜ System Settings ˜ Network.
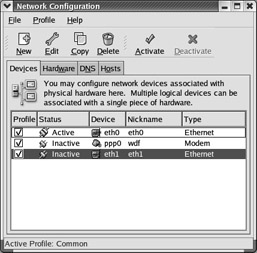
Figure 19.14: Managing a network configuration
When a network card is first configured, it is not active. You may activate it through the boot process, or you can highlight it and click the Activate button, as shown in Figure 19.14. If the configuration that you set up is good, the displayed Status will change from Inactive to Active.
The configuration for each network card is saved in the /etc/sysconfig/networking/devices directory. The configuration file for an Ethernet network card is ifcfg-eth n , where n is the number associated with the card, usually 0 or 1.
| |
You can do more with the Network Configuration window shown in Figure 19.14. As you can see, the window contains three other tabs:
| |
The Hardware tab lists each configured network device.
The DNS tab allows you to set the hostname for your computer, up to three different DNS servers, as well as a DNS search path . The hostname is saved in /etc/sysconfig/network; the DNS server information is saved in /etc/resolv.conf .
The Hosts tab allows you to set up your own database of hostnames or domain names and their corresponding IP addresses. Changes you make are saved in /etc/hosts .
Text-Mode Network Configuration
You can configure networking on your Linux computer from a text-mode console. Start with the redhat-config-network-tui command. As you can see in Figure 19.15, this allows you to set up Ethernet, telephone modem, or ISDN adapter network devices.
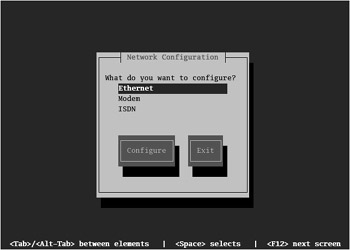
Figure 19.15: Text-mode network configuration
If you want to use this utility to set up an Ethernet connection, highlight that option, press the Tab key to highlight Configure, and then press Enter. This takes you to the Ethernet Configuration window, shown in Figure 19.16. For more information on DHCP, see Chapter 24 ; if you want to set a static IP address, see Chapter 20 for more information.
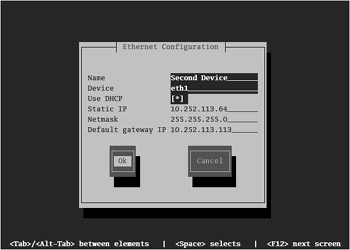
Figure 19.16: Configuring an Ethernet card in text mode
As with the graphical tool, changes are saved in the /etc/sysconfig/networking/devices directory. The configuration file is ifcfg-eth n , where n is the number associated with the card, usually 0 or 1.
If you want to use redhat-config-network-tui to set up a telephone modem, return to the screen shown in Figure 19.15. Highlight the Modem option, press the Tab key to highlight Configure, and then press Enter. This takes you to the Modem Configuration window, shown in Figure 19.17.
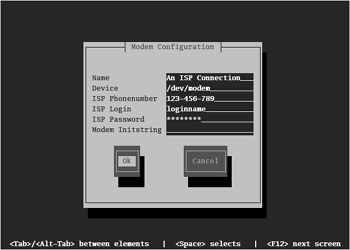
Figure 19.17: Configuring a modem connection
You can set the name of your choice. If your modem was properly detected, it should be linked to /dev/modem . You should get the remaining information from your ISP; you normally do not need to complete the Modem Initstring field.
For more information on each of these options, see Chapter 21 . If your modem is working, changes are saved to the /etc/sysconfig/networking/devices directory. The configuration file is ifcfg-ppp n , where n is the number associated with the modem.
If you want to use redhat-config-network-tui to set up an ISDN adapter, return to the screen shown in Figure 19.15. Highlight the ISDN option, press the Tab key to highlight Configure, and then press Enter. This takes you to the ISDN Configuration window, shown in Figure 19.18.
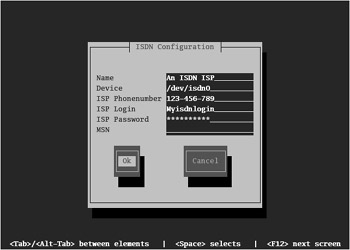
Figure 19.18: Configuring an ISDN adapter
Configure the adapter based on instructions from your ISP; this should include the Multiple Subscriber Number (MSN), normally provided by your ISP. If your ISDN adapter is working, changes are saved to the /etc/sysconfig/networking/devices directory. The configuration file is ifcfg-isdn n , where n is the number associated with the adapter.
| Note | ISDN stands for the Integrated Services Digital Network, an older digital standard for telephones. Consumer ISDN adapters are more popular in Europe; they normally support data transmission rates of 128 or 144Kbps, depending on the system. |
Apache
You can use the redhat-config-httpd utility to configure an Apache server on your computer. Start it from a GNOME desktop by selecting Main Menu ˜ System Settings ˜ Server Settings ˜ HTTP Server. This opens the Apache Configuration window, shown in Figure 19.19. For a detailed description of this utility, see Chapter 30 .
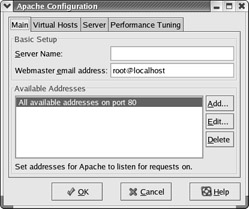
Figure 19.19: The Apache configuration tool
If you ve already configured an Apache server, you ll be able to review the current configuration with this utility; it reads and writes key variables to and from the main Apache configuration file, /etc/httpd/conf/httpd.conf .
Domain Name Service (DNS)
You can use the redhat-config-bind utility to configure a Domain Name Service (DNS) server on your computer. Start it from a GNOME desktop by selecting Main Menu ˜ System Settings ˜ Server Settings ˜ Domain Name Service. This opens the Domain Name Service window, shown in Figure 19.20. For a detailed description of this utility, see Chapter 24 .
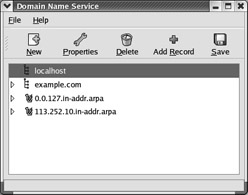
Figure 19.20: The DNS configuration tool
If you ve already configured a DNS server, you ll be able to review the current configuration with this utility; it reads key variables from the main DNS configuration file, /etc/named.conf , as well as associated files in the /etc and /var/named directories.
Network File System (NFS)
You can use the redhat-config-nfs utility to configure a Network File System (NFS) server on your computer. Start it from a GNOME desktop by selecting Main Menu ˜ System Settings ˜ Server Settings ˜ NFS Server. This opens the NFS Server Configuration window, shown in Figure 19.21. For a detailed description of this utility, see Chapter 24 .
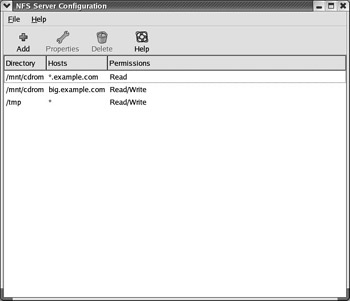
Figure 19.21: NFS Server Configuration
If you ve already configured an NFS server, you ll be able to review the current configuration with this utility; it reads key variables from the main NFS configuration file, /etc/exports .
Samba
There are two different graphical Samba configuration utilities: redhat-config-samba and samba-swat . The first, redhat-config-samba , is a graphical Red Hat tool similar to the others, in this case, for configuring your Linux computer as a Samba server on a Microsoft Windows “based network. Start it from a GNOME or KDE desktop by selecting Main Menu ˜ System Settings ˜ Server Settings ˜ Samba Server. This opens the Samba Server Configuration window, shown in Figure 19.22.
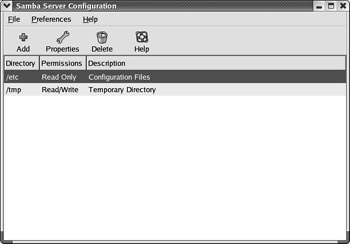
Figure 19.22: Samba Server Configuration
The other tool, developed by the people behind Samba, is a web-based tool that can configure your Linux computer as a Samba server on a Microsoft Windows “based network in quite a bit of detail. Open the browser of your choice and navigate to localhost: 901 . If the right services are active, this opens the Samba Web Administration Tool (SWAT) in the default browser, as shown in Figure 19.23.
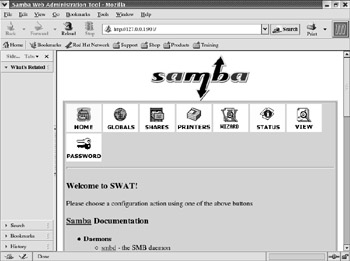
Figure 19.23: Package Management by groups
SWAT works only if you ve installed the samba-swat-* RPM package and have enabled the service in the /etc/xinted.d/swat configuration file.
Both utilities are front ends that can help you configure the main Samba configuration file, /etc/ samba/smb.conf , as well as other configuration files in the /etc/samba directory. For a detailed description of both utilities, see Chapter 29 .
EAN: 2147483647
Pages: 220