Section 6.5. A yum GUI Tool
6.5. A yum GUI ToolThere are some administrators who need the GUI. Visual aids do help some become better administrators. Graphical yum-based tools are currently under development. The only one I've found being actively developed as of this writing is the Yum Extender. For more information, see http://linux.rasmil.dk/yumex/ or http://sourceforge.net/projects/yumex/. The Yum Extender is available from the Fedora Extras repository, as the yumex RPM. A brief examination of the Yum Extender has helped me understand more of what's available from various yum repositories. Note As of this writing, Red Hat developers are working on the Package Updater, also known as Pup, to replace the Red Hat Update Agent. It may also replace the current system-config-packages tool. I cover the Yum Extender because it is already a useful yum GUI tool. And the Fedora selection of a yum GUI tool is subject to change. Because the Yum Extender is still under development, I suspect that a number of the options in this section will change, especially if it is formally adapted as a Fedora package. Therefore, we'll limit the discussion to a brief view of the capabilities of Yum Extender. If you've read the chapter up to this point, everything you see here should be familiar. When installed, you can only run the Yum Extender from the GUI. You can start it with the Applications -> System Tools -> Yum Extender command or with the yumex command in a GUI console. You're prompted for the root password, after which you see the Yum Extender, with currently configured repositories, as shown in Figure 6-9. Figure 6-9. The Yum Extender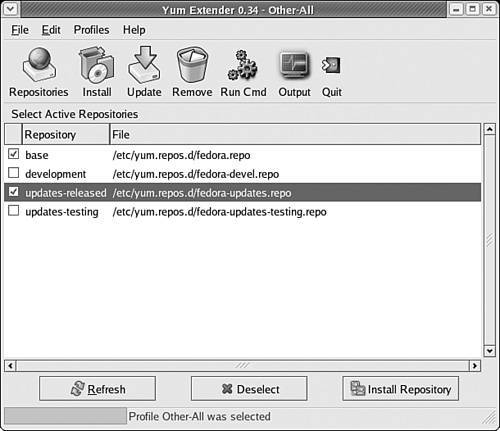 Similar to Synaptic for apt, the Yum Extender is a genuine front-end to the yum command. You can watch the output messages as they occur. After you run a command in the Yum Extender, click the Output button. Watch as the messages associated with installing, upgrading, or removing your packages scroll across the screen. 6.5.1. Basic ConfigurationBefore you run the Yum Extender, it's important to make sure that you've configured some basic parameters:
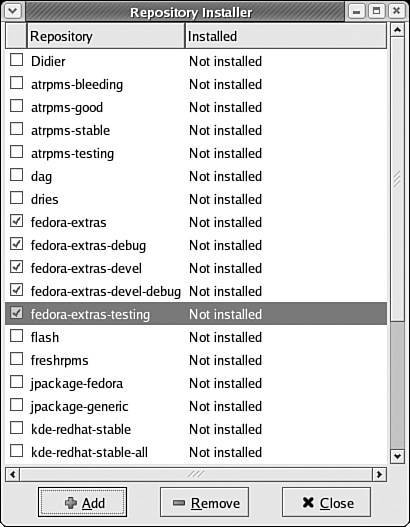
6.5.2. Adding More RepositoriesThe available menus are straightforward. You can add as many repositories as you need. Any changes that you make are reflected in files in the /etc/yum.repos.d directory. If you want to add new repositories, use the following steps:
Alternatively, if there's a repository not in the Repository Installer list, you can add it through a different menu, following these steps:
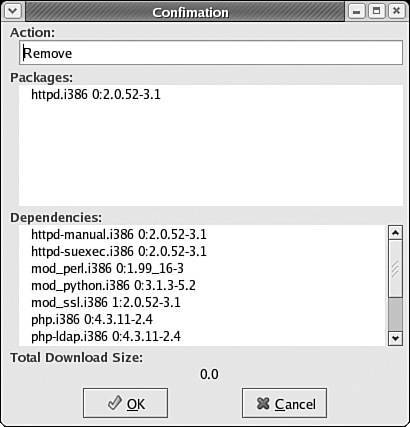
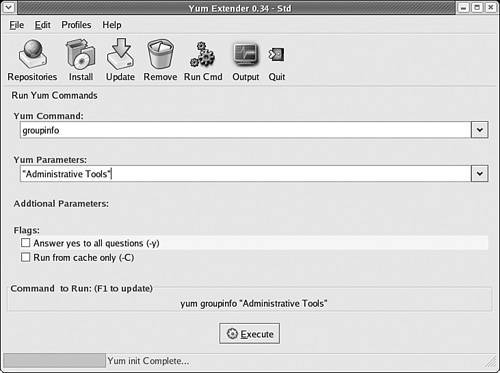
6.5.3. Installing PackagesWhile you can install packages from your repositories more quickly from the command line interface, the GUI can help you browse what is available. Now that you've selected the active repositories for your system, click the Install button. Browse through the packages available for installation. If you highlight one, you can see some information about that package, including the identified repository, as shown in Figure 6-11. Figure 6-11. Selecting packages to install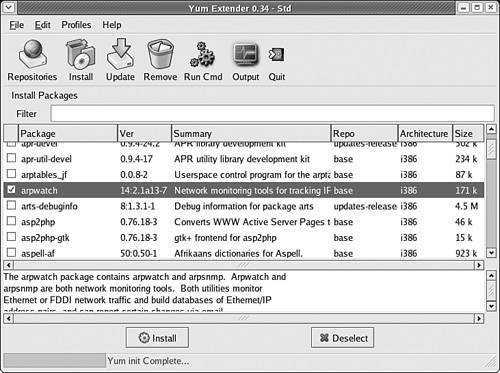 The installation process is straightforward. Select the packages you want to install, and then click the Install button. After the yum database is processed, you're shown a list of packages to be installed, along with dependencies. Click OK to confirm. When the process is complete, you'll see a message such as "Install completed OK." Tip If you see a dependency error during the update process, the most common cause is your settings associated with updating the Linux kernel. In other words, if the package you want to install requires a later version of the kernel, you have to decide whether to accept a kernel update, with all the associated risks. 6.5.4. Updating PackagesThe update process is straightforward. Click the Update button. Browse through the packages available for installation. If you highlight one, you can see some information about that package, including the associated repository. The update process is straightforward. Select the packages you want to install, and then click the Install button. After the yum database is processed, you're shown a list of packages to be installed, along with dependencies. Click OK to confirm. When the process is complete, you'll see a message such as "Install completed OK." 6.5.5. Removing PackagesThe package removal process is also straightforward. Click the Remove button. Browse through the packages already installed on your computer. If you highlight one, you can see some information about that package, including the associated repository. For example, I used the Yum Extender to remove the Apache Web Server from my system. As you can see in Figure 6-12, there are a lot of packages that depend on Apache, the httpd RPM package. I clicked OK to confirm, and all the packages noted in the Dependencies list were also uninstalled. When the process is complete, you'll see a message such as "Remove completed OK." Figure 6-12. Confirming packages to remove 6.5.6. Using Your Own CommandsThere will be times where the GUI tool won't be enough. If that is your situation, you do not need to exit. If you know how yum works from the command line, the Yum Extender allows you to enter the commands of your choice. Click the Run Cmd button. Now you can configure the yum commands of your choice. The drop-down command text box includes all the yum command options listed earlier in this chapter. You can enter the data you need in the Yum parameters text box, as shown in Figure 6-13. Figure 6-13. Running a yum command in the GUI You're not limited to the -y and -c flags shown in the figure. If you need to enter a different flag, you can include it in the Yum Command text box. For example, you might want to run the following command: yum -R 2 groupinfo "Administrative Tools" If so, type in -R 2 groupinfo in the Yum Command text box. Click the Execute button when you're ready. When you do, the Yum Extender takes you to the Output window to give you the output information that you asked for. |
EAN: 2147483647
Pages: 80