Section 1.2. Distribution-Specific Repositories
1.2. Distribution-Specific RepositoriesEvery major Linux distribution includes a repository of installation programs and packages. Distribution developers also maintain patches on these same repositories, and they update these repositories with security patches, upgrades, bug fixes, and new kernels as needed. In this book, we focus on the releases from the developers of three major distributions: Red Hat/Fedora, Novell/SUSE, and Debian. Note The Web and FTP sites associated with a distribution are often very busy. Connections are limited to a certain number of users; even with such limits, downloads may be slow. Most distributions have "mirrors," or second-level repositories, which maintain an exact copy of the original. 1.2.1. Red Hat Enterprise Linux UpdatesThe current distribution released by Red Hat is known as Red Hat Enterprise Linux 4 (RHEL). With its reliance on older technologies, it is widely regarded as a conservative, perhaps even boring, distribution. Red Hat has stated that it will provide support and updates for at least five years, which makes it an ideal candidate for the enterprise. But even a boring and stable distribution such as RHEL requires frequent updates. RHEL updates are limited to computers with valid subscriptions on the Red Hat Network (https://rhn.redhat.com). Each subscription allows you to register one computer on the Red Hat Network, which includes the right to download updates and CDs. I explain how you can purchase and activate a subscription in detail shortly. RHEL updates are often consolidated onto CDs, on a quarterly basis. If you've purchased a subscription to the Red Hat Network, you should be on the email list which notifies you of individual patches and quarterly updates as they're released. While default updates are taken from Red Hat Network servers, Red Hat supports the use of Proxy and Satellite servers to cache that content on your LAN. Because RHEL is released under the Free Software Foundation's (FSF) General Public License (GPL), the source code is publicly available from ftp.redhat.com. Several groups have built the source code, without the Red Hat trademarks, into enterprise distributions that are functionally equivalent to RHEL. We'll describe some of these "rebuilds," as well as how to use their repositories, in Chapter 2, "Consolidating Patches on a Red Hat/Fedora Network." Note The GPL and related licenses are critical to the Linux development process. In fact, this book has been released under a related license, the Open Publication License (www.opencontent.org), an open source compatible book license. For more information on the myriad of GNU licenses, see www.fsf.org/licensing/licenses/. If you want RHEL, you may have already taken the following steps:
We'll describe these steps (except installation) in detail in the following sections. Register with the Red Hat NetworkIf you want to install RHEL on more than one computer, it's best to register first with the Red Hat Network. That will help you manage all your RHEL computers with one Red Hat Network account. If you're setting up a subscription for a corporate account, read Red Hat's Best Practices Guide, available from rhn.redhat.com/help/. To register with the Red Hat Network, you'll need an account. To create a new account, navigate to https://rhn.redhat.com/newlogin/ and create a new corporate or personal login. Examine Available Red Hat Enterprise Linux DistributionsRed Hat currently supports several different versions of RHEL. As you can see in Table 1-1, there are several different versions available; pricing varies by system and architecture. For more information, including current prices, see https://www.redhat.com/software/rhel/compare/.
Note You can now subscribe to RHEL for free for 30 days. For details, see www.redhat.com/software/rhel/eval/. Registration on the Red Hat Network is required. Purchase One or More Subscriptions for RHELWhen you purchase RHEL, you're buying a time-limited subscription to the Red Hat Network, along with some level of Web, email, or phone-based support. There are three ways to get a subscription to RHEL:
Note If you work for an academic institution, you may be able to get a RHEL subscription at a greatly reduced rate; see www.redhat.com/solutions/industries/education/products/ for details. Activate Your SubscriptionWhen you purchase RHEL, there are two ways to activate your subscription. If you have a registration number, you can activate your subscription at www.redhat.com/apps/activate; you can also activate a RHEL 4 subscription during the installation process. In either case, make sure to link this subscription to the appropriate Red Hat Network account. Alternatively, if you purchased your subscription directly from Red Hat in the USA or via www.redhat.com, your subscription should already be active in your Red Hat Network account. Download the CDs for RHELWhen you have a subscription to RHEL, you can download the CDs from the Red Hat Network. Because you'll be downloading two or more GB of data, you'll need a high-speed Internet connection. You can then download the CDs in ISO format by using the following steps:
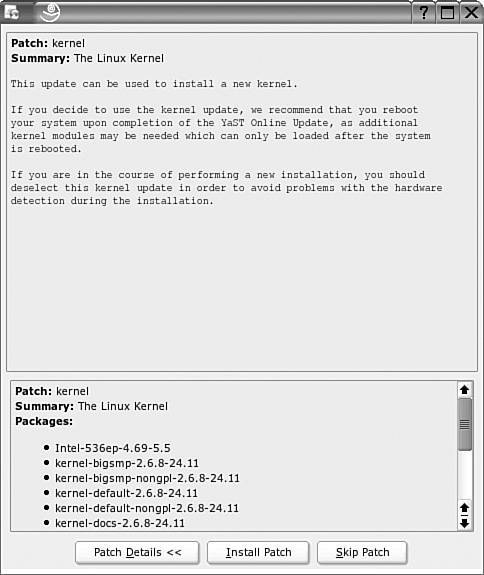
Of course, if you've purchased a boxed set, you can use the CDs directly from the box. Now you can set up an installation repository for your RHEL distribution. If you have the physical CDs, they're easy to mount. Just insert them into the drive, and run the mount /media/cdrecorder or mount /mnt/cdrom command. You can mount ISO files as if they were physical CDs. For example, I've downloaded the first ISO for RHEL AS 4 in my home directory and mounted it with the following command: # mount -o loop /home/michael/RHEL4-i386-AS-disc1.iso /media/cdrecorder You can then copy the files from each CD to the installation directory of your choice. After you share these files with the NFS, FTP, or HTTP protocols, you can then install RHEL from this directory over your LAN. Make sure to copy the hidden .discinfo file from the first installation CD; you can then use this installation repository for Red Hat's system-config-packages utility. Alternatively, you can configure a RHEL installation repository simply by sharing the directory with the installation ISO files on an NFS network. Installing Red Hat Enterprise LinuxThe steps required to install RHEL are beyond the scope of this book. For more information on RHEL installation, see Red Hat's installation guide, available from www.redhat.com/docs/manuals/enterprise. If you're installing RHEL on a computer that you intend to use as a local Red Hat Network Proxy Server, keep the packages that you include to a minimum. The Update AgentRHEL's Update Agent, also known as up2date, provides a complete system for updating the RPM packages installed on your RHEL computers. It allows you to register with and monitor appropriate Red Hat repositories for updates. In Chapter 2, you'll learn how to configure a Red Hat repository locally on your computer. You can review a standard RHEL 4 Network Alert Icon in Figure 1-2. It's a circle next to the date in the upper right part of the GUI. There are four options associated with this icon, which is available only in the GUI:
Figure 1-2. Update Agent options in RHEL 4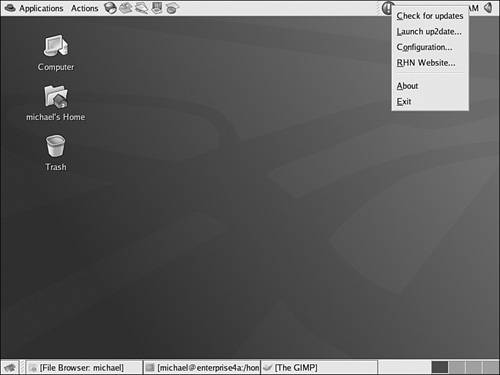 As you can see in the figure, there are four options associated with the Update Agent:
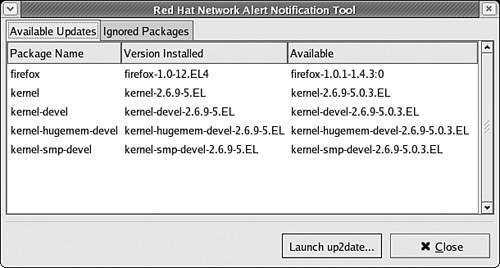
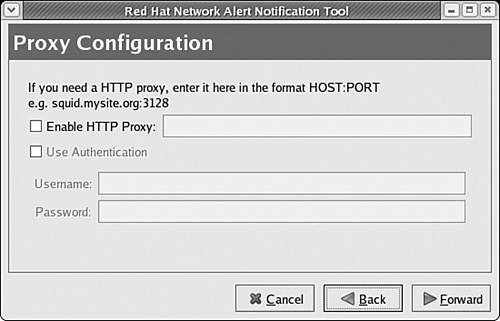
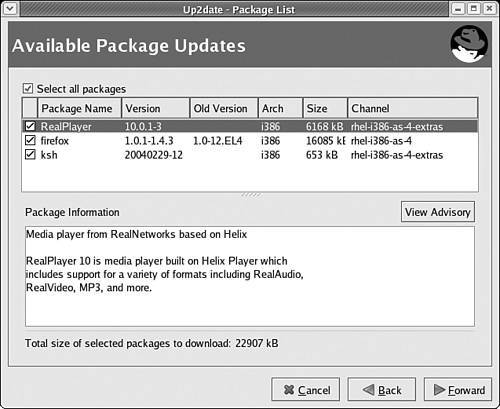
There are several things that you need to configure the Update Agent. If you have a proxy server on your network, you'll need to configure the Red Hat Network Alert Notification Tool. In the GUI, right-click the Update Agent icon, and click Configuration from the shortcut menu that appears. This opens the Red Hat Network Alert Notification Tool window. Click Forward through the Terms of Service to reach the Proxy Configuration page shown in Figure 1-4. Figure 1-4. Configuring the Red Hat Network for a Proxy Server Note The Red Hat Network Alert Notification tool warns you of new updates graphicallythere is no command line version of this tool available. Test the result. Right-click the Red Hat Network icon, and then select Check for Updates. When you next hover your mouse over the icon, you'll see the number of updates available. You can click the icon to bring up the available updates; you'll see a screen similar to Figure 1-3. Alternatively, in the command line interface, you can find a list of available updates, along with their dependencies, with the following command: # up2date --dry-run Updating Red Hat Enterprise Linux Using the Update AgentNow you can update RHEL using the Update Agent. You can start the process in a number of ways; one method that works in both the GUI and text console is the up2date command. We illustrate the process in the GUI for clarity; the process is essentially the same at the text console, and requires the following steps:
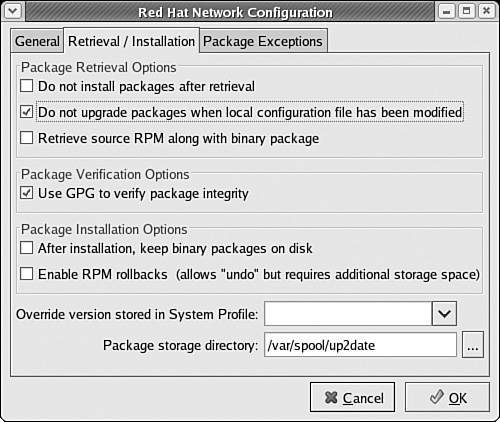
Configuring the Update Agent SettingsNaturally, Red Hat's Update Agent is much more flexible when started from the command line interface. As an administrator, you may administer a number of your systems remotely; in this case, the command line interface is more efficient. The Update Agent configuration command is up2date-nox --configure. As it opens several-dozen configuration options, it's best to pipe the output to a pager with a command such as up2date-nox --configure | less You can review the settings associated with the Update Agent in Table 1-2; the sequence in this table is based on RHEL 4. Changes are saved in /etc/sysconfig/rhn/up2date. Alternatively, if you run up2date --configure in the GUI, you'll find many of the same settings in Figure 1-8.
Figure 1-8. Configuring the Update Agent Update Agent Command Line OptionsThere are a number of other useful actions that you can take with the Update Agent. They're associated with different switches for the up2date command. While a complete list is available in the associated man page, I've listed the more important alternatives here: up2date --configure As described earlier, this command allows you to configure Update Agent options. If you're in the GUI, this opens the Update Agent configuration window shown in Figure 1-9; if you want the full functionality associated with the command line interface, use the up2date-nox --configure command. Figure 1-9. SUSE is watching for updates up2date --register This command allows you to register (or revise your registration) with the Red Hat Network. up2date -d packagename This command downloads specified packages, without installing them. If you already have the most up-to-date version of the packagename, you'll see a message to that effect. up2date --src packagename This command downloads the source package along with the associated binary RPM. If you already have the most up-to-date version of the packagename, you'll see a message to that effect. up2date --show-channels This command lists the channels available for updates to your computer. For more information on Red Hat Network channels, see Chapter 2. up2date --hardware The --hardware switch updates the hardware profile for your computer, as documented on the Red Hat Network. up2date --list-rollbacks This switch lists packages that you can restore to their former versions. up2date -u This command automatically updates your system with all upgradeable packages. up2date --installall --channel=rhel-i386-as-4 This downloads and installs all packages from the given channel, as defined in the output from the up2date --show-channels command. Naturally, you'll want to enable the KeepAfterInstall configuration option described in the previous section. Otherwise, the Update Agent deletes these packages after downloading and installing them on your system. Aggregating Red Hat Enterprise Linux UpdatesIf you administer just a few RHEL computers on a network, you may choose to configure them to download their updates directly from the Red Hat Network (after you've tested each update, of course). But if you have a substantial number of RHEL computers, their simultaneous updates may overload your connection to the Internet. There are several methods you can use to manage and maintain control of how you keep your systems up to date. Quarterly UpdatesRed Hat provides CD-based updates of its RHEL distributions on a quarterly basis. These updates include all upgraded packages otherwise available through the Update Agent. You can store these packages in a local installation repository and upgrade your system with said packages. Proxy ServersAnother way to update a group of RHEL systems is with a proxy server. A Red Hat Network Proxy Server stores content locally and passes authentication requests to the Red Hat Network. It requires a relatively high-powered system; minimum requirements shown in the release notes include
These are relatively minimal requirements. If you're storing updates for more than one version of RHEL, practical hardware requirements increase accordingly. The default Red Hat Network Proxy Server is available with 10 desktop subscription entitlements. Other packages may be available; contact Red Hat sales or www.redhat.com for more information. You can learn how to install and configure the Red Hat Network Proxy Server in Chapter 2, as well as how to configure your RHEL clients to connect to those servers. Satellite ServersIf you have a larger network, or one which requires a higher level of security, you may want more control over how your computers communicate with the Red Hat Network. This is possible with the Red Hat Network Satellite Server. Authentication, policies, and profiles are stored on the Satellite Server. Updates can be "pushed" directly to the clients of your choice. A Satellite Server can also serve as an installation server, from which you can automate the RHEL installation process on as many computers for which you have subscriptions. Nominally, the hardware requirements for a Satellite Server are not significantly greater than for a Proxy Server. But if you have the number of RHEL systems that justify a Satellite server, you'll want to follow Red Hat recommendations, including
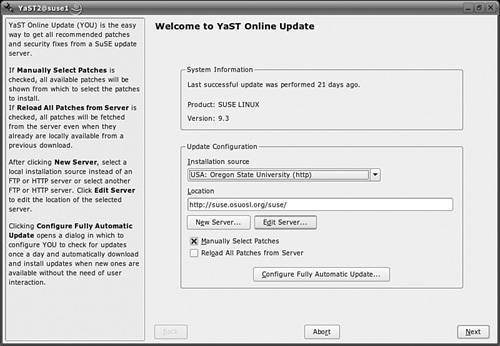
These are relatively minimal requirements. If you're storing updates for more than one version of RHEL, practical hardware requirements increase accordingly. The default Red Hat Network Proxy Server is available with 50 desktop subscription entitlements. Other packages may be available; contact Red Hat sales or www.redhat.com for more information. Creative OptionsYou can create your own repository of available updates. If you enable the KeepAfterInstall option, updates that you download are stored in /var/spool/up2date. You can then share these updates with other computers on your network. Assuming their configurations are identical, you can upgrade with these same packages. Some administrators have been known to configure downloaded packages in a yum repository, as demonstrated in Chapters 6, "Configuring a yum Client," and 7, "Setting Up a yum Repository." Alternatively, you can point the Upgrade Agent to repositories created by one of the Red Hat Rebuilds that you'll learn about in Chapter 2. 1.2.2. Novell/SUSEThe SUSE distributions, now owned by Novell, have a very different look and feel from the RHEL distributions. Administrative tools are integrated into the SUSE all-in-one tool, known as YaST (Yet another Setup Tool). While YaST is not geared to the command line interface, it does support a low-level graphical screen even from remote consoles, and it has a similar look and feel to YaST in the GUI. In this section, you'll examine detailed workings of the YaST Online Update tool and get a feel for what you can do with repositories on SUSE Linux Enterprise Server (SLES). Unlike Red Hat, SUSE does not have a dedicated interface for subscriptions similar to the Red Hat Network. YaST Online UpdateIn this section, you'll examine YaST Online Update on SUSE Linux Professional 9.3. Unlike RHEL, registration is not required at this operating system level. YaST Online Update, also known as YOU, provides a complete system for updating the RPM packages installed on your SUSE Linux Professional computers. It allows you to monitor appropriate SUSE repositories for updates. In Chapter 2, you'll learn how to configure a SUSE repository locally on your computer. You can review a standard SUSE Professional GUI in Figure 1-9. You'll see a circle next to the date in the lower-right part of the GUI. A red exclamation point indicates that updates are available. To start YaST Online Update, take the following steps:
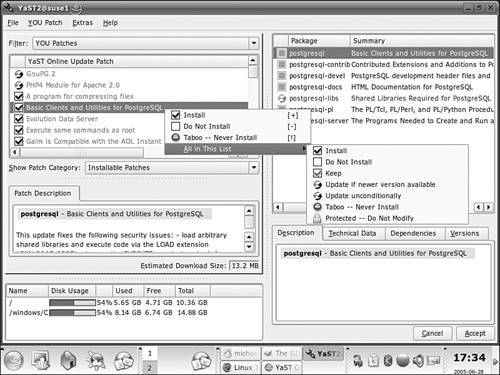
When complete, you can find a repository of download patches in the following directory: /var/lib/YaST2/you/mnt/i386/update/9.3 The directory with your patches will vary slightly, depending on your CPU and version of SUSE Linux. This repository includes four different categories of patches, as associated with their subdirectories:
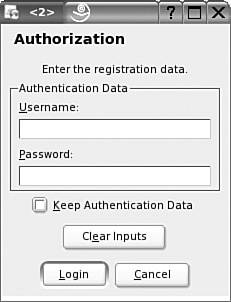
If you're running SUSE Linux Enterprise Server 9, downloads are divided into SUSE-SLES and SUSE-CORE packages. The SLES packages are associated with the first installation CD; the CORE packages include downloaded updates associated with the remaining CDs. In other words, you can find updates in the following two directories: /var/lib/YaST2/you/mnt/i386/update/SUSE-SLES/9 /var/lib/YaST2/you/mnt/i386/update/SUSE-CORE/9 Downloaded RPMs, patches and scripts can be found in the same subdirectories. SUSE Linux Enterprise Server UpdatesSUSE Linux Enterprise Server is designed to hold repositories. In SUSE Linux Enterprise Server 9, there is a YOU Server Configuration option available with the Online Update. When you start this server, you'll see the YaST Online Update Server Configuration screen shown in Figure 1-13. Figure 1-13. SUSE Linux Enterprise Server has more limits on YaST Online Update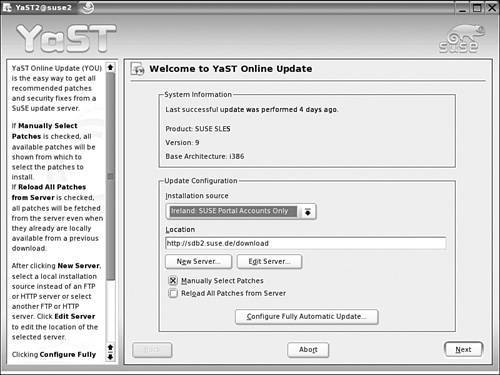 If you have a valid subscription for SUSE Linux Enterprise Server, it'll be associated with your SUSE Linux online account. In the Update Server configuration screen, select a server and then click Edit Server. This opens the Authorization window shown in Figure 1-14, where you'll need to enter the username and password for your account. Any SUSE subscriptions should be automatically linked to that account. Figure 1-14. Authorizing SUSE Linux Enterprise Server Online Update Downloading SUSE LinuxTwo of the flagship distributions in the SUSE Linux line are SUSE Linux Professional and SUSE Linux Enterprise server. While each version of SUSE Linux Professional is available only for sale during the first few months of each release, it's available for download after that. For more information, see www.novell.com/products/linuxprofessional/. It's best if you use a mirror; links are available from the noted Web site. As of this writing, downloads of SUSE Linux Professional 9.3 are available as a DVD ISO or a standard installation tree. If you download the installation tree, you'll need a boot CD or floppy. Starting with version 10.0, Novell has made an open source version of SUSE Linux Professional available at www.openuse.org. SUSE Linux Enterprise Server is available with a 30-day evaluation license. More information is available from www.novell.com/products/ linuxenterpriseserver. You'll need a Novell account before you can download this system. SUSE Linux Enterprise Server 9 requires that you download six CDs from the SUSE servers in Ireland or Utah (USA). As of this writing, with instructions available on the download page, you can extend the evaluation to six months. The license is only required for updates; the server remains functional thereafter. 1.2.3. DebianFor me, Debian offers what I think of as the Heathkit version of Linux. It offers a wide degree of flexibility. Debian repositories offer a wider variety of packages than any other distribution that I know. Debian hearkens back to the origins of Linux, where it was solely a cooperative arrangement between developers. As you can see at www.debian.org, this distribution is the province of its volunteers. However, there is commercial support available for Debian. Ian Murdock, one of the founders of Debian, started Progeny as a company which provides commercial support for Debian (and several other versions of Linux). For more information, see www.progeny.com. The current version of Debian Linux is known as Sarge. There is also a "testing" distribution, similar to a beta, known as Etch. The developmental distribution, which includes packages more likely to have problems, is known as Sid. You might recognize these names from the Disney movie Toy Story. Installing DebianDebian Linux is different. You could download the 14 CDs or 2 DVDs associated with Sarge and install Debian from there. You could store the associated packages in a network repository. I have a fairly speedy cable modem connection, and I still find the thought of downloading this amount of data rather intimidating. If you don't have a high-speed connection, you can purchase CDs or DVDs from vendors, such as www.cheapbytes.com or www.thelinuxshop.co.uk. I've installed Debian Sarge over a network connection, installing just the packages that I need. For this purpose, a high-speed connection is still the only practical method. I've started with the first installation CD. I was able to install enough of the operating system, including links to Debian repositories in /etc/apt/sources.list. For more information on this method, see www.debian.org/CD/netinst/. Note Most of the current development work on Debian is on a different release, known as Debian Sid. It is known as an unstable release; in my opinion, it is akin to the Developmental (Rawhide) releases of Fedora Linux. For more information on Debian Sid, see www.debian.org/releases/unstable/. Many Regional MirrorsAfter you've installed the basic Debian distribution, you'll want to configure your /etc/apt/sources.list file with one or more appropriate repositories. One list is available in the Debian Web page of mirrors at www.debian.org/mirror/list. I count mirrors available in over 50 countries. To use a mirror, you'll want to specify the URL, the distribution, and whether you want to be able to download source code. In my case, I've added the following mirrors to my sources.list file: deb ftp://debian.oregonstate.edu/debian/ stable main deb-src ftp://debian.oregonstate.edu/debian/ stable main This points my Debian computer to a mirror at Oregon State University. This is direct from the Debian Web page of mirrors noted previously. As I've installed Debian Sarge on my system, I've listed the stable repository. I've also noted the main set of packages. If I wanted additional packages contributed by other developers, I'd add contrib to these lines. If I wanted to access repositories of proprietary packages, I'd add non-free to these lines. The apt SystemThe Debian patch management system is very closely integrated with the apt series of commands. You'll learn about the apt commands in detail in Chapter 4. The strength of apt is how it searches for and includes any dependent packages as it installs (or removes) the packages you desire. The apt commands are also in common use on Debian-based distributions, such as Knoppix, as well as some RPM-based distributions, such as Conectiva. There are two apt commands which I use more than others. The first command is the following: apt-cache search searchterm I can check the repositories configured in my /etc/apt/sources.list for the package of my choice. All I need is a search term; for example, if I wanted to search for packages related to Linux office suites, I substitute office for searchterm. My repositories return a wide variety of packages, including the OpenOffice.org, KOffice, and Abiword applications, as well as related programs that might fit in an Office suite, such as xfonts and the HP Office Jet driver (hpoj). The other apt command I use frequently is apt-get install packagename For example, if I want to install the standard Linux DNS server, I substitute bind for packagename. The appropriate version of bind is installed; if there are dependencies, they are also installed. If additional configuration is required, Debian prompts me for appropriate selections. Alternatively, if I wanted to remove a package with dependencies, I could run the following command: apt-get remove packagename Synaptic offers a GUI front-end to the apt system. As you can see in Figure 1-15, Synaptic allows you to graphically view, install, and remove the packages you desire. Figure 1-15. Debian's Synaptic Package Manager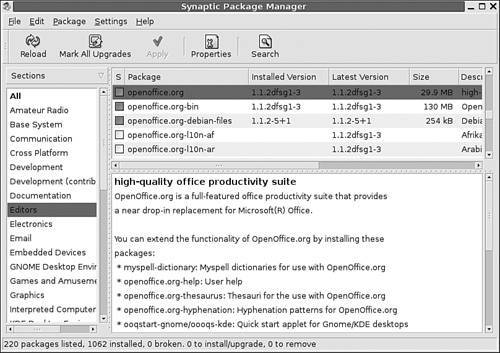 1.2.4. Other Linux DistributionsThere are hundreds of Linux distributions. Many have their own update repositories. I'll mention a few of the more important Linux distributions here:
It's not fair that I don't really have the space to mention other Linux distributions. There are many other excellent distributions available, with repositories that you can use and even replicate on your own networks. Many of these distributions use the yum and apt tools that you can learn about in the last half of this book. |
EAN: 2147483647
Pages: 80
- ERP Systems Impact on Organizations
- ERP System Acquisition: A Process Model and Results From an Austrian Survey
- Context Management of ERP Processes in Virtual Communities
- Intrinsic and Contextual Data Quality: The Effect of Media and Personal Involvement
- Healthcare Information: From Administrative to Practice Databases