Certification Objective 5.06: Recompiling a Kernel
|
| < Day Day Up > |
|
Fortunately, references to recompiling the Linux kernel have been removed from the Red Hat exam requirements. However, RHCEs in the real world are expected to know how to perform high-level tasks such as optimizing and recompiling the Linux kernel.
In this section, we'll start by looking at the kernel configuration file. Then we'll proceed with the different tools available to edit the kernel configuration. Finally, I'll show you the commands needed to compile your new configuration into the kernel, and show you the files this adds to the /boot directory and the settings it adds to the boot loader.
| Exam Watch | References to recompiling the Linux kernel have been removed from the Red Hat Exam Prep guide and associated Red Hat prep courses. However, good Linux administrators know how to recompile the Linux kernel. |
The Kernel Configuration Scripts
After you've configured a kernel once, the configuration information is stored in a hidden file, /usr/src/linux-2.4/.config. It is structured as a listing of variables. Here are some entries from the .config file:
CONFIG_NETDEVICES=y CONFIG_DUMMY=m # CONFIG_SUNLANCE is not set
As you can see, there are three main types of variables in this file. The first command here compiles in direct support, the second entry compiles support as a module (the 'm'), and the third is commented out, and is therefore not compiled into the kernel at all. You should never have to edit this file directly, as there are easier ways to configure your kernel.
Move to the directory with your kernel source files. If you've installed the RHEL 3 kernel-source RPM, you can use the /usr/src/linux-2.4 directory. If you've installed the latest kernel from www.kernel.org, it may be in the /usr/src/linux directory. Three tools can help you configure the kernel configuration file: make config, make menuconfig, and make xconfig.
Back Up Your Configuration
The default configuration for your current Linux kernel is stored in the /boot directory. For the default RHEL 3 system, it's stored in the config-2.4.21-4.EL file. Back up this file on another location such as a rescue floppy so that you can restore your current kernel configuration if all else fails.
You can use your current configuration as a baseline; the Linux kernel configuration tools will start with these settings. To do so with the current kernel, run the following command:
# cp /boot/config-2.4.21-4.EL /usr/src/linux-2.4/.config
Alternatively, there are a number of standard configuration files in the /usr/src/linux-2.4/configs directory. If you want to start with one of these files, use the config file that corresponds most closely to your hardware. You can set that as the starting point for your configuration by copying it to the /usr/src/linux-2.4/.config file.
| On The Job | There is a default kernel configuration file in the /usr/src/linux-2.4/configs directory. It's associated with your CPU hardware; for example, if you have an Athlon CPU, you'll find it in a file named kernel-2.4.21-athlon.config. If your kernel version is different, the number changes accordingly. |
make config
Once you're in the directory with the kernel source files (/usr/src/linux-2.4), you can call a simple script to configure a new kernel with the following command:
# make config
This script will prompt you through your different options. Figure 5-11 shows an excerpt from the output for this script.
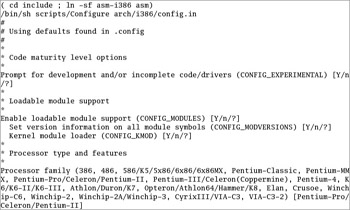
Figure 5-11: Questions from the make config utility
Here the kernel variables are listed in parentheses and the possible answers are in brackets. The default answer is in capital letters. If you type in a ?, you will see a help page explaining this option. Since several hundred questions are associated with this script, most administrators use one of the other two scripts to manage their Linux kernels.
make menuconfig
A nicer way to create the .config file is to use the make menuconfig command. This requires the ncurses RPM package. This opens a text-based, menu-driven system that classifies and organizes the changes that you can make to a kernel. Figure 5-12 illustrates the main menu associated with this command.
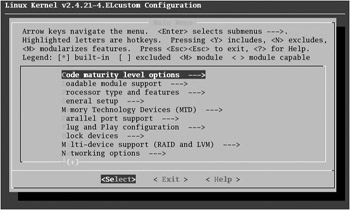
Figure 5-12: The make menuconfig configuration menu
The nice thing about menuconfig is that it works very nicely over a remote text connection from other Linux computers (or perhaps that is dangerous!). Also, options appear at the bottom of the menu to load or save the configuration file from a different location.
make xconfig
The other way to make changes to the kernel is to use the X Window System. You can generate a graphical menu system to configure your kernel by running the make xconfig command. Figure 5-13 shows the xconfig main menu. You can also use xconfig to load or save the configuration from the file of your choice.
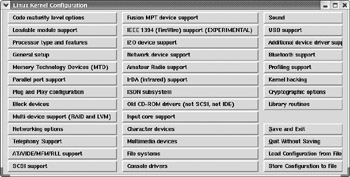
Figure 5-13: The make xconfig configuration menu
While this menu may look slightly different in different Linux distributions, the principles and basic options remain fairly constant. Each of the Kernel Configuration Options discussed on the following pages are presented for completeness. It is important for a Linux administrator to have a detailed understanding of the hows and whys about reconfiguring and recompiling the kernel.
Understanding Kernel Configuration Options
To configure a kernel, you need to understand some of the main kernel configuration options. Each of the aforementioned kernel configuration tools includes help menus for just about every available option.
The Basic Kernel Configuration
If you're asked to change a setting such as CONFIG_EXPERIMENTAL, you don't have to search through different menus. You can find the governing menu using the information in the /boot/config-2.4.21-4.EL configuration file. As you can see in the file:
# Code maturity level options # CONFIG_EXPERIMENTAL=y
The CONFIG_EXPERIMENTAL variable can be found under the Code Maturity Level Options menu.
The Standard Red Hat Kernel Configuration
The standard RHEL 3 Linux kernel supports a wide variety of hardware and software. Almost every module that could be made is made. This is a big kernel, and numerous modules can be used for it with the standard installation. This is not a problem when you install RHEL 3, but it is highly recommended you streamline the standard kernel and remove unwanted modules.
In the following sections, I describe the different kernel configuration menus, section by section. However, since it appears that recompiling the kernel is no longer a requirement on the Red Hat exams, I do not provide any screenshots of additional menus. If you're interested in this level of detail, follow along on your Red Hat computer.
Code Maturity Level Options
The Code Maturity Level options allow you to incorporate experimental code in the kernel. Common examples include drivers for new hardware, esoteric filesystems, and network protocols. Experimental code is often also known as alpha level software. If you have obsolete code that you want to incorporate into your kernel, it also falls in this category, as newer kernels often omit support for older features.
The one option relates to the CONFIG_EXPERIMENTAL variable. It's enabled by default in RHEL 3.
Loadable Modules Support Options
The Loadable Module Support screen allows you to enable loadable modules. The kernel module loader will automatically load modules for most new hardware, when detected. As discussed earlier, loadable modules allow you to optimize the kernel. If you want to optimize the kernel, keep all of the options on this screen active.
Processor Type and Features
The Processor Type and Features menu in RHEL 3 supports a wide variety of CPUs.
General Setup Options
The General Setup Options menu includes some basic hardware and kernel configuration options. Many of these options are self-explanatory, and the defaults are generally acceptable. If you need more information, click the Help button associated with a specific kernel option.
On a network, you want networking support. Most computers have PCI cards, and the defaults give you full PCI support, using BIOS detection, documenting the detected cards in the /proc directory. Various types of hot-pluggable devices are now popular, including PCMCIA cards for laptops and PCI hotplug support for removable drives.
The System V IPC, BSD Process Accounting, and Sysctrl support parameters are all standard for current kernels. While Linux kernels are normally associated with ELF binaries, the other binaries may help with certain programs.
Memory Technology Devices
The options shown in the Memory Technology Devices menu allow you to set up Linux for basic 'Flash' memory cards, including those that might be installed through a PCMCIA adapter. Unless you're planning to use some of these devices in the future, keep this option disabled.
Parallel Port Support
The options shown in the Parallel Port support menu are based on hardware that may be connected to your computer through a parallel port. This includes everything from printers through parallel port hard drives. Remember that it is normally best to avoid the Experimental options unless you are a developer working on supporting the associated drivers.
Plug and Play Configuration
The options shown under the Plug and Play Configuration menu activate basic plug and play support on your Linux computer. Generally, you should keep the defaults. While Linux plug and play does not handle all ISA and PCI devices, it does help you configure your computer for Linux.
Block Device Options
Under the Block Device Options menu, you can specify your floppy devices and nonstandard hard disks. You can specify support for parallel port ATAPI CD-ROMs, tape drives, and even ATAPI floppy drives. You can also enable loopback support and network block support (which lets you use a physical disk on the network as if it were a local disk). If you have any parallel port devices such as external CD-ROMs or hard drives, you could enable support for those here. You can also set up support for RAM disks under this menu.
Multidevice Support for RAID and LVM
If you're ever going to set up a RAID array of disks to help protect your data, you can enable that option in the Linux kernel under the Multidevice Support for RAID and LVM menu. If you ever want to put together a volume set, where a directory can span more than one partition on more than one physical hard disk, you can enable that option here as well.
| On The Job | While there is support for RAID-4 in the Linux kernel, it is not directly supported by RHEL 3 or currently available versions of Red Hat or Fedora Linux. |
Networking Options
There are many options for networking in the Linux kernel. The Networking Options menu is extensive. It includes a substantial number of settings for different hardware devices, software settings, and more.
Telephony Support
Telephony support on a computer network uses special network cards to convert voice into the type of data that can be sent over a network. Linux offers some limited telephony support through the kernel as shown under the menu of the same name.
ATA/IDE/MFM/RLL Support
These acronyms all relate to various types of regular PC hard disk and CD drive interfaces. Normally, you shouldn't disable this kernel option unless all hard disk storage on your system is based on a SCSI interface. Even then, the flexibility of being able to install IDE devices is usually worth the extra code this adds to the kernel.
SCSI Support Options and Low-Level Drivers
You can enable SCSI hard disks, tape drivers, and CD-ROM support in this section. If you have a SCSI CD-ROM jukebox, or any other device that requires more than one SCSI Logical Unit Number (LUN), you may have to enable probing of all LUNs.
Near the bottom of the menu, you can configure verbose SCSI error reporting. You can also enable specific low-level SCSI support. Red Hat includes support for high-end hardware RAID-enabled SCSI host adapters, including 64-bit PCI adapters.
Fusion MPT Device Support
This menu supports modules associated with very high speed SCSI adapters, associated with hardware developed by LSI logic.
IEEE 1394 Support
The IEEE 1394 standard is more popularly known as FireWire or iLink. It's basically a very high speed hot plug and play hardware option, with data transfer speeds in the hundreds of Mbps. Linux support for IEEE 1394 standards is far from complete. Kernel support for any IEEE 1394 device is currently officially experimental. However, support for IEEE devices such as external hard drives are readily available, and configured as modules by default in RHEL 3.
I2O Device Support
The I2O specification, also known as Intelligent I/O, supports split drivers which can optimize communication performance between a device and the rest of your computer. Don't enable I2O haphazardly; it requires hardware that supports it.
Network Device Support
Linux supports a wide range of network cards. The Network Device Support menu allows you to enable support for the adapters you may need. Generally, you should enable support for only network devices that you're using now or may use in the future.
Amateur Radio Support
Linux supports connections to various amateur radios. Unless you plan to connect your computer to an amateur radio station in the future, there is no need to enable support for any of these devices.
IrDA Support
Linux supports Infrared connections, mostly for network support. The IrLAN protocol supports wireless access points. The IrNET protocol requires PPP. The IrCOMM protocol sets up port emulation, useful for setting up terminals and printers. For a list of supported infrared-port device drivers, click that button and activate the devices that you need.
ISDN Options
Integrated Services Digital Networks (ISDN) lines are a fairly popular high-speed digital option, especially outside of North America. Adding ISDN support allows you to use an ISDN card for inbound or outbound dialing connections. The ISDN device has a built-in AT-compatible modem emulator, autodial, channel-bundling, callback, and caller authentication without the need for an external daemon to be running. Under the ISDN Options menu, you can enable synchronous Point-to-Point Protocol (PPP) connections. The supporting isdn4k-utils RPM is installed by default on RHEL 3.
Older CD-ROM Support Options
If you have an older CD-ROM that is not an IDE or SCSI CD-ROM, then you need to enable special support for it in the Linux kernel, as shown when you click the 'Old CD-ROM drivers (not SCSI, not IDE)' option. This section has many drivers for Mitsumi, Goldstar, Philips, Sony, Sound Blaster, and other old CD-ROM and disk types.
Input Core Support
The Input Core Support section configures support for various basic input devices: keyboards, mice, and joysticks. These devices are modular by default, which allows Linux to recognize these basic devices using plug and play detection.
Character Device Options
Character devices send their data in byte streams. Typical character devices range from serial ports to virtual consoles. The Character Devices submenu allows you to specify support for a wide variety of devices, including virtual terminals, serial ports, newer AGP video cards, mice, joysticks, non-SCSI tape drives, and more.
Multimedia Devices
The Multimedia Devices options support a wide range of video capture and AM/FM radio devices. Click each option (Video for Linux, Radio Adapters) for a list of drivers which you can enable. As always, it is best to keep what you enable to a minimum.
Filesystem Options
The File Systems subsection is a list of all the different types of filesystems Linux supports. Select the Quota option if you need to support quotas. You can also compile in the kernel Automounter to support remote filesystems.
Because Linux supports so many different hardware platforms, it includes support for a large number of filesystem types. However, because of the proprietary nature of some filesystems, the degree of support is variable. You'll note that support for a lot of filesystems in this menu is experimental; in fact, support for writing to NTFS filesystems may be dangerous!
Console Driver Options
Linux supports console drivers, which can set up text on most graphics systems, even when Linux doesn't detect the right cards or monitors. The Frame Buffer Support option supports video adapters that store images in frame buffers.
Sound System Support Options
A wide variety of sound cards are supported by RHEL 3, normally as modules. These cards range from the Ensoniq Audio PCI card to TV card mixers. You can also use these drivers for cards that emulate the appropriate hardware. Check the Sound submenu for the latest list of supported hardware for your kernel. If you have a card not named in the previous list, try to see if it emulates any card on the list. Many proprietary cards do emulate products from Sound Blaster or offer OPL/2 or OPL/3 compatibility.
USB Support
Linux supports a number of USB mass storage devices, input devices, printers, cameras and scanners, and even modems. Linux support for USB networking cards is still officially experimental. Linux support for USB is improving, although some USB drivers that you'll see in the USB support menu are still considered experimental as well. Unfortunately, this includes support for faster USB 2.0 standard drivers.
Additional Device Driver Support
As befits the name, the Additional Device Driver support menu allows you to configure the Linux kernel for a variety of hardware devices. These devices range from Gigabit Ethernet adapters to Storage Area Network devices.
Bluetooth Support
Bluetooth is a radio technology for short-range networks. You can configure a number of Bluetooth devices in the Linux kernel.
Profiling Support
Profiling support allows you to use the OProfile system to characterize the performance of your system. It is described in more detail at oprofile.sourceforge.net.
Kernel Hacking
Kernel hacking allows you to use the drivers you need to debug driver or related Linux kernel issues.
Cryptographic Options
The Cryptographic options support software associated with strong encryption in Linux. It's disabled by default in RHEL 3.
Library Routines
The Library Routines support compression in Linux. Unlike for Red Hat Linux 9, they are enabled by default for RHEL 3.
Compiling and Installing a Custom Kernel
After setting up all the options you want from one of the Kernel configuration programs, make sure to save your changes. The changes are saved in the appropriate .config file. Next, you can compile your kernel. Compiling a new kernel can be a long and tedious process. The following is a list of things you should do to successfully compile your kernel-in order:
-
If you haven't already done so, create a custom boot floppy disk with the following command. Test the floppy that's created.
# mkbootdisk `uname -r`
-
Run the cd /usr/src/linux-2.4 command to reach the proper directory. You'll need to run your commands to modify and compile the kernel in this directory. This assumes that you've installed the appropriate kernel-source RPM. In RHEL 3, this directory is linked to the directory with the source code, /usr/src/linux-2.4.21-4.EL.
-
Open /usr/src/linux-2.4/Makefile in a text editor. In RHEL 3, the EXTRAVERSION variable is already set to identify a custom kernel. If necessary, change the value of this variable to uniquely identify your kernel. Record the value of this variable.
EXTRAVERSION= -4.ELcustom
-
Save your current kernel configuration file. It's stored in the /boot directory. For RHEL 3, it's the /boot/config-2.4.21-4.EL file. Have it ready with a rescue floppy in case disaster strikes. Copy it to the /usr/src/linux-2.4/.config file.
-
Alternatively, you can start from a standard configuration file in the /usr/src/linux-2.4/configs/ directory. You can also run the make oldconfig command.
-
-
Run the make mrproper command to ensure your source files are in a consistent and clean state.
-
Now you can customize your kernel with one of the following three utilities: the make config command runs the text-based configuration script; the make menuconfig command runs a low-level graphical configuration script; and the make xconfig command starts the X Window System configuration tool.
-
Make any changes as required by your hardware and/or the RHCE exam. Before you exit from the kernel configuration utility, make sure to save your changes!
-
The make dep command will set up all your dependencies correctly. This takes the settings from /usr/src/linux-2.4/.config and pushes them down into the correct source code subdirectory. This will take some time, as there are nearly 1,500 possible kernel settings on a RHEL 3 system!
On The Job The make dep process took about 20 minutes on my computer with a 1.2GHz CPU.
-
Run the make clean command to prepare the source code directories to build your new kernel.
-
The make bzImage command compiles the kernel and creates a gzip compressed kernel image file.
On The Job The make bzImage process took about 20 minutes on my computer with a 1.2GHz CPU.
-
Now you need to build your modules (you did include kernel module support, didn't you?). Use make modules to build all your modules.
On The Job The make modules process took about 50 minutes on my computer with a 1.2GHz CPU.
-
Now you need to install your newly made modules, which will install all your loadable modules into a new subdirectory of the /lib/modules/kernelversion directory. The kernelversion should correspond to the EXTRAVERSION variable in your Makefile. Use make modules_install to install your modules.
-
With our kernel now built, we need to move it to /boot before we can boot from it. Run the make install command to copy the new kernel and create a new Initial RAM Disk file (initrd) in the /boot directory. It also updates the default GRUB boot loader.
On The Job The make install command copies your new kernel from the /usr/src/linux-2.4/arch/i386/boot to the /boot directory. It also uses the mkinitrd command to create a new Initial RAM disk in the /boot directory.
Verify the changes to the /boot directory.
Building a kernel is an involved process, but it follows a standard pattern. It is very important that you become familiar with kernel construction procedures and troubleshooting. Refer to the following Scenario & Solution for some common problems encountered and their recommended solutions.
| You looked under /usr/src/ but did not see the Linux kernel source code. What did you do wrong? | You did not install the kernel source code. Install the kernel-source and related RPMs or use the Red Hat Package Management utility to install the Kernel Development package group. |
| You configured the kernel as a monolithic kernel, but when you run make bzImage, it fails, saying the kernel is too big. What should you do? | You must reconfigure your kernel to use modules. There are limits on the size of a compressed kernel, so you should always build a modular kernel. |
| You can't find your new kernel. | Did you create an appropriate EXTRAVERSION variable in your Makefile? Did you use this variable throughout this process? If not, then you may not be able to correctly locate the kernel or its modules. |
|
| < Day Day Up > |
|
EAN: N/A
Pages: 194