Certification Objective 1.02: Linux Filesystem Hierarchy and Structure
|
| < Day Day Up > |
|
Everything in Linux can be reduced to a file. Partitions are associated with filesystem device nodes such as /dev/hda1. Hardware components are associated with node files such as /dev/modem. Detected devices are documented as files in the /proc directory. The Filesystem Hierarchy Standard (FHS) is the official way to organize files in Unix and Linux directories. As with the other sections, this introduction provides only the most basic overview of the FHS. More information is available from the official FHS home page at www.pathname.com/fhs.
Linux Filesystems and Directories
Several major directories are associated with all modern Unix/Linux operating systems. These directories organize user files, drivers, kernels, logs, programs, utilities, and more into different categories. The standardization of the FHS makes it easier for users of other Unix-based operating systems to understand the basics of Linux.
Every FHS starts with the root directory, also known by its symbol, the single forward slash (/). All of the other directories shown in Table 1-1 are subdirectories of the root directory. Unless they are mounted separately, you can also find their files on the same partition as the root directory.
| Directory | Description |
|---|---|
| / | The root directory, the top-level directory in the FHS. All other directories are subdirectories of root, which is always mounted on some partition. |
| /bin | Essential command line utilities. Should not be mounted separately; otherwise, it could be difficult to get to these utilities when using a rescue disk. |
| /boot | Includes Linux startup files, including the Linux kernel. The default, 100MB, is usually sufficient for a typical modular kernel and additional kernels that you might install during the RHCE or RHCT exams. |
| /dev | Hardware and software device drivers for everything from floppy drives to terminals. Do not mount this directory on a separate partition. |
| /etc | Most basic configuration files. |
| /home | Home directories for almost every user. |
| /lib | Program libraries for the kernel and various command line utilities. Do not mount this directory on a separate partition. |
| /mnt | The mount point for removable media, including floppy drives, CD-ROMs, and Zip disks. |
| /opt | Applications such as the WordPerfect or OpenOffice.org Office suites. |
| /proc | Currently running kernel-related processes, including device assignments such as IRQ ports, I/O addresses, and DMA channels. |
| /root | The home directory of the root user. |
| /sbin | System administration commands. Don't mount this directory separately. |
| /tmp | Temporary files. By default, Red Hat Enterprise Linux deletes all files in this directory periodically. |
| /usr | Small programs accessible to all users. Includes many system administration commands and utilities. |
| /var | Variable data, including log files and printer spools. |
Mounted directories are often known as volumes, which can span multiple partitions. However, while the root directory (/) is the top-level directory in the FHS, the root user's home directory (/root) is just a subdirectory.
| On The Job | In Linux, the word 'filesystem' has several different meanings. For example, a filesystem can refer to the FHS, an individual partition, or a format such as ext3. A filesystem device node such as /dev/sda1 represents the partition on which you can mount a directory. |
Media Devices
Several basic types of media are accessible to most PCs, including IDE hard disks, floppy drives, CD/DVD drives, and the various standards of SCSI devices. Other media are accessible through other PC ports, including serial, parallel, USB, and IEEE 1394. You can use Linux to manage all of these types of media.
Most media devices are detected automatically. Linux may require a bit of help for some devices described in Chapter 2. But in the context of the Linux FHS, media devices, like all others, are part of the /dev directory. Typical media devices are described in Table 1-2.
| Media Device | Device File |
|---|---|
| Floppy drive | /dev/fd0 |
| IDE hard drive | First IDE drive = /dev/had |
| SCSI hard drive | First SCSI drive = /dev/sda |
| Parallel port drives | First IDE drive = /dev/pd1 |
| USB drives | Varies widely |
| IEEE 1394 drives | IEEE 1394 (a.k.a. FireWire, iLink) is actually a SCSI standard, so these are controlled in Linux as SCSI devices |
Making Reference to Devices in /dev
Take a look at the files in the /dev directory. Use the ls -l /dev | more command. Scroll through the long list for a while. Are you confused yet? Well, there's a method to this madness. Some devices are linked to others, and that actually makes it easier to understand what is connected to what. For example, the virtual device files /dev/mouse and /dev/modem are easier to identify than the true device files. Generally, these devices are automatically linked to the actual device files during Linux installation. For example, if you have a mouse and modem installed, the following commands illustrate possible links between these components and the actual device files:
# ls -l /dev/mouse lrwxrwxrwx 1 root root 5 Apr 18 12:17 /dev/mouse -> psaux # ls -l /dev/modem lrwxrwxrwx 1 root root 5 Apr 18 12:17 /dev/modem -> /dev/ttyS0
The first output shows that /dev/mouse is linked directly to the PS/2 device driver port, and that /dev/modem is linked directly to the first serial port, which corresponds to COM1 in the Microsoft world.
Filesystem Formatting and Checking
Three basic tools are available to manage the filesystem on various partitions: fdisk, mkfs, and fsck. They can help you configure partitions as well as create, and then check and repair, different filesystems. As with the rest of this chapter, this section covers only the very basics; for more information, see the man page associated with each respective command tool.
fdisk
The Linux fdisk utility is a lot more versatile than its Microsoft counterpart. But to open it, you need to know the device file associated with the hard drive that you want to change. Identifying the hard disk device file is covered in Chapter 2. Assuming you want to manage the partitions on the first SCSI hard disk, enter the following command:
# fdisk /dev/sda
As you can see in Figure 1-3, the fdisk utility is flexible. Some key fdisk commands are described in Table 1-3.
| fdisk Command | Description |
|---|---|
| a | Allows you to specify the bootable Linux partition (with /boot). |
| l | Lists known partition types; fdisk can create partitions that conform to any of these filesystems. |
| n | Adds a new partition; works only if there is free space on the disk that hasn't already been allocated to an existing partition. |
| q | Quits without saving any changes. |
| t | Changes the partition filesystem. |
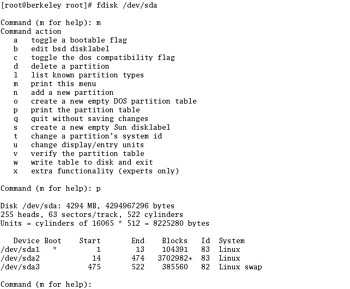
Figure 1-3: Linux fdisk commands; p returns the partition table
mkfs
To format a Linux partition, apply the mkfs command. It allows you to format a partition to a number of different filesystems. To format a typical partition such as /dev/hda2 to the current Red Hat standard, the third extended filesystem, run the following command:
# mkfs -t ext3 /dev/hda2
Running as Root
Throughout the book, I'm assuming that you're running commands after having logged in as the root user. While it may not be the best practice on the job, it can save you a little bit of time on the RHCT and RHCE exams. For example, if you've logged in as a regular user, you'd start fdisk with the /sbin/fdisk command. This applies even if you've taken administrative privileges with the su command. (I know, you could take administrative privileges with the root user PATH with the su - root command, but time is of the essence on these exams.) On the other hand, if you log in as the root user, the default root $PATH variable, means all you need to type is fdisk.
The mkfs command also serves as a 'front-end,' depending on the filesystem format. For example, if you're formatting a Red Hat standard ext3 filesystem, mkfs by itself automatically calls the mkfs.ext3 command. Therefore, if you're reformatting an ext3 filesystem, the following command is sufficient:
# mkfs /dev/hda2
| On The Job | Be careful with the mkfs command. First, back up any data on the subject partition and computer. This command erases all data on the specified partition. |
fsck
The fsck command is functionally similar to the Microsoft chkdsk command. It analyzes the specified filesystem and performs repairs as required. Assume you're having problems with files in the /var directory, which happens to be mounted on /dev/hda7. If you want to run fsck, unmount that filesystem first. In some cases, you may need to go into single-user mode with the init 1 command before you can unmount a filesystem. To unmount, analyze, then remount the filesystem noted in this section, and run the following commands:
# umount /var # fsck -t ext3 /dev/hda7 # mount /dev/hda7 /var
The fsck command also serves as a 'front-end,' depending on the filesystem format. For example, if you're formatting an ext2 or ext3 filesystem, fsck by itself automatically calls the e2fsck command (which works for both filesystems). Therefore, if you're checking an ext3 filesystem, once you unmount it with the umount command, the following command is sufficient:
# fsck /dev/hda7
Multiple Partitions with One Filesystem
The Logical Volume Manager (LVM) enables you to set up one filesystem on multiple partitions. For example, assume you're adding more users and are running out of room in your /home directory. You don't have any unpartitioned space available on your current hard disk.
With the LVM, all you need to do is add another hard disk, configure some partitions, back up /home, and use the LVM tools to combine the new partition and the one used by /home into a volume set. You may need to install the LVM rpm package. Once it is installed, the steps are fairly straightforward, as described in the following exercise:
Exercise 1-2: Creating a New LVM Partition
Logical Volume Management (LVM) is new to RHEL 3 and is more important than the prerequisite skills covered in most of this chapter. The latest available Red Hat Exam Prep guide includes LVM requirements on both parts of the RHCE exam. For more information on LVM, see Chapters 3 and 11.
-
Add a new hard disk.
-
Create new partitions. Assign the Linux LVM filesystem to one or more of these partitions. This can be easily done with the Linux fdisk utility.
-
Back up /home. Assign the LVM filesystem to that partition.
-
Scan for Linux LVM filesystems with the vgscan utility, to create a database for other LVM commands.
-
Create volumes for the set with the pvcreate /dev/partition command.
-
Add the desired volumes to a specific volume group with the vgcreate groupname /dev/partition1 /dev/partition2 … command.
-
Now you can create a logical volume. Use the lvcreate -L-xyM -n volname groupname command, where xy is the size of the volume, and groupname is the volume group name from the previous step.
-
Finally, you can format the logical volume with the mkfs command for the desired filesystem (usually ext2 or ext3), using the device name returned by the lvcreate command.
Mounting Partitions
The mount command can be used to attach local and network partitions to specified directories. Mount points are not fixed; you can mount a CD drive or even a Samba share to any empty directory where you have appropriate permissions.
There are standard mount points based on the FHS. The following commands mount a floppy with the VFAT filesystem, a CD formatted to the ISO 9660 filesystem, and a Zip drive. The devices may be different on your system; if in doubt, look through the startup messages with dmesg | less.
# mount -t vfat /dev/fd0 /mnt/floppy # mount -t iso9660 /dev/cdrom /mnt/cdrom # mount /dev/sdc
| Exam Watch | The following section covers only the most basic of commands that you can use in Linux. It describes only a few of the things that you can do with each command. Unfortunately, a full discussion would require several hundred more pages. Expect to know considerably more about commands for the RHCE and RHCT exams. If you feel a need for a more solid grounding in basic commands, get more information by reading Red Hat: The Complete Reference, Enterprise Linux & Fedora Edition, by Richard Petersen and Ibrahim Haddad. |
|
| < Day Day Up > |
|
EAN: N/A
Pages: 194