Section 7.9. I Need to Work with Microsoft-Formatted Partitions
7.9. I Need to Work with Microsoft-Formatted PartitionsUsers who continue to run Microsoft Windows on dual-boot systems with Linux need access to Windows filesystems from Linux. Even users in the process of converting to Linux may retain important files on Microsoft-formatted partitions and want to read or write them from Linux. Naturally, you'll want to encourage users to run Linux whenever possible. Therefore, you'll need to help your users access Microsoft partitions from Linux on a local computer. Samba is no help in this case because it offers access to filesystems on running operating systems, not on alternative operating systems that haven't been booted. Linux has no problems with local partitions formatted as one of the various File Allocation Table (FAT) filesystems. You can read and write files to any partition with this format. If the FAT partition is available on a local hard drive, you can mount that partition like any Linux partition on that computer. Read and write access to such partitions are enabled by default in current Linux kernels. Unfortunately, Linux does not work as well with the various Microsoft New Technology File Systems (NTFS). It's easy enough to mount an NTFS partition. Current Linux kernels allow you to read and copy files from such partitions. However, writing to an NTFS partition with current Linux distributions puts all the files on that partition at risk, due to corruption. But there is another option based on Jan Kratochvil's Captive NTFS system.
7.9.1. Mounting Microsoft PartitionsThe following is just a brief overview of how to configure access to Microsoft-formatted partitions on a local computer. If you need more information, refer to the SourceForge NTFS Project (http://linux-ntfs.sourceforge.net/). Current distributions don't always include software to mount NTFS partitions, even in read-only mode. However, if you're running Red Hat/Fedora distributions, you may be able to get RPMs for this purpose from the NTFS Project. If your first IDE hard drive partition is formatted as a VFAT file system, you can mount it locally with the following command (assuming the /mnt/vfat directory exists): # mount -t vfat /dev/hda1 /mnt/vfat If you want to configure permanent access to this partition, configure the mount in your /etc/fstab. The following command allows the root user to mount, read, and write to the noted partition. /dev/hda1 /mnt/vfat vfat defaults 0 0 But root-only access to Microsoft data can be annoying. To configure regular user access to the partition, you'll need to specify user and/or group IDs. For example, because all regular users on a SUSE computer are members of the users group, the following command in /etc/fstab enables read access for all regular SUSE users: /dev/hda1 /mnt/vfat vfat defaults,users 0 0 By default, however, write and execute access may be forbidden. To permit these, you'll need to set an appropriate umask. The following /etc/fstab entry allows complete access to all users: /dev/hda1 /mnt/vfat vfat users,gid=users,umask=000 0 0 For an NTFS system, you'll probably want to limit access to read-only. Otherwise, users may try to use experimental writing tools that could corrupt the partition. Thus, if /dev/hda2 is formatted to NTFS, you might include the following line in /etc/fstab: /dev/hda2 /mnt/ntfs ntfs ro,users,gid=users,umask=000 0 0 If you're on a distribution without a group for all users, you can create one. Alternatively, you can substitute a specific user ID. This could be sufficient on a workstation dedicated to a single user. 7.9.2. Configuring Captive NTFSThe Captive NTFS system searches through and configures connections to partitions formatted to that filesystem. As of this writing, it uses NTFS drivers available on a local partition. If you have an NTFS partition, you should already have a licensed version of Microsoft Windows with the needed drivers. The drawback of Captive NTFS is speed. A simple transfer of a 15 MB file to a Captive NTFS mounted filesystem took about six minutes in one test I ran. A similar transfer to a Microsoft VFAT partition took a couple of seconds.
The Captive NTFS package is available as a tarball and an RPM from the associated home page at http://www.jankratochvil.net/project/captive/. Once Captive NTFS is installed, check your /etc/fstab configuration file. If there's a current NTFS partition on your hard disks, Captive NTFS should have detected it and configured an installation command in that file. For instance, it added the following to my Debian /etc/fstab: /dev/hda1 /mnt/captive-noname captive-ntfs defaults,noauto 0,0 Next, you'll need to find and copy the appropriate NTFS system files from your Microsoft Windows installation. Captive NTFS includes its own search tool for this purpose, which you can start with the captive-install-acquire command. It's a slow process; it took all of the resources on my laptop with 768 MB of RAM for nearly an hour. It searches and then copies critical NTFS files to the /var/lib/captive directory, as shown in Figure 7-5. Figure 7-5. Searching for NTFS system files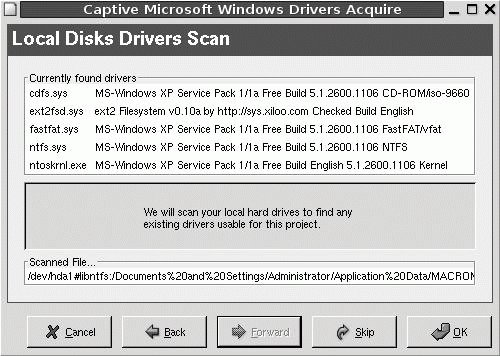
Now you can mount NTFS partitions in read/write mode. Using the configuration line added to my /etc/fstab, I can mount my NTFS partition with the following command: mount /dev/hda1 Unmounting the NTFS partition is a critical part of the process. It may seem to take a long time on your computer. That's because it's syncing any changes that you've made to the NTFS partition with the data on the actual hard disk. Because it may be annoying to have to remember to unmount a directory, you may wish to use the automounter for this purpose. We've addressed the basic configuration of this system earlier in this chapter. |

EAN: 2147483647
Pages: 144