Chapter 5. Cross-References
| CONTENTS |
- Typical Uses of Cross-References
- Planning for Cross-References
- How Cross-References Work
- Understanding the Cross-Reference Window
- Cross-Reference to a Subheading
- Cross-Reference to a Numbered Figure
- Cross-Referencing Other Document Files
- Creative Cross-References
- Cross-References and Conditional Text
- Cross-Referencing in Book Files
- Cross-References and PDF or View Only Files
- Updating Cross-References
- Unresolved Cross-References
- Summary
Often, a new piece of information that you encounter becomes meaningful or understandable only when it relates to some other item of information that you have already encountered. This is true whether you're reading from a book, browsing the Web, or listening to a CD.
As information receivers, people don't give much thought to cross-references. They are simply a part of life. As a writer, you must give cross-references more consideration. You need to manage the connections between items of information within documents actively.
In the old days when all documents were generated on paper, or even with simple text editors, keeping track of the "shadow map" or web of cross-reference relationships within documents was an overwhelming manual task. Whenever page numbers or content changed, the process of updating cross-references not only had a high-error rate, but it took an insane amount of time. FrameMaker makes it easy to include, update, and maintain cross-references in your documents. What used to take hours now takes seconds. Ahhh ... the wonder of technology.
This chapter explores the world of cross-references according to FrameMaker. You begin with typical uses and how they work before you move on to the finer detail of integrating cross-references into documents. I also review how to get those cross-references looking their best, what to do when they misbehave, and how to use them in creative ways.
Typical Uses of Cross-References
In the real world, cross-references refer readers to another location in the document that contains related information. For example, technical writing steps might refer readers to a figure that illustrates what the author is communicating. Or an overview of a topic might refer readers to a more-detailed discussion on the same topic somewhere else in the document.
Typically, cross-references are structured like this:
-
See Figure 2.3 on page 4
-
See Figure 2.3
-
Figure 2.3
-
See Chapter 9, "The Good Life," on page 70
-
Page 70, "The Good Life"
-
See Problem 6 in Section 7.3.
You can structure cross-references in your documents in many ways. How you structure cross-references in your documents is up to you. This chapter provides a solid foundation on which to build a variety of cross-references in your documents.
Planning for Cross-References
As the creator of cross-references, it's important that you present cross-references in a consistent manner throughout your documents. In the same way that each page of your document follows a consistent layout, consistency applies to cross-references for both appearance and structure. With consistent cross-references, your readers have an easier time recognizing cross-references in documents and navigating through pages.
Therefore, before you start cross-referencing, make a plan. Although FrameMaker's powerful cross-referencing tools make it easy to create and maintain cross-references, you must come up with a format that works well for your documents and decide what type of things you want to cross-reference. Your plan will consist of the following:
Note
See Chapter 3 for information about setting up numbering for sections, figures, and tables.
-
Make a list of the type of items that you plan to cross-reference for example, chapters, sections, figures, tables, and pages.
-
Decide how you want to format cross-references to each of the selected elements. For example, if sections have both numbers and titles, do you want to refer to them by both number and title or by number only? How do you want to set off the title (for example, in quotation marks or in parentheses)? Do you want to use the word "See" or avoid it? Settle on a few (usually two or three) standard cross-reference formats for each type of element.
After you have a good idea of the type of cross-reference formats you plan to use in documents, put some example cross-references together and create all the formats you will need first. The next section discusses specifically about how cross-references work in the world of FrameMaker.
How Cross-References Work
Cross-references in FrameMaker are comprised of two parts: source and format. Regardless of how you want to structure your cross-references, understanding these two parts is essential to successful integration of cross-references in your real-world documents.
Source Information
The source of a cross-reference is the information that identifies what is being referenced. For example, if a cross-reference reads
See Chapter 9, "Ain't Life Grand," on page 77
the Chapter 9 heading is the source for that cross-reference. If a cross-reference reads
Figure 9.3 on page 7
the Figure 9.3 numbered title is the source for that cross-reference.
Source information is identified in FrameMaker by either paragraph tags or spot cross-reference markers.
Paragraph Tags
As you know, each paragraph in FrameMaker is identified with a paragraph tag. Therefore, paragraph tags are the most-commonly used way to indicate source information in cross-references. Most of the time, the information being referenced is a chapter title, subheading, or figure title, and usually consists of one or two lines.
Here is how paragraph tags work with cross-referencing: Say that chapter titles are tagged with the paragraph tag Chapter. If you want to use the chapter title as the source of your cross-reference, you would select the Chapter paragraph tag as the source type. Then a list is displayed with all paragraphs in the selected document that are tagged with Chapter. Next, choose which particular paragraph you want to use as the source text for the cross-reference.
Note that if you include the page number as part of cross-references, the page number is always that of the first page that contains the source information. If the cross-reference refers to a figure, the page that will show up in the reference will be the one on which the figure appears. If the cross-reference is to a chapter or section heading, the page will be the one on which the chapter or section title appears regardless of how many pages the chapter or section spans.
Spot Cross-Reference Markers
Back to Basics
Page numbers in cross-references refer to the first page of source information.
If your sections are sufficiently short that the information to which you want to refer the reader at least begins on the first page of its section, a cross-reference to the paragraph tag for the section heading will direct the reader to the correct page. On the other hand, if the source information to which you want to refer is (or might be) located somewhere after the first page of a section that spans two or more pages, spot cross-referencing is another method that you can use.
Spot cross-references are indicated with a special cross-reference marker rather than a paragraph tag. You can insert a spot cross-reference marker at the exact location of the text you want to reference, such as the second page of the source section.Then the page number displayed in the cross-reference will be the correct page that contains the source information, rather than the first page of the section that contains the section head.
Cross-references to a logical unit in the document, such as a numbered section, are often preferred to those that only reference a page number. Therefore, cross-references should be to paragraph tags rather than to spot cross-reference markers wherever possible.
Formatting
After you determine what types of information items you want to cross-reference, the next step is to choose the formats in which you want that information to be displayed. To make that choice, you need to understand the possibilities that FrameMaker offers. For example, say that you want to cross-reference a numbered chapter title in the current document. On the document body page, the chapter title actually reads
Chapter 5 Ain't Life Grand
You might want the cross-reference to read
See Chapter 5, Ain't Life Grand , on page 9.
or
Chapter 5 on page 9, ...
or
(see " Ain't Life Grand")
or
see Chapter 5 (page 9)
The source information can supply an autonumber and title as well as a page number, but you don't have to display all these parts in the cross-reference.
How can these other elements be added, and how can you use FrameMaker to ensure that the cross-references are presented to the user in a consistent manner? That's where formats come in handy. Cross-reference formats are vitally important to the success of cross-references. Formats determine the structure of cross-references. Formats work behind-the-scenes to define how source information is displayed in the cross-reference.
Formats of cross-references are made up of character formatting, constant text, and various parts of the source information itself. For example, the format of the cross-reference
See Chapter 5 , Ain't Life Grand , on page 9.
comprises a combination of various parts of the source information (the chapter number, the chapter title, and page number) with text elements (the words "See Chapter" and "on page" as well as the period, commas, and spaces).
These various parts of source information are represented by building blocks in cross-reference formats. For example, the autonumber format of the source information paragraph, which yields the chapter number when the source paragraph is tagged Chapter, is represented by the Building Block <$paranum>.
You can see that a lot goes into the way cross-references are displayed within content. It's a good idea to decide how you want to display cross-references in documents before you set up cross-reference formats. This is explored in more detail a little later in this chapter.
Understanding the Cross-Reference Window
You will see a lot of the Cross-Reference window if you are working with cross-references in your documents. This is a good time to take a look at the Cross-Reference window and understand the behind-the-scenes elements within it.
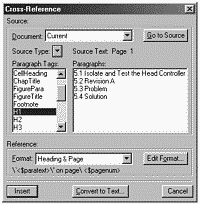
As shown in Figure 5.1, the Cross-Reference window is divided into two panes: Source (top) and Reference (bottom). These panes correspond to the source and format categories discussed in the section "How Cross-References Work" on page 115.
Figure 5.1. The organization of the Cross-Reference window.
Source Pane
You use the Source pane of the Cross-Reference window to specify the source information (a paragraph or a spot cross-reference marker) for each cross-reference:
-
Document. Use this drop-down list to select the document containing the source information that you plan to cross-reference. Current, the document in which you are currently working, is the default selection. If you plan to reference a FrameMaker document file other than the current file, that file must be open in order for it to be displayed in the list.
-
Go to Source. Click on this button to go to the source information selected in the lists at the bottom of the Source pane. The Cross-Reference window closes, and the page with the source information appears. If the source information is part of a different document, that document will become active and the page with the source will be displayed. If the source document is closed, you will be prompted to open the source file.
-
Source Type. Choose either Paragraphs or Cross-Reference Markers from the list. Use Paragraphs when referencing actual paragraphs in a source document (such as chapter or section heads, or figures), and use Cross-Reference Markers for spot cross-referencing.
When Paragraphs is selected from the Source Type list, the two lists at the bottom of the Source pane are headed Paragraph Tags and Paragraphs:
-
Paragraph Tags. This is a list of available paragraph tags in the selected source document. Choose one tag from this list to display the paragraphs that have that tag in the right-hand list.
-
Paragraphs. This is a list of the paragraphs in the source document that are marked with the paragraph tag selected from the left-hand list. If you select a Paragraph Tag on the left and no Paragraph on the right, an error message appears.
Note
Source text for a cross-reference to a paragraph is a combination of both a selected Paragraph Tag and Paragraphs text, never just one or the other.
When Cross-Reference Markers is selected from the Source Type list, the two lists at the bottom of the Source panel are headed Marker Types and Cross-Reference Markers:
-
Marker Types. This is a list of the possible types of spot cross-reference markers in the source document. As a default, FrameMaker provides one spot cross-reference marker type, "Cross-Ref."
-
Cross-Reference Markers. This is a list of all the cross-reference markers of the type selected in the left-hand list that are in the source document. Just as a cross-reference to a paragraph requires that you select both a paragraph tag and a paragraph, a spot cross-reference requires you to select both a marker type and a cross-reference marker of that type.
Note
The source for a spot cross-reference is a combination of a selected Marker Type and a Cross-Reference Marker, never just one or the other.
Reference Pane
The Reference pane contains the following features:
-
Format. The current (most-recently selected) cross-reference format is displayed. The name of the selected format appears in the drop-down list window, and the definition of the format is displayed directly below the name. If other formats are available, use the list to display and select another format.
-
Edit Format. Use this to add, change, or delete the selected cross-reference format. Clicking this button brings up the Edit Cross-Reference Format window, described in the section, "Creating a New Format" on page 122.
-
Convert to Text. Cross-references are inserted in documents as blocks of non-editable text, which are updated automatically with changes in source information. If you want to convert a cross-reference to editable text, use this button. After it's converted, the cross-reference will no longer update automatically and will be just like other text in your document.
Note
See page 148 for more information about how and when cross-references are updated.
The Big Five: Built-In Cross-Reference Formats
FrameMaker provides five default cross-reference formats when a new FrameMaker document is started using File > New > Document > Use Blank Paper:
-
Heading & Page
-
Page
-
See Heading & Page
-
Table All
-
Table Number & Page
You might have seen these in the Special > Cross-Reference > Format list. These default cross-reference formats might be included in the FrameMaker template you are using. If so, they may or may not be useful to your document, depending on whether they have been customized. If they have not been customized for your document, you can either delete or ignore those formats that you don't plan to use.
Cross-Reference to a Subheading
Regardless of whether you want to work with cross-references to chapter headings, figure titles, or some other information in your document, these exercises provide you with the understanding necessary to get the job done.
First, I show you how to start out with a simple cross-reference to a tagged paragraph within the same document and build from there, adding more-complicated elements along the way.
For this section, assume that you have a document with numbered subheadings that are tagged with the paragraph tag H2. This second-level subheading comprises an autonumber format (consisting of the chapter number, a section number, and a subsection number) and title text. Table 5.1 shows the name, autonumber format, and display of the Subheading Level 2 paragraph tag. In this example, you also define a new cross-reference format, Subhead. Subhead will display the title of the cross-referenced subsection that is, the text of the source information subheading paragraph.
Note
See Chapter 3 for more information about autonumber formats.
| Paragraph Tag | Autonumber Format | Display |
|---|---|---|
| H2 | C:<$chapnum>.<n>.<n+> | 9.2.2 Working with Microsoft Word Text |
First, I discuss creating a new cross-reference format in the next section, "Creating a New Format," and you will proceed to insert a cross-reference using that format in the section "Setting Up and Inserting a Cross-Reference;" then, in the sections, "Adding Autonumber Formats" through "Volume Numbers," enhancing an existing cross-reference format is discussed. In the real world, you can do these in any order that you want. For example, you can insert a cross-reference before you set up or edit a format, or vice versa.
Creating a New Format
As you read in the section "Formatting" on page 117, formats work behind-the-scenes to display cross-references correctly. This exercise guides you through the steps to create new formats that you might need in documents and also help you understand what's behind the formats you are currently using.
The first format you will create will display the text of the source information in the cross-reference. When a heading is chosen as the source, the cross-reference will contain the title of the section to which the heading belongs.
Here's how to do it:
-
Select Special > Cross-Reference.
The Cross-Reference window appears.
-
Click on Edit Format.
The Edit Cross-Reference Format window appears. You can use this window to create a new cross-reference format. You can also modify any existing format in the Edit Cross-Reference Format window; it does not matter what format was showing in the Format list in the Cross-Reference window.
The Edit Cross-Reference Format window comprises the following controls:
-
Name. This is the name of the format. This name shows up in the Format drop-down list in the Cross-Reference window. It's a good idea to give formats sensible names so that other people who use them have a clue about their purpose.
-
Definition. This is how the cross-reference is structured. The structure consists of a combination of text and various Building Blocks that represent source information.
-
Formats. This is a list of formats that are included in this document. You can click on any one format in the list to edit its name or definition, or delete it from the list.
-
Building Blocks. Building Blocks represent specific items of source information. For example, the Building Block <$pagenum> causes the page number of the source information to be displayed in the cross-reference, whereas <$paranum> means that the autonumber format of the source information will be displayed in the cross-reference. You can choose any combination of Building Blocks in format definitions.
Note
See Chapters 3 and 4 for more information on the Building Blocks used in autonumber formats and running headers and footers.
Using these controls, you can name and define a new format:
-
Select the text in the Name field and press the Delete key.
The current name is deleted from the Name field.
-
Type Subhead in the Name field.
Subhead is the name of the new format. This means that Subhead becomes one of the choices in the Format list in the Cross-Reference window.
-
Select <$paratext> from the Building Block list.
The Building Block <$paratext> is inserted into the Definition field. The <$paratext> block represents the text of the source information paragraph. If the cross-reference is to a heading, <$paratext> produces the title of the section to which the heading applies. Because <$paratext> is the only Building Block selected, only the text of the source information will be displayed in the cross-reference. Even if an autonumber format is included in the source information, it will not be displayed in this type of cross-reference format.
-
Click on the Add button.
The new format, Subhead, is added to the Formats list.
-
Click on Done.
You return to the Cross-Reference window. Subhead now displays in the Format list. You can set up and insert a cross-reference with the Subhead format.
Setting Up and Inserting a Cross-Reference
Back to Basics
Click in the paragraph and view the status bar for paragraph tag information.
Now that you defined a cross-reference format in the section "Creating a New Format" on page 122, it's time to figure out how to insert the cross-reference itself. First, place the insertion cursor in the exact location where you want the cross-reference to appear. It's a good idea to know the paragraph tag name of the source information beforehand. If you do not, you will wander through source information in the Cross-Reference window, and that can take some time. For example, if you want to create a cross-reference to a figure title, check the paragraph tag of the figure title before moving on.
To insert a cross-reference, follow these steps:
-
Select Special > Cross-Reference.
The Cross-Reference window appears.
-
Select Current from the Document list in the Source pane.
Current is the default selection. Use Current when you insert a cross-reference to source information within the same document file.
-
Click on the Source Type button. Select Paragraph Tags from the Source Type pop-up menu.
Paragraph Tags is the default selection. Use Paragraph Tags when referencing paragraphs (such as section headers) in a source document.
-
Select H2 from the Paragraph Tag list on the left.
H2 is the name of the tag for the type of paragraph (Subheading Level 2) to which you are creating a cross-reference. After the tag name is selected, all paragraphs in the current document that are tagged with H2 will be displayed in the Paragraphs list on the right side. Experiment by selecting different paragraph tags on the left to see what pops up on the right.
-
Select "9.2.2 Working with Microsoft Word Text" from the Paragraphs list (see Figure 5.2).
Figure 5.2. The selected paragraph tag and source paragraph.
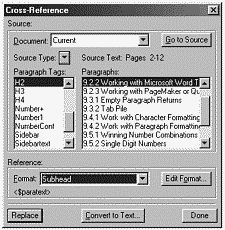
This paragraph is the source information that will be displayed in the cross-reference. If you choose a different paragraph in the list, that source information will be displayed in the cross-reference. Keep in mind that, even though an autonumber format is displayed in the Paragraphs source list as well as a title, it will not necessarily be displayed in the actual cross-reference. What is displayed in the cross-reference is determined by the format structure.
-
Select Subhead from the Format list in the Reference pane.
The definition of Subhead is displayed directly below its name. In the section, "Creating a New Format," you defined the new Subhead format to display only the text of the source information.
-
Click Insert.
The cross-reference is inserted at the insertion cursor. (Figure 5.3 has the cross-reference highlighted so you can see it better.)
Figure 5.3. The cross-reference is inserted.

Back to Basics
Type a space on either side of the cross-reference once inserted within text.
Marker Awareness
After a cross-reference is inserted into your document, a marker is also inserted at the source paragraph, whether that source paragraph is in the current document or in a different document file. You will not see this marker being inserted. This action is transparent to you. Cross-reference markers are inserted at the beginning of source paragraphs and look just like other marker types in FrameMaker.
Back to Basics
You can turn on text symbols to see if markers are in the text. Just select View > Text Symbols.
Take a quick look at a cross-reference marker so you become more familiar with it. To view the marker in the source paragraph, either manually move to that page of the document or do the following:
Back to Basics
You can find markers by using Edit > Find/Change > Marker of Type > Cross Ref.
-
Double-click on the cross-reference.
The Cross-Reference window appears with the source information selected in the Paragraph Tags and Paragraphs lists. Note that the Source Text page number is displayed directly above the Paragraphs list.
-
Click on Go to Source.
The Cross-Reference window closes and the insertion cursor immediately goes to the source paragraph cross-reference marker.
Back to Basics
You can go directly to the source information by pressing Alt-Control-clicking the cross-reference.
Be careful not to delete cross-reference markers when you edit text in documents. If cross-reference markers are deleted, the cross-reference will not be able to find its source information, and an unresolved cross-reference error message will be displayed. For more information on solving unresolved cross-references, see the section "Unresolved Cross-References" on page 150.
Adding Autonumber Formats
Now that you know how to create a cross-reference format that displays the text of the source information, you can now move on to adding autonumbers into the mix.
You probably noticed that inserting a cross-reference is easy. The real work is in the formats, which determine what is displayed in the cross-reference.
If you have several cross-references throughout documents that use a particular format, and you decide to edit that format, the display of those cross-references will update based on the new format.
Go through these steps to add an autonumber to the existing Subhead cross-reference format, which was created to show only the title in the section, "Creating a New Format" on page 122.
Back to Basics
You can double-click any cross-reference to display the Cross-Reference window.
-
Select Special > Cross-Reference.
The Cross-Reference window appears.
-
Click on Edit Format.
The Edit Cross-Reference Format window appears with the Format Definition selected.
Be careful of fast-typing fingers! It's easy to hit a key on the keyboard and delete the current definition.
If Subhead is not the selected format, click one time on Subhead in the Formats list box. Its name and definition appears.
-
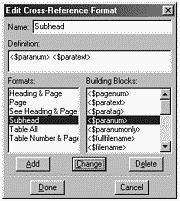
With the insertion cursor placed before the current definition, click one time on <$paranum> in the Building Block list.
The Building Block <$paranum> is inserted into the Definition field (see Figure 5.4). The <$paranum> block represents the autonumber format of the selected source paragraph. This means that the paragraph's autonumbering, whose format is defined in the Paragraph Designer numbering property, will be displayed in the cross-reference at the selected position.
Figure 5.4. The Add Autonumber format to cross-reference.
-
Type a space between the pointing brackets of the two Building Blocks.
A space is inserted between the Building Blocks <$paranum> and <$paratext> in the Definition field. This means that a space will be included between the autonumber and text of the cross-reference display. If you do not type a space, the autonumber and the text will run together.
-
Click on Change. Then click on Done.
The change you just made is incorporated into this format.
-
The Update Cross-References window appears (see Figure 5.5).
Figure 5.5. The Update Cross-References window.

Select Internal Cross-References. This means that cross-references to source information located in the current document will be updated.
If cross-references with this format have source paragraphs in other document files, and those documents are presently open in FrameMaker, select References to All Open Documents to update the cross-references to those files.
Select References to All Documents to update all cross-references, whether their source files are open or closed.
Click on Update to update the selected cross-references.
-
You return to the Cross-Reference window. You do not have to click on Replace because you are not replacing the current cross-reference; you have already updated the format for all cross-references that use this format. Click on Done to finish.
Adding the Page Number and Text
By now, you should have a good idea about the relationship between cross-reference formats and the way in which cross-references are displayed.
Take your understanding a step further and add a page number and typed text to the cross-reference format. The cross-reference that has been formatted, inserted, and modified previously, is displayed as
9.2.2 Working with Microsoft Word Text
Let's add the page number to this type of cross-reference:
9.2.2 Working with Microsoft Word Text on page 2
With a quick edit to the format, all cross-references that use this format will be updated with the new one automatically. This exercise begins with the Edit Cross-Reference Format window.
Tip
Type the word "See" and a space before the entire definition to include it in the cross-reference format.
-
Select Subhead from the Format list.
The definition of the Subhead format appears in the Definition field.
-
Place the insertion cursor after the <$paratext> Building Block in the Definition box. Type the words "on page". The words "on page" are inserted in the Format Definition field, so that the words "on page" will appear after the source paragraph text (the subsection title) in cross-references that use this format.
-
Select <$pagenum> from the Building Block list.
The Building Block <$pagenum>, which represents the page number of the source information, is inserted into the Definition field. This means that the page number of the source information will appear in the cross-reference immediately after the words "on page".
-
Make sure to insert a space in between the word "page" and the <$pagenum> Building Block. If you don't, the word "page" runs into the page number, and the cross-reference in the text will end with "page2."
-
Click on Change and Done.
You are taken to the Update Cross-References window. After you're there, select the desired set of references, then click on Update. All cross-references that use this format will be updated to use the new definition.
Adding a Dash of Style
Thus far, the format of the cross-reference that was formatted, inserted, and modified in the previous examples looks like this:
9.2.2 Working with Microsoft Word Text on page 2
The design of your documents might require that part but not all of the cross-reference be displayed with italic, bold, or some other character format.
By now, you know that the cross-reference itself is a single unit that can only be selected as such. You cannot use ordinary methods to insert characters into a cross-reference in text, nor can you use the B or I toolbar button to apply character formatting to a part of the cross-reference. That's where Character Format Building Blocks come in.
Back to Basics
You can create new character format tags with Format > Characters > Designer.
Character Format Building Blocks use existing character format tags. Before getting started with character format building blocks, its a good idea to check the Character Catalog in your FrameMaker document to see what character format tags are available. If the character format you plan to use is not already part of the catalog, you must first create a tag for it in the catalog. If it is not available in the Character Catalog, it will not be available in the list of Cross-Reference Formats Building Blocks.
For this example, you put the autonumber and text of the referenced information (the section number and title) into italics. FrameMaker provides the character tag Emphasis for italics. The remainder of the cross-reference will be the default font of the paragraph. The cross-reference will look like this:
9.2.2 Working with Microsoft Word Text on page 2
This exercise starts at the Edit Cross-Reference Format window:
-
Select Subhead from the Format list.
The format name "Subhead" appears in the Name field, and its definition appears in the Definition field.
-
Place the insertion cursor at the beginning of the definition, and select <Emphasis> from the Building Block list.
The Building Block <Emphasis> is inserted into the Definition. As a result of inserting this Building Block, all characters to the right of the <Emphasis> Building Block will be tagged with the Emphasis character tag and, therefore, will be formatted with italic.
-
Place the insertion cursor before the word "on" and select <Default Font> from the Building Block list.
The Building Block <Default Font> is inserted into the Definition. As a result, all characters to the right of <Default Font> are reset to the default font of the paragraph tag. If you do not reset to the default font, all the characters in the cross-reference will be italic, because of the <Emphasis> tag added in Step 2 of this exercise.
Back to Basics
The appearance of characters in Default Paragraph Font is determined by the paragraph tag properties.
Cross-Reference to a Numbered Figure
Just for fun and to get some practice, it's time to create a cross-reference to a numbered figure in your current document. Use the same principles as you did in the section "Cross-Reference to a Subheading on page 121, except that, this time, you'll combine all the steps into one exercise.
It's likely that in documents, you will create cross-references to a variety of source information and structure them in many different ways. For this exercise, you create a cross-reference format that's structured like this:
See Figure x.x Title on page x.
First, set up the cross-reference to a numbered figure. For this example, suppose that, in this document, the paragraph tag for figure titles is FigureTitle. Perform the following steps:
-
With the insertion cursor at the cross-reference location, select Special > Cross-Reference.
The Cross-Reference window appears.
-
Select Current from the Source > Document drop-down menu.
Current is the default selection. The current document is the location of the source information for this cross-reference.
-
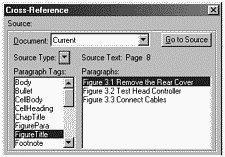
Select the name of the paragraph tag used for figure titles in the current document, FigureTitle, from the Paragraph Tags list.
FigureTitle will be selected in the list. All paragraphs tagged with FigureTitle (which should all be figure titles) will be displayed in the Paragraphs list on the right side.
-
Select Figure 3.1 Remove the Rear Cover from the Paragraphs list.
The paragraph "Figure 3.1 Remove the Rear Cover" is selected from the list of paragraphs (see Figure 5.6). As a result, this figure paragraph will be the source information for this cross-reference. A cross-reference marker will be inserted in the figure paragraph after the cross-reference is inserted.
Figure 5.6. Set up a cross-reference to a figure title.
Next, create a new format in which to display cross-references for figure titles:
-
Click on Edit Format.
The Edit Cross-Reference Format window appears. The current format selection, Heading & Page, is displayed in the Name box, and its definition appears in the Definition field. You might see a different format name displayed in your document.
-
Click on Heading & Page in the Name box, select the whole name, and delete it. Type "See Figure".
"See Figure" will be the name of the new cross-reference format. As a result, it is displayed in the Reference > Format drop-down list.
-
Click on the Definition field, select the entire definition, and delete it.
The Definition field becomes blank.
-
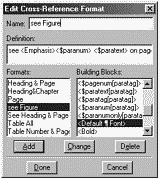
Type in the Definition field and select Building Blocks from the Building Blocks list to create a new format structure: See <Emphasis><$paranum> <$paratext> on page <$pagenum>.
The new definition is inserted into the Definition field.
-
Click on the Add button and then click on Done.
The new format is added to the list of formats, and you return to the Cross-Reference window (see Figure 5.7).
Figure 5.7. The definition of the "see Figure" format.
-
Click on Insert.
The cross-reference is inserted at the cursor location, and it uses the new format structure; see Figure 5.8.
Figure 5.8. The cross-reference to a figure is inserted into the document.

Back to Basics
Use \` and \' for left and right smart quotes.
Here are a few ideas for different format structures and the corresponding definitions.
| Cross-Reference Display | Format Definition |
|---|---|
| see Figure 3.1 | see <$paranum> |
| Figure 3.1 Remove the Rear Cover | <$paranum> <$paratext> |
| see Figure 3.1 on page 8 | see <$paranum> on page <$pagenum> |
| see Figure 3.1 , "Remove the Read Cover", on page 8 | see <$paranum>, \`<$paratext>\' on page <$pagenum> |
Cross-Referencing Other Document Files
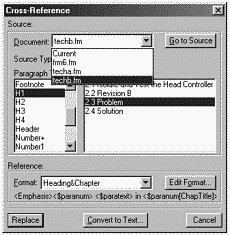
So far, you explored cross-references within the same file. What if you want to create cross-references to other files in your documents? This task requires the same procedure as cross-referencing within the current document, except for one thing: When you create cross-references to FrameMaker files other than the current file, the file containing the source information must be open in order to select it from the Document list in the Source pane of the Cross-Reference window, as shown in Figure 5.9. If the file isn't open, it doesn't show up in the document list.
Figure 5.9. Select the file from the Source Document menu.
Tip
Remember to save all open files to which you have created cross-references, or the markers will not be saved in the source file.
The file containing the source information must be open because, when you create a cross-reference to that file, it gets modified automatically by having a cross-reference marker inserted.
After you select the file from the list (see Figure 5.9), the paragraph tags from that file are displayed in the Paragraphs list.
Creative Cross-References
Now that you learned some basic principles of cross-references, let's discuss a few creative ways to work with them. In this section, I cover working with chapter and volume numbers, including using the volume number as text, as well as using cross-references to build a table of contents and understand the preceding paragraph technique.
Chapter Numbers
If you are including chapter numbers as part of the page number, you can make a slight adjustment to cross-reference formats to include this information in cross-references that display page numbers.
Previously, you learned about the <$pagenum> Building Block, which represents the page number in cross-reference formats. This does not, however, represent your document page number correctly if your document's actual page numbers look like this:
3-1, 3-2, 3-3, 3-4, and so on
In that case, a cross-reference to source information on page 2 of Chapter 3 of your document would look like this:
See Figure 3.1 , Remove the Rear Cover, on page 3-2.
Starting from the Edit Cross-Reference Format window, here's how to make the change you need in the cross-reference format:
-
Place the insertion cursor before <$pagenum> in the Definition field.
The cursor position specifies the location where you will insert the Building Block for the chapter number.
-
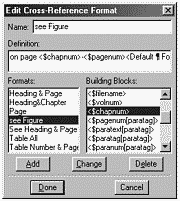
Select <$chapnum> from the Building Blocks list. Then type a hyphen.
The Building Block "<$chapnum>-" is inserted in the definition. The Building Block <$chapnum> represents the chapter number of the source information document. The hyphen is just one method that you can use to format the chapter number and page number together (see Figure 5.10).
Figure 5.10. Add the chapter number to the cross-reference format.
Back to Basics
You can set chapter numbers by selecting Format > Document > Numbering > Chapter.
Volume Numbers
Back to Basics
You can set volume numbers by selecting Format > Document > Numbering > Volume.
If you are using volume numbers in documents, you might want to refer the reader to the volume number, in addition to the chapter and page number of source information. Suppose that, in Volume I, you want to refer the reader to Figure 2-3 , in Volume II, Chapter 2.
Here are a couple of examples of using volume numbers in cross-references:
| Cross-Reference Display | Format Definition |
|---|---|
| See Figure 2-3 in Volume II on page 2-14. | See <$paranum> in Volume <$volnum> on page <$chapnum>-<$pagenum> |
| Page 2-14 of Volume II shows Figure 2-3 | Page <$chapnum>-<$pagenum> of Volume <$volnum> shows <$paranum> |
Using Text as a Volume Number
The volume number function in FrameMaker provides more than just the capability to add an autonumber to documents. You can also use this special function for text, such as a book name. Keep in mind that you can do this only if you are not already using the volume number as an actual number in documents.
Note
The Chapter Number function has the same text capability.
Why do this? Imagine that you have created two books for the same software tool, but one book is for beginners and the other book is for advanced users. You decide not to use a volume number, and use book titles instead. For this example, the software tool is named "Stock Market Analyzer" and the book titles are
-
Getting Started with Stock Market Analyzer
-
Advanced Stock Market Analyzer
In the beginner book, there will be cross-references to some of the advanced topics, and the advanced book will reference some beginner topics as reminders. For this exercise, you will start with the beginner book, Getting Started with Stock Market Analyzer. These steps begin with the book file, and the first chapter file in the book is selected.
Set the volume number to text:
-
Select Format > Document > Numbering.
The Numbering Properties window appears. Select the Volume tab, if it has not already been selected.
-
Select Text from the Format drop-down list.
Text appears in the Format box.
-
Type "Getting Started with Stock Market Analyzer" in the Volume # text field.
-
Click on the Set button (see Figure 5.11).
Figure 5.11. Change the volume numbers to use text.
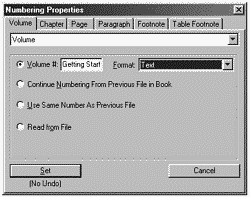
The volume number is set to the text "Getting Started with Stock Market Analyzer" instead of to a number. This means that, any time the volume number Building Block or variable is used, that text will be inserted rather than a number.
-
For each subsequent file in the book, open the file and use Format > Document > Numbering and select the Volume tab. Then, select the Use Same Number As Previous File radio button (see Figure 5.12).
Figure 5.12. You can set up book files to use previously set volume numbers.
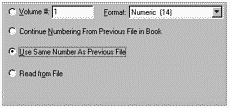
All files in the book will be set up to use the text you entered in the first chapter instead of a volume number.
After you finish, open the second book, Advanced Stock Market Analyzer. Follow the same steps as in the first book to set the volume number of each file to the name Advanced Stock Market Analyzer.
Now you are ready to insert a cross-reference in the beginning document, Getting Started with Stock Market Analyzer, that refers to a topic in the advanced document.
First, set up the format to display the cross-reference as
See Figure 3.1 in Advanced Stock Market Analyzer on page 3.2
-
From the Edit Cross-Reference Format window, clear the Name field and type a new format name, DocNameFigPage.
DocNameFigPage appears in the Name field.
-
Clear the Definition field and use text and building blocks to insert the new definition: See <$paranum> in <Emphasis><$volnum><Default Font> on page <$chapnum>.<$pagenum> (see Figure 5.13).
Figure 5.13. Define the cross-reference format using volume number.
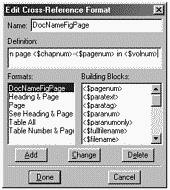
The new definition is inserted into the Definition field. The Building Block <$paranum> represents the autonumber, <$chapnum> notes the chapter number, <$pagenum> represents the page number, and <$volnum> notes the text you previously defined in the volume number text field.
-
Click on the Add button. Then click on Done.
The new definition is added to the Format list. You return to the Cross-Reference window.
Now that you set up the format, it's time to insert the cross-reference:
Back to Basics
Document files must be open to show up in the Document drop-down list in the Source pane of the Cross-Reference window.
-
Select the source document (techc.fm) from the Document drop-down menu.
The source document appears in the Document box.
-
Select FigureTitle from the Paragraph Tags list.
FigureTitle is the paragraph tag used for figure titles in the source document. All paragraphs tagged FigureTitle are displayed in the Paragraphs list.
-
Select Figure 3.1 Add Stock to Portfolio from the Paragraphs list (see Figure 5.14).
Figure 5.14. You can set up a cross-reference to figures in other documents.
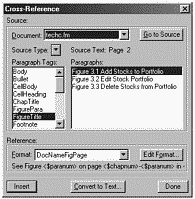
The text "Figure 3.1 Add Stock to Portfolio" is selected in the list. This is the source information that is displayed in the cross-reference.
-
Click on the Insert button.
The cross-reference is inserted into the document and displays as
See Figure 3.1 in Advanced Stock Market Analyzer on page 3.2
Note
See page 148 for more information on updating cross-references in documents.
If you decide to change the name of the advanced book, just change the name in the first file of the book and update the book file by opening the book file with File > Open and then selecting Edit > Update Book. All the subsequent files in the book will be updated based on the new name, because their volume numbers are set to Use Same Number as Previous File. Then open the book that contains the cross-references to the advanced book file, and update that book with Edit > Update Book. (The advanced book does not have to be open.) Each occurrence of the book name will change accordingly throughout each document file.
Using the Preceding-Paragraph Technique
Up to this point, you've been inserting cross-references that are directly linked to specific paragraphs as source information. In other words, each Building Block used in the definition represented some portion of the specific source information that you were linking to.
FrameMaker, however, provides a powerful, and often underrated, cross-reference tool that enables you to include information from a paragraph preceding the source paragraph in a cross-reference. Suppose you want to insert a cross-reference to Table 2.1 in your document, and you want readers to know that the table is within Section 2.4 (whose title happens to be "Solution for Correcting Junction Board"), regardless of where in Section 2.4 Table 2.1 actually resides. You want one cross-reference that reads
See Table 2.1 (in Section 2.4, Solution for Correcting Junction Board).
The preceding-paragraph technique enables you to insert the cross-reference, selecting just the table title as the source information. You will have to know the paragraph tag that is used for section headings. In this case, the paragraph tag is H1. You can set up the format to look for the last occurrence of an H1-tagged paragraph preceding the source information. It doesn't make a difference as to whether the last paragraph tagged H1 was 10 pages before or on the same page.
Starting with the Edit Cross-Reference Format window, do the following:
-
Clear the Name field and type the new format name, Table and Section. "Table and Section" is the format name that is displayed in both the Formats list in the Edit Cross-Reference Format window and the Reference Formats drop-down list in the Reference pane of the Cross-Reference window.
-
In the Definition field, type "See" followed by a space. Select <$paranum> from the Building Blocks list. Then type a space followed by "(in" with another space. Here, as has been the case until now, the Building Block <$paranum> represents the autonumber of the table title.
-
Select <$paranum[paratag]> and <$paratext[paratag]> from the Building Blocks list. Put a comma and a space between these Building Blocks, and put the ). characters after the last block.
The Building Blocks "<$paranum[paratag]>" and "<$paratext[paratag]>" are inserted into the Definition field. These blocks represent the autonumber and the text of the most-recent paragraph with the intended tag that precedes the source information. In these blocks, "paratag" is a placeholder for the paragraph tag that you want to reference, which contains the desired section number and title.
-
Replace "paratag" with H1 in the two Building Blocks <$paranum[paratag]> and <$paratext[paratag]> (see Figure 5.15).
Figure 5.15. You can set up a cross-reference format for preceding paragraphs.
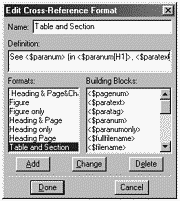
The definition should now read
See <$paranum> (in <$paranum[H1]>, <$paratext[H1]>).
As a result, the autonumber of the source information is displayed, followed by the autonumber and text of the last occurrence, before the source information, of a paragraph tagged H1.
-
Click on the Add button. Then click on Done.
Your new cross-reference format, "Table and Section," is added to the Format list. You return to the Cross-Reference window.
-
After you return to the Cross-Reference window, set up the cross-reference to the desired table in the source document. Then click on Insert to insert the cross-reference.
Building a Cross-Reference Table of Contents
Say that you want to include a short table of contents at the start of each chapter in a book. Cross-references provide an excellent way to create this table. Figure 5.16 shows an example:
Figure 5.16. A sample cross-referenced table of contents.

You could also generate the table of contents for the book and copy/paste each subset into their appropriate chapters each time you update the files. It's up to you. Try out this method. You might find it to be a real timesaver in the long run.
Note
See Chapter 8 for more information on generating a table of contents for a book.
First, set up the cross-reference format. This exercise starts at the Edit Cross-Reference Format window:
-
Clear the Name field and type the new format name TOC.
The new name, TOC, is displayed in the Name field and in the Reference Format drop-down list in the Cross-Reference window.
-
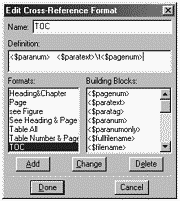
Type and select Building Blocks to insert <$paranum> <$paratext> \t <$pagenum> in the Definition field.
The Building Block <$paranum> represents the autonumber of the source information, <$paratext> represents the text, \t (which you have to type) represents a tab, and <$pagenum> represents the page number.
-
Click on Add and then Done.
The new TOC format is added to the Formats list (see Figure 5.17). You are returned to the Cross-Reference window.
Figure 5.17. The TOC cross-reference format definition.
Next, set up and insert the cross-references that will be part of your table of contents. Press Enter after each cross-reference is inserted. This action places each subsequent cross-reference on a new paragraph line.
Back to Basics
You can use Format > Paragraphs > Designer to create new tags.
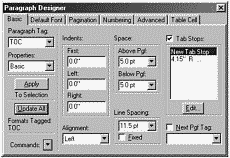
After you finish, set up a new paragraph tag that includes one tab stop, right-aligned where you want to show the page number (see Figure 5.18). Apply the new tag to each line of the cross-reference table of contents.
Figure 5.18. The TOC cross-reference paragraph tag.
Cross-References and Conditional Text
If you use both conditional text and cross-references in your documents, this is a worthwhile section for you.
Suppose that you insert a cross-reference to a certain piece of source information, and suppose you also apply a condition tag to that same piece of information. Then suppose you hide that condition tag. You run into that annoying problem of unresolved cross-references. Why does this happen?
Note
See Chapter 10 for more information on using, tagging, showing, and hiding conditional text.
When text is hidden, FrameMaker treats it as if it were deleted. For example, if hidden text is part of a numbered list, the list renumbers automatically as if the hidden text were deleted. Likewise, if hidden text is part of a running header or footer variable, it will not show up in the header or footer because it is not currently in view. In the same way, a cross-reference will not be able to find its source after the source is hidden.
This issue can get very complicated if you use many condition tags and refer to source information in various files. If you come up with unresolved cross-references because of hidden text, you can always turn those problem conditions back on; but, you might defeat your original purpose of using conditional text: to show different versions of a document without confusing them. If you turn the conditions back on, you will not have one version only in view.
What is the solution? Here's one useful approach: For every cross-reference that uses hidden or conditional text as its source, tag the cross-reference too with the same condition. Then, when that condition tag is hidden, the cross-reference is hidden as well, and you can avoid the problem altogether.
Cross-Referencing in Book Files
Cross-references in files that are part of a book behave the same way as cross-references in files that are not part of a book.
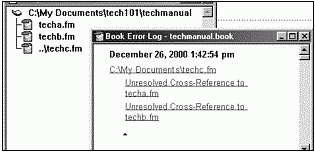
As far as cross-references are concerned, the main advantage to working with book files is the way unresolved cross-references are handled. The good news is that FrameMaker generates an organized list of unresolved cross-references in book files, with clickable items that take you to the cross-reference with the problem. Each document that contains unresolved cross-references is listed, and that document name is followed by an indented list of the documents that are supposed to contain the unresolved source information (see Figure 5.19).
Figure 5.19. A list of unresolved cross-references in book files.
After you have a list of problem cross-references, see the section "Unresolved Cross-References" on page 150 to learn how to solve them.
Cross-References and PDF or View Only Files
Documents produced in FrameMaker are commonly exported as HTML, PDF, or FrameMaker View Only files so that users can read them and print them (but not edit them) without having FrameMaker installed on their systems. When exporting to these file types, FrameMaker can preserve cross-references as hypertext links that work in the programs the users will use to view the documents. This section deals specifically with PDF andView Only documents and how they work with cross-references as hypertext links.
View Only Documents
Back to Basics
To make View Only press Esc Flk or select File > Save As > View Only.
FrameMaker View Only files enable others to read and print (but not edit) documents created in FrameMaker. Users who do not have FrameMaker can use FrameViewer, which is available from Adobe.
If you plan to create View Only documents, you get an added bonus with cross-references. When cross-references are part of a FrameMaker document that you convert to a View Only file, they are automatically converted to hypertext links.
Here's how to use cross-references in a View Only file:
Back to Basics
To test a cross-reference in a file without locking the file, Control-Alt-click on the cross-reference.
-
In a View Only file, place the insertion cursor over a cross-reference text area.
The insertion cursor changes to a hand with a pointing finger (see Figure 5.20).
Figure 5.20. In View Only files, the cursor changes to a hand when it hovers over a text area.

-
Click one time over the cross-reference text area.
The area becomes highlighted and FrameMaker jumps to the source information, whether it's in the current file or in a different file.
Note
When in the same location, cross-references take priority over hypertext commands
That's all there is to it!
PDF Documents
Portable Document Format, or PDF, is a common document distribution format that enables users with Adobe Acrobat or Acrobat Reader to view documents. Although PDF documents are not discussed in detail in this book, I do discuss how cross-references work in them.
Tip
Do not use the PDFWriter driver to create PDF documents. Instant hypertext links will not be activated using PDFWriter.
Just as with View Only documents, cross-references become instant hypertext links when FrameMaker documents are saved as PDF documents. These hypertext links make it easy for readers of your PDF documents to navigate.
Here's how to use cross-references in a PDF file:
-
In a PDF file, place the insertion cursor over a cross-reference text area. The insertion cursor change to a hand with a pointing finger (see Figure 5.21). Click one time.
Figure 5.21. The insertion cursor changes to a hand in PDF files when it hovers over a text area.

Acrobat jumps to and displays the source information, whether it is in the current file or in a different file.
Tip
Keep the same file path when creating PDF files.
Keep the following information in mind when you create a PDF file: To preserve FrameMaker cross-references as Acrobat hypertext areas, you must create the PDF file by selecting File > Save As and file type PDF. If you create the PDF file by printing to PDFWriter, the cross-references are converted to text, and they do not link to their sources.
If sources of cross-references are other documents, those documents must also be in PDF format in order for the hypertext links to work. If they are not, you will get a message similar to Figure 5.22.
Figure 5.22. The error message that's displayed when the source file was not converted to PDF.

Updating Cross-References
Cross-references are automatically updated each time a document containing cross-references is opened. You can also force cross-references in documents to be updated at any time while working in FrameMaker document files. You can also suppress the automatic update when the file is opened. This section discusses how to force and suppress the updating of cross-references.
Forcing an Update
If you massively edited a document, cross-references will not automatically update themselves. You need to run the Update References operation that FrameMaker provides. If you don't update cross-references, they simply display the most-recently updated source information. However, you don't have to perform the update after every change; you can update all the cross-references at once when you are ready.
To update cross-references at any time, follow these steps:
-
Select Edit > Update References.
The Update References window appears.
-
Click on the All Cross-References check box. Click Update.
All cross-references in this document will be updated, whether the source information is located in the current document or in another document file.
If unresolved cross-references are in the document file, you will get an unresolved cross-reference error message. For more information on solving this tricky problem, skip to the section "Unresolved Cross-References" on page 150.
Suppressing Automatic Updates
Automatic updating of cross-references, each time a document is opened, is a valuable feature, but it can be time-consuming when that document contains many cross-references.
If your documents have only a few cross-references sprinkled about, you don't have to worry about this time factor. These will update quickly. If, on the other hand, you have a massive collection of cross-references in a document, opening the file can take some time, especially when the source information is in other documents.
How much time does the automatic update take? That depends on how many cross-references are in your document, how fast your computer is, and whether the source information is in the current file or another file. Each case is different.
All such delay problems can be solved with one quick FrameMaker command: Suppress Automatic Updating. With this feature, cross-references will not be updated automatically every time a file containing them is opened.
Here's how to do suppress the automatic updating of cross-references:
-
Select Edit > Update References.
The Update References window appears. This window is used for both the Suppression command and manual updating of cross-references.
-
Click on the Commands button and select Suppress Automatic Updating.
The Suppress Automatic Updating window appears.
-
Click on the Suppress Automatic Updating of All Cross-References check box. Click on the Set button.
This means that cross-references with both internal and external source information will not be updated while the document is opened.
Note
Internal cross-references and cross-references to open documents will continue to be automatically updated when a document is printed.
Unresolved Cross-References
If you have never come across the Fix Unresolved Cross-References window, consider yourself lucky. If you have, you know that trying to resolve these cross-references that have come undone for one reason or another can be a challenge.
This section explores the "why"s and investigates the ways to solve unresolved cross-references, as well as how to locate individual occurrences in document files.
There are a few reasons why cross-references come undone:
-
A cross-reference marker was deleted from the source information.
-
The source information is part of conditional text that is hidden.
-
The name of the source file has changed.
-
The location (path) of the source file has changed.
The Update Unresolved Cross-References Window
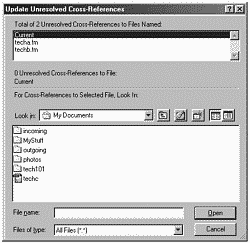
When you open a file with cross-references or update references some other way, and unresolved cross-references occur, you see the Update Unresolved Cross-References window. This is not an intuitive window, but it does serve a useful purpose: to show you which files contain source information that is no longer recognized by the current document's cross-references (for one reason or another). This window also points out how many total unresolved cross-references are contained in the current document, and how many of those are referenced in each of the individual source files.
You can resolve some, but not all, unresolved cross-references right from this window. If unresolved cross-references are caused by deleted cross-reference markers, you will not be able to use this window to resolve them. See the section "Finding Unresolved Cross-References and Their Sources" on page 155 for more information.
With that said, take a closer look at the Update Unresolved Cross-References window, shown in Figure 5.23, and see how it can work for you.
Figure 5.23. The Update Unresolved Cross-Reference window.
Back to Basics
If a file is closed and has unavailable fonts, open the file before you use the Update Unresolved Cross-References window.
Here is an example in which unresolved cross-references were introduced into a file in the following manner:
-
A directory called tech101 contained three files: techa.fm, techb.fm, and techc.fm.
-
The file techc.fm contained two cross-references: one to techb.fm and one to techa.fm. These cross-references worked fine.
-
The files were then saved and closed.
-
The name of techb.fm was changed to techbulb.fm.
-
The file techc.fm was moved outside the tech101 directory.
Here is how to use the Update Unresolved Cross-References window to fix the cross-reference problems that appear when techc.fm is reopened:
-
Open a file (techc.fm, in this example) that contains unresolved cross-references (or use Edit > Update References).
The Update Unresolved Cross-References window appears, as shown in Figure 5.23. The top portion of the window provides information about how many total unresolved cross-references are located in the file just opened; in this case, there are two total. Current is selected in the Files Named list. Look below the list to see there are no unresolved cross-references in the Current file. That is, none of the unresolved cross-references has a source within the current file.
-
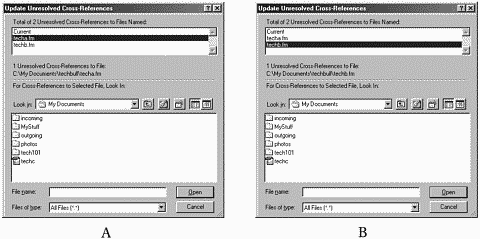
Click once on the second file in the list, techa.fm.
There is one unresolved cross-reference to source file techa.fm, as displayed beneath the Files Named list (see Figure 5.24).
Figure 5.24. The unresolved cross-reference information, per file
-
Click once on the third file in the list, techb.fm.
There is one unresolved cross-reference to source file techb.fm, as displayed beneath the Files Named list (see Figure 5.24).
Now that you determined which files contain the unresolved cross-reference source information, it's time to solve each one:
-
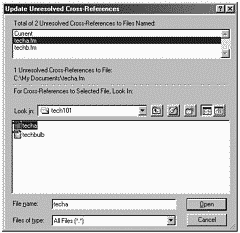
Click on techa.fm in the Files Named list.
This is the first file for which you will resolve cross-references. Why is the cross-reference to this file unresolved? Recall that both the current file (techc.fm) and techa.fm were in the tech101 directory when the cross-references were created. Now techc.fm has been moved outside the tech101 directory whereas techa.fm has not, so the cross-references in techc.fm can no longer find techa.fm.
-
Using the file display in the bottom part (For Cross-References to Selected File, Look In:) of the Update Unresolved Cross-References window, navigate to the correct directory, tech101, and click once on the correct file, techa.fm (see Figure 5.25).
Figure 5.25. The cross-references to file techa.fm are resolved.
-
After you finish, click on the Open button. As a result, the Current file will now find its cross-references to this source document using the new path.
-
Click on techb.fm in the Files Named list.
This is the next file for which you will resolve cross-references. Recall that not only was the current file, techc.fm, moved outside the directory that contained the source file techb.fm; techb.fm itself was renamed to techbulb.fm. So the current file cannot find its cross-reference source.
-
Navigate to the correct directory, tech101, and click once on the new correct filename, techbulb.fm (see Figure 5.26).
Figure 5.26. You can resolve the cross-references to file techb.fm by clicking on the correct filename.
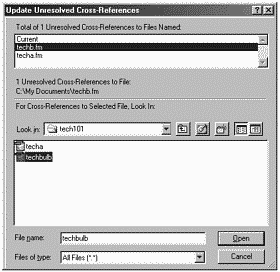
After you finish, click on the Open button.
The Current file will now find its cross-references to this source document by using the new path and the new filename.
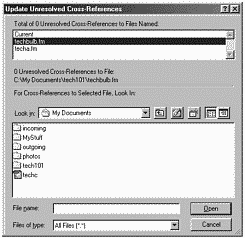
As you can see, fixing unresolved cross-references for files that have changed locations, names, or both, is an easy task. After the previous steps for unresolved cross-references are completed, the Update Unresolved Cross-References window will look like the one shown in Figure 5.27. Notice that there are now no unresolved cross-references in the Current open file.
Figure 5.27. The result of resolving all the unresolved cross-references.
Finding Unresolved Cross-References and Their Sources
If you have used the Update Unresolved Cross-References window and have not been able to get the cross-references resolved with the standard methods described in the previous example, you might need to take more serious measures.
For example, if a cross-reference marker was deleted in one of the files, you will not be able to use the Update Unresolved Cross-References window to correct the resulting unresolved cross-references. In this case, you have to find individual occurrences of unresolved cross-references to see exactly what the problem is with both the cross-reference and its source information.
You can combine these two methods to locate specific unresolved cross-references and their sources in files.
First, generate a list of unresolved source information:
-
Select Special > List Of > References.
If you are working in an individual file rather than a book file, you first see a message window containing the question, "Do you want to create a standalone List of References for this file?" Click on the Yes button.
The Set Up List of References window appears.
-
Select Unresolved Cross-Refs from the Don't Include list and move to the Include References list.
Unresolved Cross-Refs will be displayed in the Include References list.
-
Click on the Set button.
A list will be created in a separate List of References file, which will then be opened. This file is a FrameMaker file whose name is the same as that of your document plus suffix (LOR, by default). For example, the List of References for the techc.fm file discussed in the section, "The Update Unresolved Cross-References Window" on page 150 would be techcLOR.fm. For each unresolved cross-reference, the list will contain the filename, paragraph tag, source content, and page number (see Figure 5.28). This information makes it easier to locate the unresolved source information.
Figure 5.28. The List of References (LOR).

Back to Basics
Double-click on Unresolved Cross-Refs to move that item to the Include References list. Or you can click one time and then click on the left arrow.
Second, you can use Find/Change to find the cross-references in the current file that lost the connection to the source information:
-
Select Edit > Find/Change.
The Find/Change window appears.
-
Select Unresolved Cross-Reference from the Find drop-down menu. Click on Find.
The first unresolved cross-reference is displayed in the Find text field and the cross-reference is selected (see Figure 5.29). Notice that the information displayed in the Find text field matches the information in the List of References, which was previously generated.
Figure 5.29. You can find and change unresolved cross-references.

-
Look in the List of References for each found unresolved cross-reference.
Notice the first found cross-reference, H1:2.2 Revision B, is the first item in the LOR. The LOR provides the name of the source file (techb.fm) and page number information as well.
-
Double-click the found unresolved cross-reference.
The Cross-Reference window appears. Notice that the source type is Marker. The two lists in the Source pane are Marker Types and Cross-Reference Markers. Marker type is the default selection when you double-click on cross-references with lost connections to source information.
-
Click on the Source Type button and select Paragraphs from the pop-up menu.
Paragraphs are selected as the source type. All paragraph tags in the selected document file are displayed in the Paragraph Tags list.
-
Select H1 from the Paragraph Tags list.
Select H1 because H1 is the paragraph tag from the LOR that matches the unresolved cross-reference. All paragraphs tagged with H1 are displayed in the Paragraphs list on the right side.
-
In the Paragraphs list, look for a paragraph that matches the source information in the LOR or otherwise appears to be the missing source.
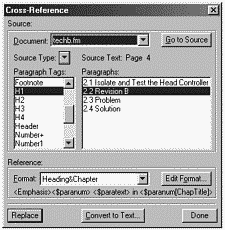
It turns out that there is a paragraph tagged H1 that begins "2.2 Revision B." This text matches the source shown in the LOR. Select that paragraph (as shown in Figure 5.30).
Figure 5.30. Reconnect the lost cross-reference to its source.
Back to Basics
Select the correct format for this cross-reference from the Reference > Format drop-down list.
-
Click on the Replace button.
The unresolved cross-reference is replaced with the new cross-reference.
The foregoing example was easy to resolve, because there was a paragraph that matched the desired source information exactly. You may often need to do more detective work than was needed here to locate the material that should be the source.
Even when the exact source information is found, an unresolved cross-reference can often be a symptom of an underlying problem in the organization of your document. You should spend some thought on deciding what to do to solve the underlying problem so as to achieve the highest possible document quality.
If the source information is present, why is a cross-reference unresolved? Check to see whether the paragraph is conditional text that was hidden when FrameMaker attempted to update its references and is now shown again. You can find cross-references that have become unresolved because of hidden conditional text by the following procedure:
-
Search for unresolved cross-references first without turning conditional text back on, and resolve the references you can resolve.
-
Turn all conditional text back on.
Search for unresolved cross-references again. If a source paragraph is found now that was not found at Step 1, it was lost by hiding the conditional text. To solve the underlying problem, set the same conditional tag on the cross-reference too, as described in "Cross-References and Conditional Text" on page 145.
Back to Basics
To turn all conditional text back on, select Special > Conditional Text. On the Conditional Text window, click on Show/Hide. On the Show/Hide Conditional Text window that appears, select Show All and click on Set.
Summary
Cross-references are not such a mystery once you understand what goes on behind the scenes. In this chapter, you learned a few techniques for creating cross-references as well as some creative ways in which to use them in professional documents. You also learned how to cope with the dreaded Unresolved Cross-Reference window.
After you set up cross-references, have some fun with defining and trying out various formats. If a format doesn't work out, just try a new one.
| CONTENTS |