Task One: Opening the Report File The orders for the most recent month, November 2002, are in the text file  Nov2002.txt. The first task is to open the file, splitting it into columns as you do, and move the file into the workbook with the macro. Nov2002.txt. The first task is to open the file, splitting it into columns as you do, and move the file into the workbook with the macro. Open a Text File | Tip | You might want to carry out steps 3 through 6 as a dry run before recording the macro. | Restore Window  -
If the Chapter02 workbook window is maximized, click the Restore Window button (for the workbook, not for the Excel application). Record Macro  -
On the Visual Basic toolbar, click the Record Macro button, type ImportFile as the macro name, and then click OK. If the Visual Basic toolbar is not visible, right-click any toolbar and click Visual Basic. Open  -
Click the Open button. 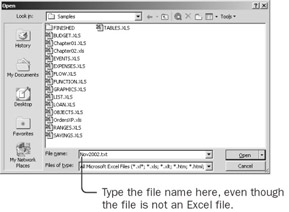 -
Type Nov2002.txt in the File Name box, and then click Open. Step 1 of the Text Import Wizard appears. 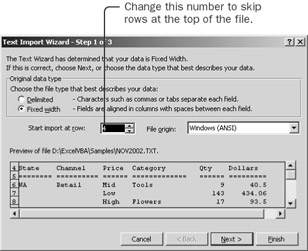 -
The first three rows of the file contain the report title and a blank line. You want to skip the first three rows, so change the Start Import At Row value to 4. Accept all the other default options in the Text Import Wizard, and click Finish. The text file opens, with the columns split into Excel columns. -
Drag up the bottom of the new window so that you can see the tabs at the bottom of the Chapter02 workbook. Then drag the tab for the Nov2002 worksheet down in front of the Sheet1 tab of the Chapter02 workbook. 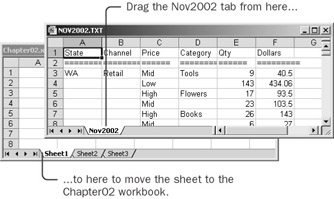 The Nov2002 worksheet moves to the Chapter02 workbook, and the Nov2002.txt workbook disappears (because it lost its only worksheet, and a workbook can't exist without at least one sheet). | Tip | You'll have several copies of the Nov2002 worksheet after you test this macro several times. Multiple copies will be useful as you develop the macros for the later project tasks. Once you have a worksheet named Nov2002 in the workbook, new copies are automatically named Nov2002 (2), Nov2002 (3), and so forth. | -
Row 2 contains equal signs that you don't need. Select cell A2, choose the Edit menu and click the Delete command, select the Entire Row option in the Delete dialog box, and then click OK.  Stop Recording -
Select cell A1, and click the Stop Recording button to stop the recorder. -
Save the Chapter02 workbook. You should now have the imported file split into columns and stripped of extraneous rows. Watch a Macro Run by Stepping Through It Rather than merely read a macro, you can step through it. This allows you to both read and test the macro as you watch it work. As you step through the macro, make notes of minor changes you might want to make to it. When you step through a macro, the Visual Basic Editor window appears over the top of the workbook. The Visual Basic window displays the selected macro and allows you to see which statement will execute next. Run Macro  -
Click the Run Macro button, select ImportFile from the Macro Name list, and click Step Into. The Visual Basic window appears on top of the workbook, with your recorded macro visible in the module. The statement that is ready to execute is highlighted in yellow, with a yellow arrow in the left margin. 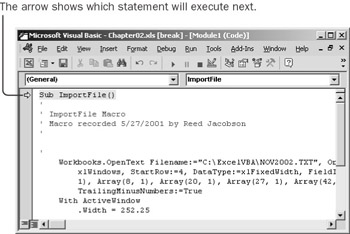 The highlighted statement, which is the first statement in the macro, contains the macro name. In your recorded macro, the line divisions will differ from those in this example. Sub ImportFile() -
Press F8 to highlight the first statement in the body of the macro. Workbooks.OpenText _ FileName:="C:\ExcelVBA\Nov2002.txt", _ Origin:=xlWindows, _ StartRow:=4, _ DataType:=xlFixedWidth, _ FieldInfo:=Array(Array(0, 1), Array(8, 1), _ Array(20, 1), Array(27, 1), Array(42, 1), _ Array(49, 1)), _ TrailingMinusNumbers:=True This long statement opens the text file. You can probably identify the argument that specifies the file name. The Origin and DataType arguments were default values in the first step of the Text Import Wizard. The StartRow argument is where you specified the number of rows to skip. The FieldInfo argument specifies how to split the text file into columns. Be grateful that the macro recorder can create this statement so that you don't have to! The macro recorder divides this long statement into several lines by putting a space and an underscore at the end of each partial line. However, it doesn't divide the statement at the most logical places. When you edit the macro, you should redivide the statement into meaningful lines. You can use the way the statement is divided in the preceding OpenText statement as a model. This month, you opened the Nov2002.txt file. Next month, you'll open the Dec2002.txt file. Make a note to change the macro statement to let you select the file you want to open. You'll learn how to generalize your macro in the next section. -
Press F8 to open the file and highlight the next statement, which is the first line of this With structure: With ActiveWindow .Width = 452.25 .Height = 254.25 End With These four statements were added when you moved the window out of the way. (Your Width and Height properties might have different values, and if you moved the window, there will be statements that change the Top and Left properties as well.) When you edit the macro, you'll be able to delete these statements without harming the macro. -
Press F8 to step through any statements that move or resize the window. Make a note to delete all of them. The next statement is now highlighted: Sheets("Nov2002").Select This statement makes the Nov2002 sheet into the active sheet, even though it was already the active sheet. (Macro recorders can't be too cautious.) You'll be able to delete this statement later also. | Tip | You can edit many statements while stepping through the macro. For example, you could delete the Select statement. Some changes, however, would force you to restart the macro. For example, you can't delete a With structure without restarting the macro (although you can delete individual statements inside a With structure). Visual Basic warns you if you try to make a change that would require you to restart the macro. | -
Press F8 to highlight the next statement: Sheets("Nov2002").Move _ Before:=Workbooks("Chapter02.xls").Sheets(1) This statement moves the new sheet into the Chapter02 workbook. But when you run this macro next month, the sheet won't be named Nov2002. It will be Dec2002. Make a note to change Sheets('Nov2002') to ActiveSheet in the macro so that it will work every month. -
Press F8 to move the worksheet and highlight the next statement: Range("A2").Select This statement selects cell A2 of the worksheet. -
Press F8 to select cell A2 and highlight the next statement: Selection.EntireRow.Delete Because the selected cell is A2 and this statement deletes the entire row of the selected cell, this statement deletes row 2. -
Press F8 to delete the row and highlight the next statement: Range("A1").Select This statement selects cell A1. -
Press F8 to select cell A1 and highlight the final statement of the macro: End Sub -
Press F8 to end the macro. In summary, this is how you want to modify the macro: -
Allow the user to decide which file to open. -
Delete unnecessary statements. -
Make the macro work with any month's file. The next section shows you how to make these changes. Select a File While Running a Macro Excel provides a method that prompts the user to open a file, but Excel doesn't actually open the file. Instead it returns the name of the file, which you can turn over to the OpenText method. -
Make the statement that begins with Workbooks.Open easier to read by dividing it into meaningful lines. Put a space and an underscore at the end of each partial line. Follow the ImportFile macro example in the 'Watch a Macro Run by Stepping Through It' section earlier in this chapter. | Important | If Option Explicit appears at the top of your module sheet, delete it before continuing. | -
Insert a new line immediately before the Workbooks.OpenText statement, and enter this statement: myFile = Application.GetOpenFilename("Text Files,*.txt") As soon as you type the period after Application, Visual Basic displays a list of all the methods and properties that can be used with an Application object. This feature is called Auto List Members. (The word Members refers to both methods and properties.) When you type the letter G, the list scrolls to show methods and properties that begin with that letter. At that point, you can press the Down Arrow key to select GetOpenFilename and press the Tab key to enter the method name into the macro. When you type the opening parentheses, Visual Basic displays the possible arguments for the GetOpenFilename method. This feature is called Auto Quick Info. You can ignore it for now. Just type the words in parentheses as they appear at the beginning of this step. The Application.GetOpenFilename method displays the Open dialog box, just as if you had clicked the Open toolbar button. The words in parentheses tell the method to display only text files-files ending with the .txt extension. (Be careful to type the quotation marks just as they appear at the beginning of this step.) The word myFile at the beginning of the statement is a variable for storing the selected filename. -
In the Workbooks.OpenText statement, select the entire file name, including the quotation marks, and delete it. In its place, type myFile. The first part of the statement should look like this when you finish: Workbooks.OpenText _ Filename:=myFile, _ Origin:=xlWindows, _ StartRow:=4, _ By the time this statement executes, the variable myFile will contain the name of the file. -
Delete the statements that resize the window and also the statement that selects the Nov2002 sheet. -
Change the words Sheets('Nov2002').Move to ActiveSheet.Move. When you're finished, the macro should look like this: Sub ImportFile() myFile = Application.GetOpenFilename("Text Files,*.txt") Workbooks.OpenText _ FileName:=myFile, _ Origin:=xlWindows, _ StartRow:=4, _ DataType:=xlFixedWidth, _ FieldInfo:=Array(Array(0, 1), Array(8, 1), _ Array(20, 1), Array(27, 1), Array(42, 1), _ Array(49, 1)), _ TrailingMinusNumbers:=True ActiveSheet.Move _ Before:=Workbooks("Chapter02.xls").Sheets(1) Range("A2").Select Selection.EntireRow.Delete Range("A1").Select End Sub -
Save the Chapter02 workbook. -
Press F5 to run the macro and make sure it works. It should display the Open dialog box (displaying only text files), and then it should open the file that you select and move the worksheet to the Chapter02 workbook. That concludes the macro for the first task of your month-end processing project. By now, you should have several copies of the Nov2002 worksheet in the Chapter02 workbook. You're ready to move on to the next task. |