Understanding Worksheets Worksheets come in collections just as workbooks do. By manipulating worksheets in the Immediate window, you will see some similarities-and some differences-between different collection classes. Add a New Worksheet -
In Excel, close all but one workbook. The one workbook should have three sheets, named Sheet1, Sheet2, and Sheet3, with Sheet1 as the active sheet. -
Switch to the Visual Basic Editor. In the Immediate window, type Worksheets.Add and press Enter. A new worksheet named Sheet4 appears before the original active sheet. You add a new worksheet to the current workbook the same way you add a new workbook to Excel: by using the Add method. 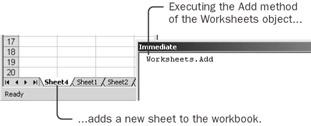 Rename and Delete a Worksheet A worksheet is an object with properties and methods of its own. You can use those methods and properties to manipulate a worksheet. As you work with worksheets, you will notice that the AutoList of methods and properties will not always appear after you type a period. Later in this chapter, you will learn how to get an AutoList to always appear with a worksheet object. -
Type ?Worksheets(1).Name and press Enter to display the name of the first worksheet (probably Sheet4). In the same way that you use the Item property (in either its long form or its short form) on a Workbooks object to establish a reference to a single Workbook object, you use the Item property on a Worksheets object to establish a reference to a single Worksheet object. Once you have a reference to a Worksheet object, you can use Worksheet object properties, such as Name. | Important | The name of a workbook is a read-only property; you have to save a file to change its name. The name of a worksheet, however, is a read-write property; you can change the name directly. | -
Type Worksheets(1).Name = "Input Values" and press Enter. The name of the worksheet changes. 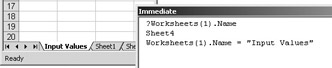 -
Type Worksheets("Sheet1").Activate and press Enter. The worksheet named Sheet1 becomes the active sheet. -
Type ActiveSheet.Delete and press Enter. Click Delete when warned that the sheet might contain values. -
Type Worksheets("Input Values").Activate and press Enter. As with workbooks, you can refer to a single worksheet by number, by name, or by pointing. With the first worksheet named Input Values and activated, the expressions Worksheets("Input Values"), Worksheets(1), and ActiveSheet all establish a reference to the same Worksheet object. Look at the Return Value of the Delete Method Normally, you execute a method and you change or retrieve the value of a property. Methods do, however, return values, and you might want to see the value that a method returns. For example, when you use the Delete method on a worksheet, the effect of the method is to close the worksheet, but the method also returns a value to the macro. -
Type ?ActiveSheet.Delete and press Enter. Click Delete when warned about the sheet containing data. The active sheet disappears, and the word True appears after the statement. When the Delete method carries out its task, it returns the value True if it completes the task successfully. The deleting of the worksheet is the effect of the method. The word True that appears in the Immediate window is the return value of the method. -
Type ?ActiveSheet.Delete and press Enter. This time, click Cancel when warned. The word False appears after the statement. The Delete method did not complete the task of deleting the worksheet, so it returns the value False. You can often look at a method's return value to find out whether it completed its task. Most methods return something. Some methods (like Delete) return either True or False, depending on whether they were successful at their task. Look at the Result of the Add Method The Delete method of the Worksheet object returns either True or False, depending on whether it achieves the desired effect. The Add method also has an effect-it creates a new item in the collection. But the Add method does not return True or False. Rather, the Add method returns a reference to the newly created object. You can use that reference the same way you can use the reference created by the Item property or by the ActiveSheet property. -
In the Immediate window, type Worksheets.Add.Name = "New Sheet" and press Enter. A new worksheet appears in the workbook, with the name New Sheet. 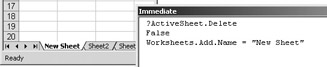 -
Type Worksheets.Add.Delete and press Enter. When the confirmation dialog box appears, you can see the new worksheet in Excel. Click Delete, and watch the worksheet disappear. This example is bizarre because it deletes the worksheet in the same statement that creates it. It does, however, illustrate how the Add method returns a reference to the newly created object. The Add method has an effect-it creates a new worksheet. In addition, it returns a reference to the new object. If you don't use the reference immediately-as part of the same statement-the reference is discarded. If you then want to communicate with the new worksheet, you must establish a new reference using the ActiveSheet property or the Item property. Usually, you don't bother using the reference returned by Worksheets.Add because using ActiveSheet to establish a new reference is as easy as shouting 'Jared' to get a slumbering student's attention. Copy a Worksheet Another useful method for a worksheet allows you to make a copy of the worksheet. You can copy the worksheet either to a new workbook or to the same workbook. -
In the Immediate window, type Worksheets("New Sheet").Copy and press Enter. This statement creates a new workbook that includes the copy. 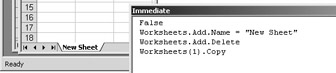 -
Type ActiveWorkbook.Close SaveChange:=False and press Enter to delete the new workbook. -
Type Worksheets("New Sheet").Copy Before:=Worksheets(1) and press Enter. This statement copies the worksheet before the specified worksheet. You must give a reference to a worksheet as the Before argument. If you want to copy a worksheet to the end of the workbook, the Copy method has an After argument you can use instead of the Before argument. The Copy method is a convenient way to clone a worksheet. The Copy method does not return a reference to the new worksheet; if you need to refer to it, you must use ActiveSheet or some other method or property. Manipulate Multiple Worksheets When you work with collections, you typically work with the entire collection (as when you closed all the workbooks at the same time using the statement Workbooks.Close), or you work with a single item from the collection (as when you closed a single workbook by using the statement Workbooks(1).Close.) With worksheets, however, you sometimes need to create a subcollection-a new collection that includes some, but not all, the worksheets in the collection. -
Type Worksheets(3).Select and press Enter to select the third worksheet in the workbook, the Sheet2 worksheet. The Select method allows you to select a new worksheet within the workbook.  -
Type Worksheets(Array(1,3,4)).Select and press Enter to select the first, third, and fourth worksheets. Array is a function that lets you treat multiple values as one. With the Array function, you can select more than one worksheet at the same time. (When you are not in a macro, you select multiple worksheets by holding down the Ctrl key and clicking the sheet tabs.)  -
Type Worksheets(3).Activate and press Enter to activate the third worksheet in the workbook, the Sheet2 worksheet, while leaving all three worksheets selected.  When you select more than one worksheet, one of the worksheets is on top as the active worksheet. All three worksheets are selected, but only one is active. You use the Activate method to specify which worksheet should be the active worksheet. If only one worksheet is selected, the Select method and the Activate method act the same: they select and activate a single worksheet. You can execute methods or assign values to properties for the entire subcollection of worksheets at once. -
Type Worksheets(2).Activate and press Enter to select only the second worksheet. When you activate a worksheet that is not selected, the selection changes to include only the newly activated worksheet.  -
Type ?Worksheets(Array(1,3,4)).Count and press Enter. The number 3 appears. When you select items from a collection with the Array function, the selected items form a new collection. Declare Variables to Enable Auto Lists In a Visual Basic statement, when you type ActiveWorkbook and follow it with a period, an Auto List of methods and properties appropriate for a workbook appear. When you type ActiveSheet and follow it with a period, no Auto List appears. The Auto List does not appear because a workbook can contain different types of sheets: The active sheet could be a chart sheet as well as a worksheet. In the context of a macro, you can get the Auto List to appear by creating an appropriate variable for the object reference. -
Close the Immediate Window, point at the Insert menu, and click Module. -
In the module, type Sub Test and press Enter. This creates a new macro. -
Type mySheet and then type a period. No Auto List appears. The word mySheet acts as a variable. When you create a new word and use it as a variable, Visual Basic makes it Variant. Variant means that you can assign anything you want to the variable and it will change from Integer to String to Workbook to Range as fast as you can assign different values or objects to it. Visual Basic can't display the Auto List because it really doesn't know what type of value or object will be assigned to the variable at any given moment. You can, however, promise Visual Basic that you'll never, ever assign anything other than a Worksheet object to the mySheet variable. -
Delete the period you just typed. At the top of the macro, just below the Sub Test statement, enter this statement: Dim mySheet As Worksheet. This statement declares the variable to Visual Basic-that is, you declare to Visual Basic that mySheet is a variable and that the only thing you'll ever assign to it is a reference to a Worksheet object. (Dim is an archaic term. It's short for Dimension and has to do with telling the computer how much space you'll need for the variable.) -
Position the cursor at the end of the statement beginning with mySheet, and type a period. Sure enough, the Auto List appears. Type N to select the Name property. 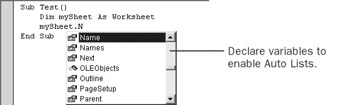 -
Press Space, and then type = "Test Sheet". The final statement should be mySheet.Name = "Test Sheet". The problem with the macro is that even though you promised that mySheet would contain only a worksheet, you still haven't assigned a worksheet reference to it. -
After the Dim statement, add the statement Set mySheet = ActiveSheet. The Set statement assigns a reference to the ActiveSheet object to the mySheet variable. -
Press F8 repeatedly to run the macro. The macro first assigns the active sheet object to the variable and then changes the name of that sheet. You can create a variable 'on the fly' simply by assigning a value or an object to it, but if you use Dim to declare how you intend to use the variable, Visual Basic can display Auto Lists that make code much easier to write and less likely to contain errors. |