The XMLConnector Class
| | ||
| | ||
| | ||
The XMLConnector class is the script version of the XMLConnector component. You can use this class to work with external XML documents using ActionScript. You can use ActionScript to bind the contents to other components .
You might want to script the XMLConnector component if youre adding components to the Stage dynamically. Before you can get started, youll need to have a copy of the XMLConnector in your library. The easiest way to do this is to drag the component to the Stage and delete it again.
You can include the XMLConnector class within your file using the following code line. Using an import statement means you wont have to use mx.data.components.XMLConnector each time you want to refer to the XMLConnector class.
import mx.data.components.XMLConnector;
Youve already seen some of the scripting that you can use with the XMLConnector component. Earlier, you saw the trigger method of the XMLConnector class and you displayed the results property in an Output window.
Setting the XMLConnector properties
Well get started by scripting an XMLConnector that loads an external XML document. You can create a new XMLConnector with this line:
var myXMLConnector:XMLConnector = new XMLConnector();
You can set the parameters for the XMLConnector with the following code. These are equivalent to the parameters within the Component Inspector; you can see a description of each parameter in Table 8-2.
myXMLConnector.URL = "xmlDoc.xml"; myXMLConnector.direction = "receive"; myXMLConnector.ignoreWhite = true; myXMLConnector.multipleSimultaneousAllowed = true; myXMLConnector.suppressInvalidCalls = true;
Interestingly, even though the ignoreWhite parameter is set to true by default in the Component Inspector, it still defaults to false when you script the XMLConnector. Make sure you dont forget this line if youre scripting the XMLConnector; otherwise Flash will include white space in the results.
Once youve configured the parameters, youll need to trigger the component using this line:
myXMLConnector.trigger();
Displaying the results
The XMLConnector class broadcasts the result event when it completes the call to the XML document. You can use a listener to display the XML content as shown here:
var xmlListener:Object = new Object(); xmlListener.result = function(evtObj:Object):Void { trace (evtObj.target.results); }; myXMLConnector.addEventListener("result", xmlListener); You can access the XML document through the results property of the XMLConnector. The name is very similar to the result event, so make sure you dont confuse the two.
The best way to get started with the XMLConnector class is through an example.
| |
In this exercise, well load the file address.xml into Flash using the XMLConnector class.
-
Open Flash and create a new movie. Add a new layer, actions , to the movie.
-
Save the file as scriptLoadAddress.fla in the same folder as the address.xml file.
-
Add and then delete an XMLConnector component. This adds the XMLConnector component to the library.
-
Select frame 1 of the actions layer and add the following code:
import mx.data.components.XMLConnector; var addressXC:XMLConnector = new XMLConnector(); var xCListener:Object = new Object(); xCListener.result = function(evtObj:Object):Void { trace (evtObj.target.results); }; addressXC.addEventListener("result", xCListener); addressXC.URL = "address.xml"; addressXC.direction = "receive"; addressXC.ignoreWhite = true; addressXC.multipleSimultaneousAllowed = true; addressXC.suppressInvalidCalls = true; addressXC.trigger();This code imports the XMLConnector class and creates a new XMLConnector object. It assigns a listener that traces the results when the XMLConnector broadcasts the result event. The XMLConnector loads the address.xml file and sets the relevant properties. The last line triggers the connection.
-
Test the movie and you should see the contents of the XML document in an Output window. You can see the completed file scriptLoadAddress.fla saved with your resources.
In exercise 5, you saw how to use ActionScript with the XMLConnector component. You loaded the contents of an XML document into an XMLConnector object called addressXC , set the parameters, and displayed the results in an Output window.
| |
Working with the XML class
You could work with the loaded XML using the XML class. For example, you can set an XML variable to the value of evtObj.target.results in the listener function, as shown here:
xCListener.result = function(evtObj:Object):Void { var myXML:XML = evtObj.target.results; var RootNode:XMLNode = myXML.firstChild; trace (RootNode.nodeName); }; addressXC.addEventListener("result", xCListener); You can then work with the resulting XML object using the methods and properties of the XML class. However, this defeats the purpose of the XMLConnector class. One of the main benefits of the XMLConnector class is that you can bind the results to other components. You can do this using the Component Inspector, or you can use the DataBindingClasses component to achieve the same result with ActionScript.
Binding the results to components with ActionScript
The DataBindingClasses component allows you to use ActionScript to set the bindings between components. This is useful if youre dynamically adding components to your Flash movies using the createClassObject method. You need to use ActionScript because the components dont exist until you compile the movie.
Including the DataBindingClasses component
To start with, youll need to include the DataBindingClasses component in your movie. This component is available from the Classes library. You can open this library by choosing Window ![]() Other Panels
Other Panels ![]() Common Libraries
Common Libraries ![]() Classes . Drag the DataBindingClasses component to the Stage of your movie and then delete it again. This will add the component to your library. You can check this by opening your library with the CTRL-L ( CMD-L for Macintosh) shortcut key. Unlike the data components, the DataBindingClasses component has a visual appearance, so dont forget to delete it from the Stage before you publish your movie.
Classes . Drag the DataBindingClasses component to the Stage of your movie and then delete it again. This will add the component to your library. You can check this by opening your library with the CTRL-L ( CMD-L for Macintosh) shortcut key. Unlike the data components, the DataBindingClasses component has a visual appearance, so dont forget to delete it from the Stage before you publish your movie.
You can import the relevant classes from the mx.data.binding package with this code:
import mx.data.binding.*;
Table 8-5 shows the classes included in the package. These classes are only available with the Professional version of Flash.
| Class name | Purpose |
|---|---|
| Binding | Creates a binding between two EndPoint objects |
| ComponentMixins | Allows you to add data binding to components |
| CustomFormatter | Allows you to create custom formatter classes |
| CustomValidator | Allows you to create customer validator classes |
| DataType | Provides read and write access to the data fields of a component property |
| EndPoint | Defines a point in the data binding |
| TypedValue | Provides information about the datatype of a value |
In this section, Ill introduce you to the Binding and EndPoint classes. The Binding class creates the binding but it uses the EndPoint class to specify the details for each side of the binding. Youll need two EndPoint objectsone for each component involved in the binding. Each EndPoint object needs information about the component, as well as a component property for binding.
Creating EndPoints
You can create the two EndPoint objects using this code:
var fromBinding:EndPoint = new EndPoint(); var toBinding:EndPoint = new EndPoint();
Youll need to set two properties for each EndPoint with the following code:
EndPoint.component = componentName; EndPoint.property = "componentProperty";
The code sets the component property to the instance name of the component. The property is a string value that refers to the bindable component property. For example, in a TextInput component, you would set the property to text . Youd normally use the dataProvider property for data-aware components.
Depending on how you trigger the binding, you may need to set the event property of the source EndPoint as shown here. This code line lists the name of the event that will trigger the binding.
EndPoint.event = "triggerEventName";
You can leave out this line if youre going to trigger the binding at another time, for example, within an event-handler function.
Creating the binding
To create the binding, youll need to call the constructor for the Binding class, as shown here:
new Binding(fromBinding, toBinding);
When you create bindings using ActionScript, they are one-way by default. The component that triggers the binding has an out direction while the other component has an in direction.
As you saw a little earlier, you can set the event that will trigger the binding:
EndPoint.event = "triggerEventName";
This is useful where updating one component should immediately update another, for example, two TextInput components. You could use the change , focusOut , or keyDown events to trigger the updating.
The second approach is to call the execute method of the binding in an event-handler function. For example, you could call this method in the result event handler of an XMLConnector component. The execute method looks like this:
var bindingResults:Array = newBinding.execute(reverse);
The execute method has one Boolean parameter, reverse , that indicates whether to apply the binding in both directions. You can assign the execute method to an array as shown. The array will contain any errors that occur when executing the binding. If there are no errors, it will contain the value null .
In the next exercise, Ill show you a simple example of how to script the XMLConnector class.
| |
In this exercise, well script an XMLConnector and display the results in a TextArea component.
-
Open Flash if necessary and create a new movie. Save it in the same folder as the address.xml file.
-
Rename the first layer actions .
-
Add the DataBindingClasses component to your library by choosing Window
 Other Panels Common Libraries Classes and dragging the DataBindingClasses component to the Stage. Delete the symbol from the Stage so it doesnt show in the completed movie.
 -
Add a TextArea component to the library. Do the same with an XMLConnector component. The library should contain the three items shown in Figure 8-41.
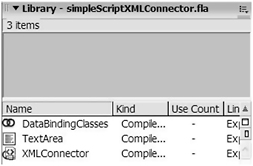
Figure 8-41: The library contents -
Click on frame 1 of the actions layer and add the following code in the Actions panel. The code imports the binding, TextArea, and XMLConnector classes.
import mx.data.binding.*; import mx.controls.TextArea; import mx.data.components.XMLConnector;
Importing the classes means that we dont have to use a fully qualified name to refer to the class. We can avoid using mx.data.component.XMLConnector each time we refer to the XMLConnector class.
-
Add the following code to the actions layer to create a new XMLConnector object and set values for its properties:
var addressXC:XMLConnector = new XMLConnector(); addressXC.URL = "address.xml"; addressXC.direction = "receive"; addressXC.ignoreWhite = true; addressXC.multipleSimultaneousAllowed = true; addressXC.suppressInvalidCalls = true;
-
Create a TextArea component using ActionScript by adding the following code at the bottom of the actions layer:
createClassObject(TextArea," content_ta", this.getNextHighestDepth()); content_ta.moveTo(10,10); content_ta.setSize(400, 200); content_ta.wordWrap = true;
This code uses the createClassObject method to add a TextArea component called content_ta to the Stage at 10,10 . The code also sets the size and wordWrap property of the TextArea.
-
Add this binding at the bottom of the actions layer:
var fromBinding:EndPoint = new EndPoint(); var toBinding:EndPoint = new EndPoint(); fromBinding.component = addressXC; fromBinding.property = "results"; toBinding.component = content_ta; toBinding.property = "text"; var newBinding:Binding = new Binding(fromBinding, toBinding);
In this code, weve created two EndPoint objects. The first is fromBinding , which will send the results to the toBinding EndPoint. The code sets the component properties of each EndPoint by specifying the name of the component to use. It also identifies which component property should be bound. In this case, we use the results property of the addressXC XMLConnector and bind that to the text property of the TextArea component.
-
Create a listener with the following code. The listener responds to the result event of the XMLConnector object. The XMLConnector broadcasts the event after it completes the call to an external XML document.
var xCListener:Object = new Object(); xCListener.result = function(evtObj:Object):Void { var bindingResults:Array = newBinding.execute(false); trace (bindingResults); }; addressXC.addEventListener("result", xCListener);When the results are received, we call the execute method to apply the binding. The false parameter specifies that the binding is one way. We assign the outcome of the execute method to an array variable called bindingResults . This array contains any errors that Flash encounters when trying to execute the binding. If there are no errors, the word null displays in the Output window.
-
Add the following line at the bottom of the actions layer. This code triggers the XMLConnector component.
addressXC.trigger();
-
Test the movie and youll see the results from the binding within an Output window. You should see the word null in the window if there are no errors. When you close the Output window, you should see the same interface as that shown in Figure 8-42.
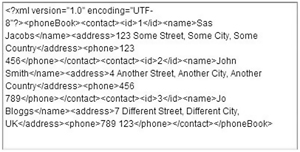
Figure 8-42: The completed interface
You can find the completed resource file saved as simpleScriptXMLConnector.fla .
In exercise 6, we loaded an external XML document into an XMLConnector object and bound it to a TextArea component. It was a very simple example, but as you can see it took a lot of code to create the bindings.
In the next exercise, well look at an alternative method of binding the results of an XMLConnector to a component. Instead of using bindings, well use ActionScript to process the results and add them to the dataProvider of a List component.
| |
| |
In this exercise, well use the results from an XMLConnector to populate the dataProvider of a List component. The steps outlined in this exercise provide an alternative to the approach in exercise 6, scripting the bindings.
-
Open Flash if necessary and create a new movie. Save it in the same folder as the address.xml file and rename Layer 1 as actions .
-
Drag the DataBindingClasses component from Window
Other Panels Common Libraries Classes onto the Stage. Delete the symbol so it appears only in the library. -
Add a List and XMLConnector to the library.
-
Click frame 1 of the actions layer and add the following code to import the List and XMLConnector classes:
import mx.controls.List; import mx.data.components.XMLConnector;
-
Add the following code to the actions layer. These lines create a new XMLConnector object that loads the file address.xml .
var addressXC:XMLConnector = new XMLConnector(); addressXC.URL = "address.xml"; addressXC.direction = "receive"; addressXC.ignoreWhite = true; addressXC.multipleSimultaneousAllowed = true; addressXC.suppressInvalidCalls = true;
-
Use the following code to add a List component to the Stage:
createClassObject(List,"name_list", this.getNextHighestDepth()); name_list.moveTo(10,10); name_list.setSize(200,100);
-
Create an event listener that listens for the result event of the XMLConnector object:
var xCListener:Object = new Object(); xCListener.result = function(evtObj:Object):Void { trace (evtObj.target.results); }; addressXC.addEventListener("result", xCListener); -
Add the following line at the bottom of the actions layer. The code triggers the XMLConnector object.
addressXC.trigger();
-
Test the movie and youll see the results from the XMLConnector in an Output window.
So far, weve used the same steps as in the previous example. Now, instead of using the EndPoint and Binding classes, well populate the dataProvider with ActionScript.
-
Change the event listener function as shown here. The new lines, which appear in bold, add the XML content to an array. We use the array to populate the dataProvider of the List component. Note that we can use evtObj.target.results to refer to the XML tree loaded into the XMLConnector object.
xCListener.result = function(evtObj:Object):Void { var len:Number = evtObj.target.results.firstChild.childNodes.length; var dp_arr:Array = new Array(); var childNode:XMLNode, theName:String, theID:Number; for (var i:Number = 0; i < len; i++) { childNode = evtObj.target.results.firstChild.childNodes[i]; theName = childNode.childNodes[1].firstChild.nodeValue; theID = childNode.childNodes[0].firstChild.nodeValue; dp_arr.push({label: theName, data: theID }); } name_list.dataProvider = dp_arr; };The code creates a variable len that finds the number of contacts in the address book. We can find this by counting the number of childNodes in the firstChild . The code creates an array for the List items as well as supporting variables. We loop through each contact and find the name and id. These values are stored in the variables theName and theID and added to the array dp_arr . The function sets the array as the dataProvider for the name_list List box.
-
Test the movie and youll see the interface shown in Figure 8-43. You can also see the completed scriptLoadAddressNoBinding.fla in your resource files.
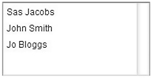
Figure 8-43: The completed interface
Exercise 7 has shown how to add data from an XMLConnector object to a List component without scripting the bindings. It is an alternative method for working with complicated data structures in bindings.
The ActionScript to create multiple bindings can get very involved, especially where you are using an XML document with complicated data structures. The EndPoint class has another property, location , which allows you to navigate data structures within the XML document. You can specify the path in many different ways, such as by using XPath statements or ActionScript paths. You then have to use Rearrange Fields, Compose String, or Custom formatters to manipulate the data.
Given the amount of effort involved in creating simple bindings with ActionScript, its much easier to create these bindings visually using the Component Inspector. I strongly suggest that you configure your bindings through the Component Inspector wherever possible.
| |