XML in Word 2003
| | ||
| | ||
| | ||
Word 2003 includes XML as a native document format. This means that you can save any Word document in XML format. It also means that you can open and edit XML documents within Word.
Word 2003 includes an XML vocabulary called WordprocessingML. This language allows you to describe any aspect of a Word document using XML elements. You could create an entire Word document using WordprocessingML if you knew how to write the language. You can also generate WordprocessingML by saving a Word document in XML format.
Opening an existing XML document
Words native XML capabilities mean that you can use it as a sophisticated XML editor. Open an existing XML document within Word 2003 and youll see the document content marked up with tags. Each tag name is displayed in purple, with a different shape for start and end tags. Word also displays the XML Document pane so that you can start working with the content.
Figure 5-1 shows the address.xml document opened in Word. You can find this file with your resources if you want to try opening it in Word 2003.
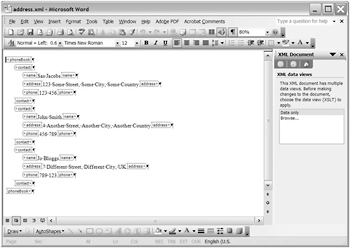
Figure 5-1: Opening an existing XML document in Word
The XML Document pane allows you to view the document in different ways. The screenshot in Figure 5-1 shows the Data only view.
Transforming the document view
When you open an XML document, you can apply an XSL transformation so that you can view the data in different ways. You can also apply a transformation to a document that is already open. An XSL transformation changes the original XML document tree into another type of XML document tree, called the result tree. For example, you can use XSL to generate new XML or HTML content from an existing XML document.
Once youve opened a file, the XML Document pane allows you to view Data only or apply an XSLT file. Clicking the Browse button allows you to search for an XSL file, as shown in Figure 5-2.
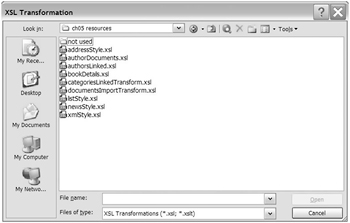
Figure 5-2: Selecting an XSL style sheet
When you have selected the style sheet, Word will apply it and alter the display of the XML content. Figure 5-3 shows the address.xml file after applying the transformation from the file listStyle.xsl . You can find this style sheet with your resources.
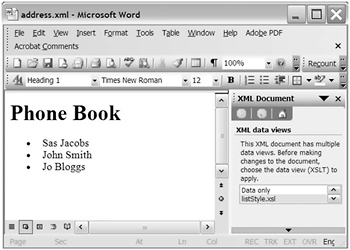
Figure 5-3: An XML document with an XSL style sheet applied
The style sheet transforms the content into an HTML document, containing a heading and a bulleted list. You can look at the contents of the style sheet if you want to see how the transformation works. You can learn more about transformations in Chapter 3.
You can also apply a transformation as you open an XML document by using the options you access by clicking the Open button. For example, in Figure 5-4, Ive chosen to open an XML document with a transformation. When I choose this option, Word prompts me to locate the style sheet and opens the transformed XML document. I dont get the Data only view as an option in the XML Document pane.
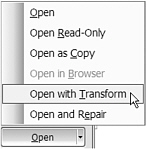
Figure 5-4: Opening an XML document and applying an XSL style sheet at the same time
If you choose Open with Transform , Word defaults to the Templates folder when searching for the style sheet. If the transformation results in an XML document, Word will display the XML Document pane. Figure 5-5 shows the address.xml document transformed with xmlStyle.xsl . You can find both documents with your resources. Compare this view with the one shown in Figure 5-1.
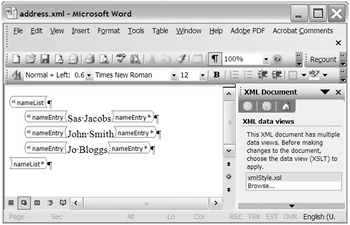
Figure 5-5: Applying an XSL style sheet to produce alternative XML content
Once open, you can apply more transformations to the XML document by clicking the Browse button.
Dealing with errors
Word 2003 wont open an XML document that is not well formed . If you try to open an XML document containing errors, youll see an error message shown in Figure 5-6.
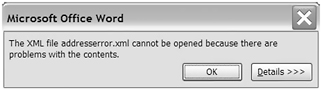
Figure 5-6: Trying to open a document that is not well formed
You can click the Details button to find out more about the error. Figure 5-7 shows the resulting detailed error message.

Figure 5-7: Displaying the detailed error message in Word
Youll understand how Word 2003 opens an XML document by working through an exercise. Well practice opening an XML document with and without transformations to see how Word presents the data.
| |
In this exercise, well use Word 2003 to open the file address.xml . Well apply transformations that create both XML and HTML output.
-
Open Word 2003.
-
Choose File
 Open , select address.xml from your resource files, and click Open . You should see XML tags displayed within the document. Word will also bring up the XML Document pane.
 -
In the XML Document pane, click the Browse option and navigate to the xmlStyle.xsl document. Click Open and look at how Word transforms the content.
-
Click the Browse option again and navigate to the file addressStyle.xsl . Click Open and look at the different view of the data.
-
Click Browse again and choose the file listStyle.xsl . Click Open .
-
Double-click the different views in the XML Document pane and watch Word apply the transformations.
-
Close the address.xml file without saving and reopen it, choosing Open with Transform . Apply any of the style sheets listed in this exercise before opening the document.
-
Close the address.xml file without saving.
The exercise showed you how to open an XML document within Word 2003. You applied different transformations both after and during the open process. In the next section, well look at how you can generate XML content from Word.
| |
Creating XML content with Save as
The easiest way to create an XML document in Word is to save an existing document in XML format. This will convert the document properties, content, and formatting to WordprocessingML. Figure 5-8 shows how you can save a document in XML format by selecting the file type XML Document .
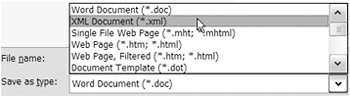
Figure 5-8: Using Save as type to generate an XML document
Word converts the document information into WordprocessingML and generates an XML document. Figure 5-9 shows the file newsitem.doc saved in XML format and opened in XMLSpy. You can see the files newsitem.doc and newsitem.xml with your resources.
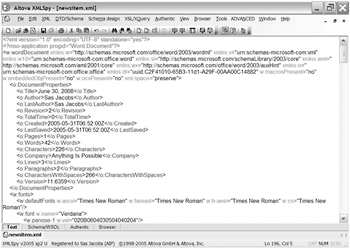
Figure 5-9: XML Spy showing an XML document generated by Word
Youll notice that Word generates a lot of content from a small document. The document shown in Figure 5-9 is 259 lines long in XMLSpy. This is because the XML document includes information about the document properties and formatting as well as the content. If you look through the file, youll see that the document contains several sections. It starts by listing the document properties in the <o:DocumentProperties> element. It also lists the fonts and styles in the <w:fonts> and <w:styles> elements. Its not until we get to the <w:body> element on line 196 that we see the content of the document.
Youll also notice that, during the save process, Word adds a processing instruction at the top of the document, instructing the file to open within Word:
<?mso-application progid="Word.Document"?>
When you view the document in Windows Explorer, youll see that it displays a Word XML icon, as shown in Figure 5-10.
Figure 5-10: Viewing the Word XML icon in Windows Explorer
The processing instruction means that the document automatically opens in Word when you double-click the icon. To open it in a different application, right-click the icon and choose Open with . You can also open the file from within another application. If you want to open the WordprocessingML document within Flash, youll need to remove the processing instruction first. You can find out more about processing instructions in Chapter 2. Well examine WordprocessingML more closely in the next exercise.
| |
In this exercise, well create a WordprocessingML document from an existing Word document by using the File ![]() Save As command.
Save As command.
-
Open Word 2003 if necessary.
-
Open the file newsitem.doc .
-
Choose File
Save As and change the type to XML Document . -
Close the newsitem.xml file within Word and open it in an XML or text editor. You can use Notepad if you dont have an XML editor installed. Open the file from within the software package rather than double-clicking the XML file icon. Work your way through the document and see if you can interpret the document sections and elements.
-
Close the file without saving.
Exercise 2 showed you how to generate WordprocessingML content from Word. Youll notice that Word hid many of the elements that appeared when you opened the file in an XML editor.
| |
Understanding WordprocessingML
WordprocessingML is Word 2003s XML vocabulary. It can describe every aspect of a document so that you can open a WordprocessingML document in Word or within an XML editor. If you knew how to write WordprocessingML, you could create a Word 2003 document from scratch without using Word. Word XML documents always start with an XML declaration, processing instruction, and root element that references the Word namespaces. Heres an extract from a Word XML document:
<?xml version="1.0" encoding="UTF-8" standalone="yes"?> <?mso-application progid="Word.Document"?> <w:wordDocument xmlns:w="http://schemas.microsoft.com/office/word/2003/wordml" xmlns:v="urn:schemas-microsoft-com:vml" xmlns:w10="urn:schemas-microsoft-com:office:word" xmlns:sl="http://schemas.microsoft.com/schemaLibrary/2003/core" xmlns:aml="http://schemas.microsoft.com/aml/2001/core" xmlns:wx="http://schemas.microsoft.com/office/word/2003/auxHint" xmlns:o="urn:schemas-microsoft-com:office:office" xmlns:dt="uuid:C2F41010-65B3-11d1-A29F-00AA00C14882" w:macrosPresent="no" w:embeddedObjPresent="no" w:ocxPresent="no" xml:space="preserve">
A WordprocessingML document contains an <o:DocumentProperties> element that describes the properties of the document, including the title, author, creation, and revision dates and word counts There are <w:fonts> and <w:styles> elements that describe the formatting within the document. The content of the document is contained in a <w:body> element. This section is small relative to the remainder of the document. Each paragraph exists within a <w:p> element.
You could spend time learning how to write WordprocessingML so that you could write the XML by hand. You can also generate WordprocessingML by using the Save As command. If youre generating XML documents for use in Flash movies, WordprocessingML is not likely to be useful. It will include formatting information that is irrelevant to Flash. The XML document also uses a complicated element structure. For Flash developers, its better to use an XML schema to streamline the XML document during the save process. You can apply this schema to either a document or template within Word 2003.
Structuring content within Word
Chapter 3 covered XML schemas and style sheets. Schemas provide the rules for constructing XML documents. You can use them to validate that an XML document has the correct structure. You can also use schemas within Word to dictate the structure of an XML document. Another alternative is to use XSLT style sheets to structure the XML output from Word.
The best way to work with either a schema or style sheet is to add it to the Word schema library. The library is specific to a computer rather than a document. Within Word, style sheets always have to refer to a schema document so youll have to add at least one schema document to the library before you can include a style sheet. Word 2003 calls XSLT style sheets solutions .
These steps summarize how you can apply a schema and style sheet to a Word document. The next section covers each step in more detail.
-
Add the schema to the schema library.
-
Add a style sheet to the schema.
-
Attach the schema to a Word document.
-
Add XML tags to the Word document.
-
Save the data from the Word document in XML format.
Working with the schema library
You can access the schema library in Word by choosing Tools ![]() Templates and Add-Ins . Youll then need to select the XML Schema tab, as shown in Figure 5-11.
Templates and Add-Ins . Youll then need to select the XML Schema tab, as shown in Figure 5-11.
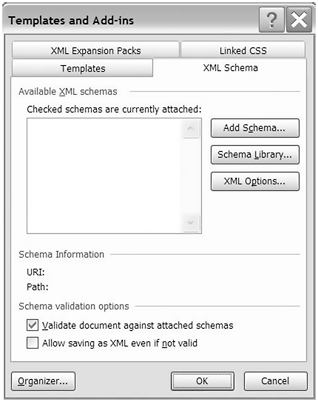
Figure 5-11: The XML Schema tab in the Templates and Add-Ins dialog box
The XML Schema tab shows all of the XML schemas attached to the current document. In Figure 5-12, the document has no schemas attached.
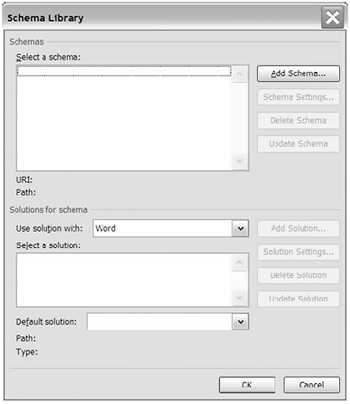
Figure 5-12: The Schema Library within Word 2003
To access the schema library , click the Schema Library button. Figure 5-12 shows the Schema Library dialog box.
You can use the dialog box to add a new schema as well as to update and delete existing schemas.
Adding a schema to the library
When you add an XML schema to the library, youll be able to use it in more than one Word document. Prepare the schema outside of Word, perhaps in an XML editor such as XMLSpy. To add the schema, click the Add Schema button in the Schema Library dialog box. You could also click the same button in the XML Schema tab of the Templates and Add-Ins dialog box.
Locate the schema document and click Open . Word will show the Schema Settings dialog box. Youll need to enter a URI and an Alias . The URI is a unique value that identifies the schema. It should point to a valid web address; however, the location in the URI doesnt have to exist. The Alias is a short name that you can use to refer to the schema. You can see an example of the Schema Settings dialog box in Figure 5-13.
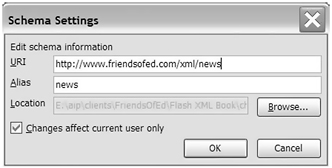
Figure 5-13: The Schema Settings dialog box
Once youve added the schema, youll see the Alias listed in the Templates and Add-Ins dialog box. You can see this in Figure 5-14.
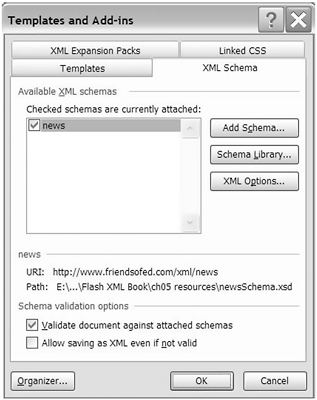
Figure 5-14: The Tempates and Add-Ins dialog box
The screenshot in Figure 5-14 shows that the news schema is checked. This means that this schema is attached to the current document.
Adding a transformation to a schema
If you have at least one schema in the schema library, you can add a related XSLT style sheet. Open the schema library and click the schema that contains the transformation, as shown in Figure 5-15.

Figure 5-15: Selecting a schema from the Schema Library dialog box
Click the Add Solution button and select a style sheet. Enter a short name for the style sheet in the Alias field. Figure 5-16 shows a completed Solution Settings dialog box. Word has automatically added the XSL Transformation type.
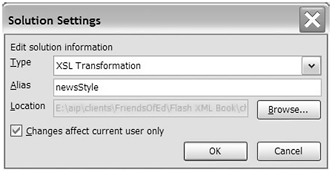
Figure 5-16: The Solution Settings dialog box
Click OK to return to the Schema Library dialog box. Youll see the solution listed, as shown in Figure 5-17.
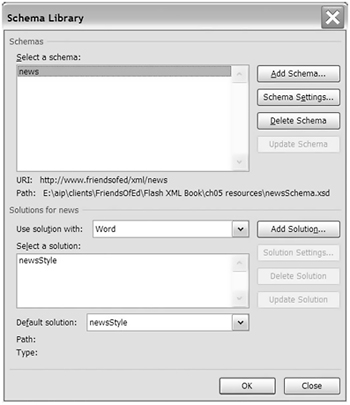
Figure 5-17: The Schema Library displaying an added solution
In the next exercise, youll practice adding a schema and transformation to the schema library.
| |
Exercise 3 will introduce you to the schema library in Word. Youll add an XML schema to the library with an associated style sheet. The style sheet becomes the default transformation for Word.
-
Open Word 2003 if necessary.
-
Choose Tools
Templates and Add-Ins and select the XML Schema tab. -
Click the Add Schema button and navigate to the file newsSchema.xsd .
-
Enter http://www.friendsofed.com/xml/news in the URI field and news in the Alias field. Click OK .
-
Click the Add Solution button and navigate to the file newsStyle.xsl .
-
Enter newsStyle in the Alias field and click OK .
-
Click OK twice to close the Templates and Add-Ins dialog box.
Once youve added a schema and style sheet, youll be able to apply them to your Word documents.
| |
Creating a new Word XML document
You can create a new Word 2003 XML document by choosing File ![]() New and selecting XML document from the New Document pane. You can see this in Figure 5-18. When you choose this type, Word automatically displays the XML Structure pane with the blank document.
New and selecting XML document from the New Document pane. You can see this in Figure 5-18. When you choose this type, Word automatically displays the XML Structure pane with the blank document.

Figure 5-18: Creating a new XML document
After youve created the blank XML document, the XML Structure task pane will display. The task pane allows you to attach a schema to the document.
Attaching a schema to a Word document
XML schemas describe the rules for creating XML documents. They list the valid elements and attributes, their datatypes, whether theyre mandatory, and the number of times and the order in which they should appear. Schemas are useful for creating a shared XML vocabulary for people or applications working with XML documents. You can find out more about XML schemas in Chapter 3.
Word uses an XML schema so it can create a valid XML document. When you attach a schema, it stops Word from generating a WordprocessingML document. Instead, Word generates elements and structures that are consistent with the schema document. In a way, youre using the schema to teach Word how to write your XML document.
You can attach a schema to either a Word document or template so that you can structure the XML output from Word. The schema must be included within the schema library, and you can use it with a new document or a document that already contains content. You can also attach multiple schemas where different parts of the document are used for different purposes.
To attach a schema, choose Tools ![]() Templates and Add-Ins and select the XML Schema tab. Check the schema that you want to attach to the document, as shown in Figure 5-19.
Templates and Add-Ins and select the XML Schema tab. Check the schema that you want to attach to the document, as shown in Figure 5-19.
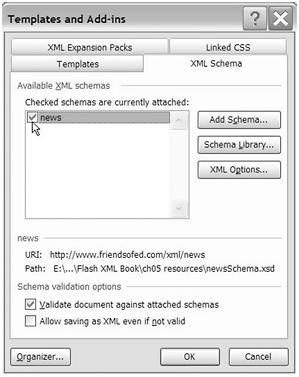
Figure 5-19: Attaching a schema to a Word document
When you attach a schema to an existing document, Word will automatically validate the content against the schema. Errors will display as a yellow cross in the XML Structure pane. Figure 5-20 shows an invalid news element. Word wont validate the contents if it cant locate the schema document.
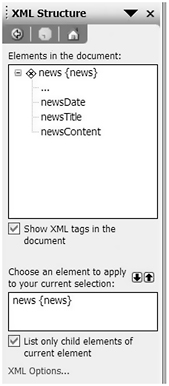
Figure 5-20: An invalid XML document in Word
After youve attached a schema, youll need to mark up the content with XML tags from the schema document.
Adding XML tags to the document
Make sure that you can see the XML Structure pane in the right side of your document. If it is not showing, select View ![]() Task Pane and choose XML Structure from the drop-down menu at the top of the pane. Figure 5-21 shows how to do this.
Task Pane and choose XML Structure from the drop-down menu at the top of the pane. Figure 5-21 shows how to do this.
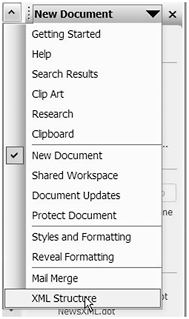
Figure 5-21: Displaying the XML Structure pane
Figure 5-22 shows the XML Structure pane. Notice that it includes an option for showing XML tags within the Word document Show XML tags in the document . Make sure that you check this option. Youll probably want to uncheck the option later to hide the XML tags from users.
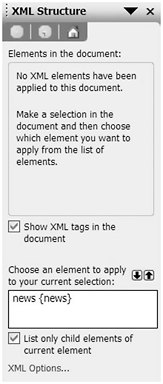
Figure 5-22: The XML Structure pane
The XML Structure pane allows you to add the XML tags from the current schema to your document. You need to identify which portions of the document correspond to which tag names within the schema.
Youll notice that in Figure 5-22, only the root element displays in the list of elements. This is because you have to apply the root element first. Applying this element will make the other elements within the schema available in the XML Structure pane.
Click the root element name in the XML Structure pane and choose the Apply to Entire Document option when prompted. Figure 5-23 shows the dialog box. You can apply the root element to a selection if you want to exclude the unselected content from the final XML document. You might do this to exclude an instruction or document title.
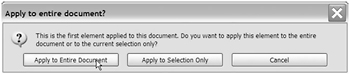
Figure 5-23: Applying the root element to the entire Word document
Once youve added the root element, you can select portions of the text and apply XML elements from the XML Structure pane. Figure 5-24 shows the process of highlighting text and clicking an element name.
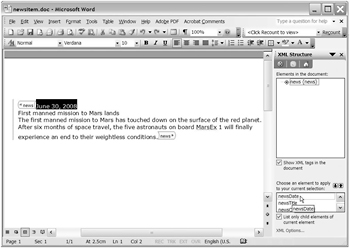
Figure 5-24: Applying an element to a portion of the Word document
After youve applied an XML element, that section of the Word document will display a purple tag. This indicates that youve applied the element. You can continue applying elements to the remainder of the document. You dont need to include all content from the Word document within your XML tags. Figure 5-25 shows the finished product.
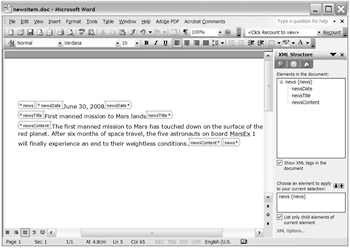
Figure 5-25: The Word document after applying all elements
If you dont mark up some text content within the root element, youll create a mixed content element when you generate the XML document. Word preserves mixed content unless you tell it otherwise in the XML Options dialog box. Click the XML Options link in the XML Structure pane and check the Ignore mixed content check box, as shown in Figure 5-26.
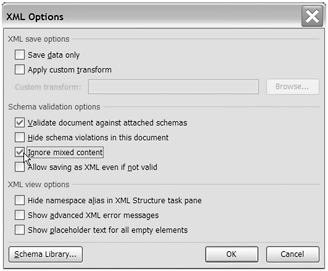
Figure 5-26: Selecting the Ignore mixed content option
When you select this option and save the data in XML format, Word excludes the mixed content. This might be useful if your Word document contains user instructions that you want to exclude from the XML document. The following exercise will show you how schemas and documents work together.
| |
In this exercise, well create a new XML document and attach a schema from the schema library. Youll add content and use elements from the schema to mark up the document. Youll need to have completed exercise 3 before you start this one.
-
Open Word 2003 if necessary.
-
Choose File
New and select XML document from the New Document pane. -
Click the Templates and Add-Ins link and check the news schema. This adds the news schema to the current document.
-
Enter content for a news item. Youll need to add a date, a title, and some content. The order in which you enter the text isnt important.
-
Make sure you check the Show XML tags in the document option in the XML Structure pane.
-
Click the news element at the bottom of the XML Structure pane.
-
Click the Apply to Entire Document button. This applies the root news element to all of the text in the document.
-
Select the date and apply the newsDate element. Repeat for the newsTitle and newsContent elements.
-
Save the document. The completed file should look like the example shown earlier in Figure 5-25. Ive saved my completed document as newsitem_tags.doc with your resources.
If youre working with an empty document, you wont be able to mark up existing text. Instead, youll add tags without making a selection first. This means you might need to give some extra support to users who will add content to the document.
| |
Adding placeholders for empty XML tags
You can show and hide the XML tags in a document by using the CTRL- SHIFT-X shortcut keys or by checking and unchecking the Show XML tags in the document check box in the XML Structure pane. You can see this in Figure 5-27.
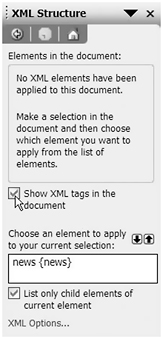
Figure 5-27: Showing the XML tags in a document
If youve shown the tags, the tag names display in purple within the Word document. If you turn off the option, only the content within each tag will display. If theres no content, nothing will display. This will be a problem for clients unless you add a placeholder for the tags.
To add placeholder text, click the XML Options link in the XML Structure pane. Figure 5-28 shows the XML Options dialog box that opens. Check the Show placeholder text for all empty elements option.
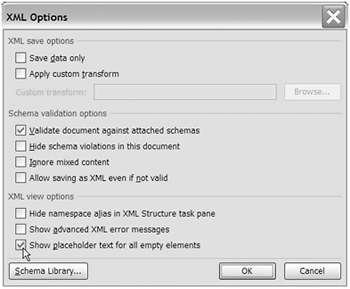
Figure 5-28: Setting the show placeholder text option
By default, placeholder text displays the name of an element. You can see an example of this in Figure 5-29.
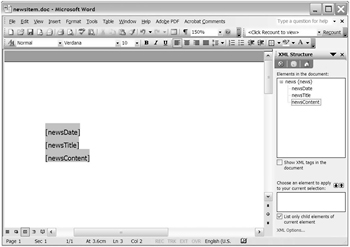
Figure 5-29: Displaying the default placeholder text for XML content in a Word document
Element names cant have spaces, so this type of placeholder may be difficult for clients to interpret. You can customize the placeholder text by right-clicking the element name in the XML Structure pane. You can see this in Figure 5-30.
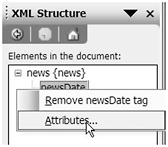
Figure 5-30: Customizing the display of placeholder text
Choose the Attributes option and enter new placeholder text at the bottom of the Attributes dialog box, as shown in Figure 5-31.
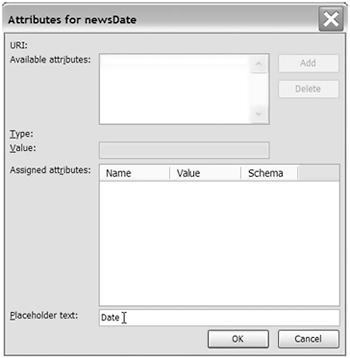
Figure 5-31: Entering custom text for the placeholder
Click OK to use the custom text. Figure 5-32 shows the completed document with renamed placeholders.
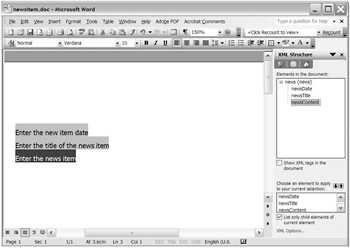
Figure 5-32: The changed placeholder names
In the example you just saw, we used the Attributes option to set placeholder text. Youre probably wondering if we can use this to deal with XML attributes. In the next section, well look at how you can use Word with attributes.
Adding attributes
Working with attributes in Word 2003 is a little more difficult than working with elements. The only way to edit attributes is by using the Attributes dialog box. Unlike elements, a user cant just replace the content by typing within a Word document. This makes attributes a little trickier for users to update.
You can display the Attributes dialog box by right-clicking an element name in the XML Structure pane and selecting the Attributes option. You can see this in Figure 5-33.
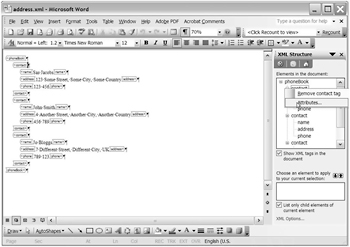
Figure 5-33: Viewing attributes from the XML Structure pane
The Attributes dialog box shows the existing attributes for the selected element. You can change the value of the attribute or delete it from the element. Figure 5-34 shows the Attributes dialog box.
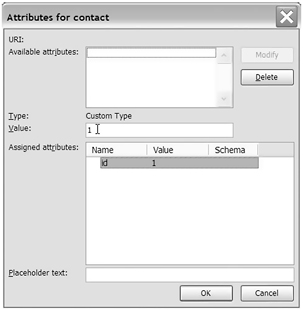
Figure 5-34: The Attributes dialog box
For some users, it may be too difficult to use the XML Structure pane to change the values of attributes. If you cant avoid using attributes in your Flash XML document, you can use other solutions to help your users. For example, you could apply a transformation that changes attributes to elements when the document is loaded. Of course, youd have to translate these elements back to attributes when you save the document. A better solution may be to avoid using attributes.
Saving a structured XML document
Earlier, you saw the complicated XML structures generated when you used the Save As option to create a WordprocessingML document. Using a schema simplifies the XML document structure and allows you to save only the data from Word.
Make sure the document has an attached schema. Choose File ![]() Save As and select the XML Document type. Make sure you check the Save data only option before you click Save , as shown in Figure 5-35. If you dont do this, youll generate a WordprocessingML document instead of creating your own XML structures based on the attached schema.
Save As and select the XML Document type. Make sure you check the Save data only option before you click Save , as shown in Figure 5-35. If you dont do this, youll generate a WordprocessingML document instead of creating your own XML structures based on the attached schema.

Figure 5-35: Saving a Word document in XML format
Its useful to turn on the Save data only option within Word so that its always checked in the Save As dialog box. Click the XML Options link in the XML Structure pane and check the Save data only check box in the XML Options dialog box. You can see this in Figure 5-36.

Figure 5-36: Setting the Save data only option
When you select the data only option, youll see the warning shown in Figure 5-37 after you click the Save button. Word warns you that you may lose formatting features during the save process. Youll need to click Continue to generate an XML document.
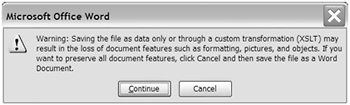
Figure 5-37: The default warning when saving XML content
Once you have created the XML document, you can view it in an XML editor such as XMLSpy. Figure 5-38 shows the XML document generated by selecting the data only option.
Figure 5-38: The data only XML document created by Word
If you compare the content shown in Figure 5-39 with the equivalent WordprocessingML document, youll notice that the new document contains significantly less content. The data only XML document contains no information about the properties of the Word document. It has no information about the formatting of the content.
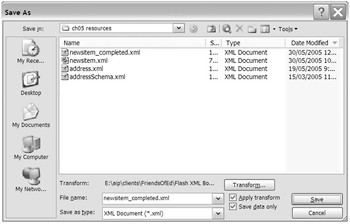
Figure 5-39: Saving a Word document with a transformation
Another way to generate structured XML content is by applying an XSLT transformation during the save process. If you do this, you can use the default transformation attached to the current schema. Remember that Word calls this a solution in the schema library. You can also apply a custom transformation.
Saving transformed XML content
You can use a transformation to change the names of the XML elements, streamline the XML elements generated, or switch elements and attributes during the save process. Choose File ![]() Save As and select the type XML Document . Make sure you check the Apply transform and Save data only options. Figure 5-39 shows how the Save As dialog box appears during a transformation.
Save As and select the type XML Document . Make sure you check the Apply transform and Save data only options. Figure 5-39 shows how the Save As dialog box appears during a transformation.
Word will apply the default solution for the current schema. You can see this by opening the schema library. You could also use a different transformation by choosing Apply Custom Transformation in the XML Options dialog box.
Once youve saved and transformed the document, you can open it in an XML editor, as shown in Figure 5-40. Make sure you close the file in Word first.
Figure 5-40: The transformed XML document
The screenshot displayed in Figure 5-40 shows the transformed content. The transformation applied within Word created HTML from the original XML document. You could also have used a transformation to add sorting or filtering to the XML document.
Youll understand Word 2003 transformations better by working through the next exercise.
| |
In this exercise, youll generate your own XML structures from a Word XML document. You should complete and save the file from exercise 4 before you start this exercise. If you havent done this, you can use the starter file newsitem_tags.doc .
-
Open Word 2003 if necessary.
-
Open the file from exercise 4 if necessary. If you didnt complete the exercise, open the file newsitem_tags.doc instead.
-
Choose File
Save As and select the type XML Document . -
Check the Save data only check box and click Save .
-
When prompted, click the Continue button.
-
Close the XML file in Word and open it in an XML or text editor. View the XML structure generated by Word. You can see my completed file saved in your resource files as newsitem_tags.xml .
-
Open the Word document again.
-
Choose File
Save As and choose the type XML Document . -
This time, check both the Save data only and Apply transform check boxes. Change the name of the document so you can compare it with the one created in step 4. I saved mine as newsitem_transform.xml .
-
Click Save and when prompted, click the Continue button.
-
Close the XML file and open it in an XML or text editor.
-
Compare the two XML documents that you have created. You can see the two documents that I generated in the files newsitem_tags.xml and newsitem_transform.xml .
From this exercise, you can see that its possible for you change the XML that Word creates during the save process. You can create multiple XSLT style sheets that create different XML documents from the same content. You can also use style sheets to change the output from XML to HTML.
| |
Editing XML content in Word
You can use Word 2003 to edit an existing XML document. However, youll need to take precautions to make sure that the editing process doesnt accidentally delete the XML tags. It can be useful to add protection to the Word document or template by locking the entire document and unprotecting the text that you need to edit.
You can protect a document by choosing Tools ![]() Protect Document . This displays the Protect Document pane, as shown in Figure 5-41. Check the Allow only this type of editing in the document: option and choose No changes (Read only) from the drop-down list. You can exempt text from the rule by selecting it and clicking the Everyone check box in the Exceptions area of the Protect Document pane.
Protect Document . This displays the Protect Document pane, as shown in Figure 5-41. Check the Allow only this type of editing in the document: option and choose No changes (Read only) from the drop-down list. You can exempt text from the rule by selecting it and clicking the Everyone check box in the Exceptions area of the Protect Document pane.
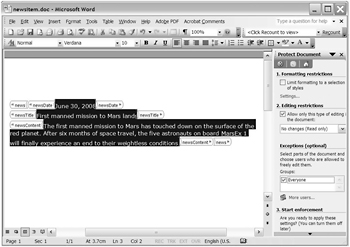
Figure 5-41: Protecting the Word document
In Figure 5-41, Ive selected noncontinuous areas of the document by holding down the CTRL key to add new areas to the selection.
When youre ready to turn on the document protection, click the Yes, Start Enforcing Protection button in section 3 of the Protect Document pane. You can see this button in Figure 5-42. You may need to scroll down in the Protect Document pane before you see it.
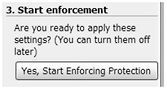
Figure 5-42: Enforcing protection in the Word document
You can add a password to secure the document and stop a user from unlocking the document. A password is optional. Figure 5-43 shows the Start Enforcing Protection dialog box.
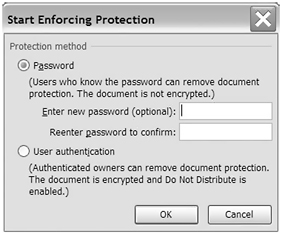
Figure 5-43: The Start Enforcing Protection dialog box allows you to add a password.
After youve protected the document, the areas that you can edit display in a light yellow color . You can see a protected document in Figure 5-44.
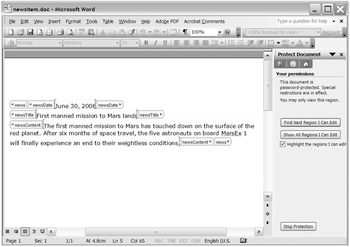
Figure 5-44: The protected document
Before you give this document to a user, it might be useful to turn off the display of the tags using the CTRL-SHIFT-X shortcut keys or by unchecking the option in the XML Structure pane. Well cover placeholder text and document protection in the next exercise.
| |
In this exercise, well add protection to the file we created in exercise 4. You should complete exercise 4 before starting this exercise. However, if you havent done so, you can use the file newsitem_tags.doc instead.
-
Open Word 2003 if necessary.
-
Open the file from exercise 4 if necessary. If you havent completed the exercise, you can use the file newsitem_tags.doc .
-
Make sure you can see the XML Structure pane.
-
Right-click the newsDate element and choose the Attributes option.
-
Add Enter date of news item as Placeholder text and click OK . Repeat the process for the newsTitle and newsContent elements, using appropriate text.
-
Choose Tools
Protect Document . -
In section 2 of the Protect Document pane, check the Allow on this type of editing in the document: option and select No changes (Read only) from the drop-down list.
-
Select the text within the document, using the CTRL key to choose noncontinuous text blocks.
-
Check the Everyone check box in the Exceptions section of the Protect Document pane.
-
Click the Yes, Start Enforcing Protection button to turn on the document protection.
-
Enter a password and then reenter it again for confirmation. Click OK .
-
Display the XML Structure pane and uncheck the Show XML tags in the document check box.
-
Experiment with changing the text in the news item.
-
Remove the date to display the placeholder text.
-
Check the Show XML tags in the document check box to verify that you havent accidentally deleted the XML tags from the document. You can see the completed document saved as newsitem_protected.doc in your resource files.
So far in the exercises, weve added a schema to the schema library and attached it to a new XML document. Weve entered content that weve marked up with XML tags. Weve generated an XML document and transformed the content. As a final stage, we added placeholder text and protected the XML tags against deletion.
The steps that youll use to generate XML from a Word document are summarized here:
-
Add a schema to the schema library.
-
If necessary, add a style sheet to the schema.
-
Attach the schema to a Word document or template.
-
Mark up the document with XML tags from the schema, starting with the root element.
-
Add placeholder text for empty elements.
-
Protect the XML tags, if necessary.
-
Use Save As to generate XML content.
Well use what we learned in the previous chapter to display the content of the news item in a Flash movie. Well use Word to update the content and see how it changes within Flash.
| |
Putting it all together
In the next exercise, well include the XML content generated by Word within a Flash movie. At the end of the exercise, well update the content in Word and see it changed within Flash.
| |
-
Open the starter file newsItem.fla in Flash. Figure 5-45 shows the interface. The movie contains a static text field with the title Latest news and a TextArea component named news_txt . The html property of the TextArea is set to true.

Figure 5-45: The Flash interface -
Create a new layer called actions .
-
Open the file from exercise 6 in Word 2003. If you havent completed the exercise, you can use the resource file newsitem_protected.doc .
-
Save the file in XML format, making sure that you choose the Save data only option. Enter the name newsData.xml for the file and save it in the same folder as the newsItem.fla file. Close the XML document in Word.
-
Switch back to Flash and add the following code on frame 1:
var RootNode:XMLNode; var myXML:XML = new XML(); myXML.ignoreWhite = true; myXML.onLoad = loadNews; myXML.load("newsData.xml"); function loadNews(success:Boolean):Void { if (success) { RootNode = this.firstChild; trace (RootNode) } }The preceding code should look familiar to you from the previous chapter. Ive created a new timeline variable for the root node as well as an XML object called myXML . The code loads the file newsData.xml and calls the loadNews function. The function tests for the successful loading of the XML document, sets the RootNode variable, and displays the contents in an Output window.
-
Test the Flash movie and you should see an Output window similar to that shown in Figure 5-46.
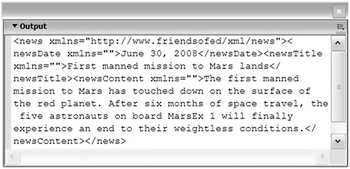
Figure 5-46: Testing the Flash movie -
Modify the loadNews function as shown here. The function creates a string variable called content_str that contains the complete news item. It then assigns the variable to the text property of the news_txt TextArea. Notice that Ive included HTML <b> tags in the news item.
function loadNews(success:Boolean):Void { if (success) { RootNode = this.firstChild; var content_str:String = "<b>"+RootNode.childNodes[1].firstChild; content_str +="</b> ("+RootNode.childNodes[0].firstChild; content_str += ")<br>" + RootNode.childNodes[2].firstChild; news_txt.text = content_str; } } -
Test the movie. You should see something similar to the screenshot shown in Figure 5-47. You can see the completed file saved as newsItem_completed.fla in your resource files. You can also see the completed newsData.xml file.

Figure 5-47: The completed Flash movie -
Make changes to the Word document and save it in XML format. Close the Word XML document and test the Flash movie again to see the updated content.
In exercise 7, we generated XML content from a Word document and used it within a Flash movie. You were able to use Word to update the contents of the Flash movie.
It would be more useful if you could display more than one news item at a time. In the next exercise, well create a new Word document that you can use to manage multiple news items.
| |
| |
In this exercise, well extend the example from exercise 7 so that we can add a list of news items to the Flash movie. By using tables in Word, youll be able to duplicate the XML tags in a Word document. Each time you add a row, Word will copy the XML tags from the existing rows to the new row.
Creating a new Word XML document and attaching a new schema
Well start by creating a new Word document, attaching a new schema from the library, and adding sample content to a table.
-
Open Word 2003 if necessary and create a new XML document. You can use File
New XML Document . -
Click the Templates and Add-Ins link in the XML Structure pane and click the Add Schema button.
-
Navigate to the file newsSchemaGroup.xsd within your resources and click Open .
-
Enter http://www.friendsofed.com/xml/newsgroup in the URI field and newsGroup in the Alias field.
-
Click OK twice and check the newsgroup schema option. Click OK to attach the schema.
Adding XML tags to the Word document
Once youve attached the schema, youll need to add content to the Word document. Well add it in a table and mark up the content with XML tags from the schema.
-
Add a three-column table to the Word document. Enter a date in the first column, a news item title in the second column, and news content in the third. Figure 5-48 shows my news item.
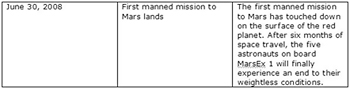
Figure 5-48: A news item within a table -
Save the document as newsTable.doc . Make sure you select Word Document as the type and add it to the same folder as the completed Flash file from the previous exercise.
-
Click the news root element in the XML Structure pane and click the Apply to Entire Document button when prompted.
-
Select all of the text in the table row and apply the newsItem element.
-
Apply the newsDate , newsTitle , and newsContent elements to the contents of each cell within the table.
-
Add placeholder text for the XML tags.
-
Uncheck the Show XML tags in the document check box and save the document again.
Generate the XML and add to the Flash movie
Youll need to generate an XML document for use in the Flash movie. As the structure of the XML document generated has changed since exercise 7, well also need to update the Flash movie to display the information correctly.
-
Save the Word document in XML format, making sure that you check the Save data only option. Dont change the file name.
-
Close the Word XML document.
-
Switch to Flash and open the Flash file from the previous exercise. If you didnt complete the exercise, use the file newsItem_completed.fla . Make sure it is in the same folder as your newsTable.xml file.
-
Modify the code within the Flash file as shown here. Ive indicated the new lines in bold.
var RootNode:XMLNode; var myXML:XML = new XML(); myXML.ignoreWhite = true; myXML.onLoad = loadNews; myXML.load("newsTable.xml"); function loadNews(success:Boolean):Void { if (success) { RootNode = this.firstChild; var content_str:String=""; var newsItem:XMLNode; var newsDetail:XMLNode; for (var i:Number=0; i<RootNode.childNodes.length;i++){ newsItem = RootNode.childNodes[i]; for (var j:Number=0; j<newsItem.childNodes.length;j++) { newsDetail=newsItem.childNodes[j]; if (newsDetail.nodeName == "newsDate") { if (i > 0) { content_str += "<br><br>"; } content_str += newsDetail.firstChild + " - "; } else if (newsDetail.nodeName == "newsTitle") { content_str += "<b>"+newsDetail.firstChild + "</b>"; } else if (newsDetail.nodeName == "newsContent") { content_str += "<br>"+newsDetail.firstChild; } } news_txt.text = content_str; } } }The function loops through each of the child nodes of the <newsItem> node and adds the text to the content_str variable. If were showing the second or subsequent news item, we add two line breaks above so we space out each news item.
-
Test the movie. You should see your first news item displayed in the Flash interface. Ive shown my interface in Figure 5-49. Notice that Ive changed the date and title display slightly compared with the previous example.
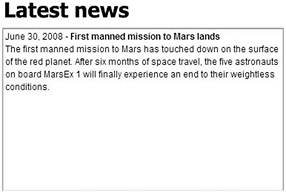
Figure 5-49: The updated Flash interface
Update the XML content and check the Flash movie
-
Open the newsTable.doc document in Word 2003 and display the XML Structure pane. Turn off the Show XML tags in the document option if necessary.
-
Insert a row above the current row and check that the placeholder text displays. Add a news item.
-
Use File
Save As to generate the data only XML content and close the file. -
Test the Flash movie again. This time, you should see more than one news items displayed in the Flash interface, as shown in Figure 5-50.
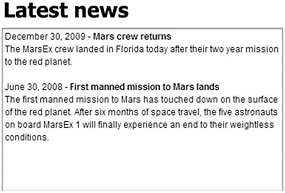
Figure 5-50: The completed Flash interface showing two news items
You can find the completed files for this exercise among your resource files saved as newsTable.doc , newsTable.xml , and newsTable_completed.fla . The exercise showed how to create a Word document that managed repeating items. You were able to use Word 2003 to manage the XML content for use in Flash.
| |
Points to note from exercise 8
-
In this exercise, we used a table to store the details of each news item. We added the XML tags to a row in a Word table. Each time you add a new row to the table, Word duplicates the XML tags. You could also sort the data within the table before you use it to generate XML content.
-
You might notice that I didnt protect the XML tags in this Word document. Adding protection would have stopped me from adding more rows within the table and creating multiple news items.