FILE AND FOLDER SECURITY
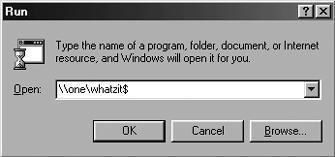
USER-LEVEL CONTROLS IN WINDOWS 98SE/METhe Annoyance:I want to protect some of the folders on my Windows 98SE computer so that only certain users can access them. The Access Control dialog box offers the option of user-level controls, and has a field for entering the location of the user list. I'm not sure whether to enter the name of the computer or the name of a file. If it's a file of usernames, how do I create it? The Fix:I'm assuming your network is a workgroup, not a domain. If you were running a domain (usually found only in business environments), the name of the domain would have been entered automatically in the "Obtain list of users and groups from" field (see Figure 7-7). For workgroups, only the share-level access control option is available. Here's what's really annoying about this. Even though user-level access controls aren't available for workgroups, Microsoft doesn't make this option inaccessible when a computer is part of a workgroup. wait, I'm not donenot only is the option available, but also, you can enter anything in the field and the system will accept it (and make you reboot the computer to put the new setting into effect). However, after you go through all that, no users will ever be able to access the folder across the network because, of course, the option isn't really available. Figure 7-7. Windows 98SE and Me computers that log on to a domain instead of a workgroup can limit access to specific users or groups.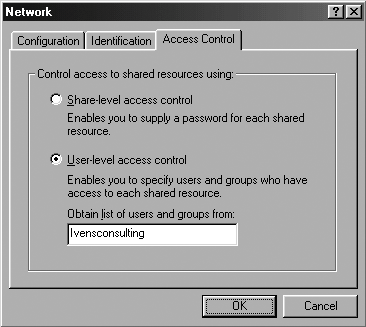 Your network is a workgroup, so you're limited to share-level access controls. To protect the files, password-protect the folder and give the password only to those people you want to let into the folder. DEFAULT PERMISSION OPTIONS FOR SHARE-LEVEL CONTROLSThe Annoyance:I shared a folder on my Windows 98SE computer. Anyone on the network can open the files in that folder, which is what I intended when I shared it. However, if anyone working on a remote computer, including me, tries to save that file, the system displays an error message. What did I do wrong? The Fix:You didn't look carefully at the Sharing dialog box when you created the share. By default, Windows 98SE and Me impose a Read Only access restriction on shared folders. This means files can be read (opened) but not written (saved). If you want remote users to be able to save files, right-click the folder icon and choose Sharing, then select the Full option under Access Type (see Figure 7-8). Figure 7-8. By default, remote users can see, but not save, files in this folder.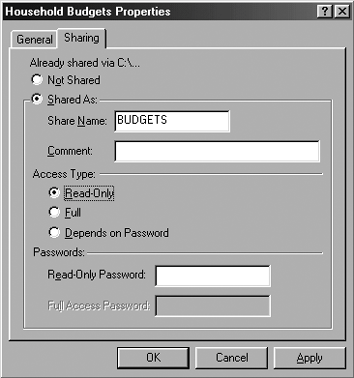 Warning: If you configure a shared folder for read-only access, the restrictions aren't limited to saving a file when you're working in software. Network users can't move or copy files into the folder, either, because there's no write access. LOCAL USERS DON'T NEED A PASSWORD TO ACCESS A PROTECTED FOLDERThe Annoyance:On my Windows 98SE computer, I password-protected a folder and didn't give anyone the password. I use the password to work on the files in that folder from another computer on the network. However, anyone who works on the Windows 98SE computer can get into the folder and open the files. The system never asks for a password. What kind of security protection is this? The Fix:That's the kind of security protection you have in Windows 98SE and Me. The password-protection feature is only for users who access files across the network. Local users can access anything, anywhere, at any time. If you want to protect files, use the password-protection features in your word processor. DEFAULT PERMISSION OPTIONS FOR SHARED FOLDERS IN WINDOWS XPThe Annoyance:I shared a folder on my Windows XP computer by checking the "Share this folder on the network" box. Everybody on the network, including me when I'm working on a remote computer, can open the files in the folder. But nobody can save the files. The Fix:By default, when you share a folder for network access, the system makes the folder read-only, which means nobody can write (save) to the folder. If you want to write to the folder, right-click its icon and choose Properties. Click the Sharing tab and check the "Allow network users to change my files" box (see Figure 7-9). Figure 7-9. You must specifically choose the option to let users change files if you want network users to be able to save files to the folder.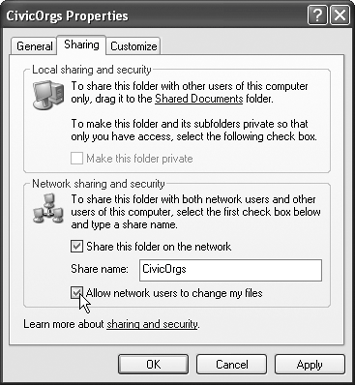 SHARE THE WINDOWS XP SHARED DOCUMENTS FOLDER OVER THE NETWORKThe Annoyance:I put some documents into the Shared Documents folder for the express purpose of letting everyone share those documents. That way, I can keep all my other folders private. But nobody, not even me, can find the Shared Documents folder when working on another computer on the network. The Fix:The Shared Documents folder is designed to let multiple users of the local computer access the documents it contains. It's not a network-based sharing scheme. However, you can share it across the network by right-clicking its icon and selecting Properties from the shortcut menu. Click the Sharing tab and check the "Share this folder on the network" box. To let users make changes to files, check the "Allow network users to change my files" box. FIND THE SHARED DOCUMENTS FOLDER ON THE NETWORKThe Annoyance:I shared the Shared Documents folder on the network, but when I'm working on another computer, I can't find it. The Fix:This folder has a different name when you access it over the network; it's named Documents. PRIVATE FOLDER FEATURE IN WINDOWS XP REQUIRES NTFSThe Annoyance:I want to make some of my folders private, but the "Make this folder private" option isn't available. The Fix:Making a folder private is a security feature, and your computer must be running NTFS to have security features available. Apparently, your computer is running the FAT (or FAT32) filesystem. To see which filesystem was used to format your hard drive, right-click My Computer and choose Manage. In the left pane of the Computer Management console window, select Disk Management. The right pane displays information about your hard drive(s), including the filesystem (see Figure 7-10). Figure 7-10. Only drives formatted with NTFS offer security features.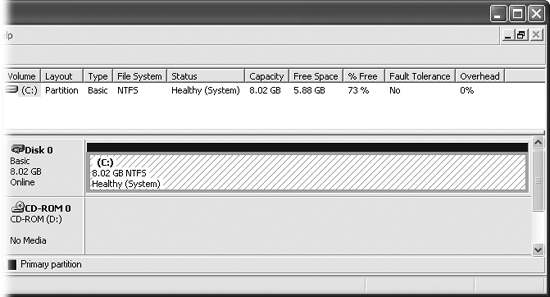
SOME FOLDERS CAN'T BE MARKED PRIVATEThe Annoyance:I have some folders that contain software, and I want to keep some of them private. However, Windows won't let me check the "Make this folder private" box. The Fix:Your computer is running Simple File Sharing, which is the default security mode for Windows XP (see the sidebar "Simple File Sharing Simplified" for an explanation). With Simple File Sharing, you can make folders private only if they exist as part of your personal folders hierarchy (called your user profile). To see the folders in your user profile, follow these steps:
If you're running Windows XP Professional, you can turn off Simple File Sharing. If you're running Windows XP Home Edition, you can't turn off Simple Fire Sharing, but you have some other workarounds to make files private. Both of these options are discussed in the annoyances that follow. Figure 7-11. Your personal folders are subfolders of your logon name folder, and some of the subfolders have additional subfolders, indicated by a plus sign.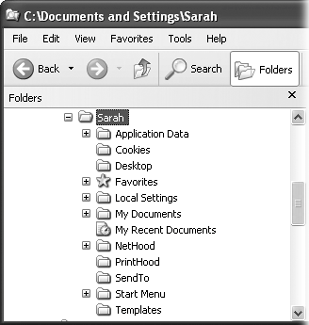
TURN SIMPLE FILE SHARING OFF IN WINDOWS XP PROFESSIONALThe Annoyance:I'm running Windows XP Professional with NTFS and I want to be able to decide which folders are private and which can be accessed by other users of my computer. How do I get rid of Simple File Sharing? The Fix:Open any Windows system folder (My Documents, Windows Explorer, My Network Places, etc.), and select Tools Tip: The Folder Options dialog box is also available in the Control Panel (under Appearance and Themes). After you disable Simple File Sharing, the Properties dialog box for every folder displays the classic Security and Sharing tab. You can use that tab to specify user permissions for shared folders. Warning: If you're not familiar with the way Security and Sharing permissions work, don't mess with this feature. You might accidentally deny yourself access to your own data. INSTALL SOFTWARE AND MAKE IT PRIVATE IN WINDOWS XP HOME EDITIONThe Annoyance:I want to install QuickBooks on my computer, and I don't want anyone who logs on to the computer to be able to use it. However, the folder in which QuickBooks is installed can't be made private. It's annoying that Windows XP won't let me keep software private. The Fix:To keep a software installation private, install the software in your user profile because any folder in your user profile can be made private. To accomplish this, you need to create a subfolder for the software in your user profile, and then change the installation process so that the software is installed into that folder. To create a folder for the software in your user profile, open My Computer or Windows Explorer, expand the hard drive, expand the Documents and Settings folder, and select the folder bearing your user logon name. Select File Install the software, but instead of accepting the default location for installation (commonly a subfolder under the Program Files folder), select the option to customize the installation process. Then select your new subfolder as the target folder for the software. After the software is installed, open My Computer or Windows Explorer and navigate to the folder you created for this software. Right-click the folder and choose Sharing and Security from the shortcut menu, then check the "Make this folder private" box. If any other user tries to open the software, an error message appears. MAKE SOFTWARE DATAFILES PRIVATE IN WINDOWS XP HOME EDITIONThe Annoyance:I installed Quicken on my computer and now I want to make sure nobody can get to my datafile. I can't make the installation folder private, but it's OK if other users use the software as long as they can't see my datafiles. However, Quicken automatically saves the datafile in the installation folder. What can I do? The Fix:You have two ways to make software datafiles private: password-protect the file, or move the datafiles into a private folder (almost all software applications offer both of these features). If you want to move the datafiles to a private folder, first create the folder within your user profile. Then copy (don't move) the datafiles to the new location. Open the software. Most database software applications, such as Quicken, automatically open the datafile you were working on when you last closed the software (which is why I told you not to move the datafiles because that would confuse the software, and it could hang for a long time trying to find the file). Open the datafile that exists in the private folder (using the File To make sure it worked, rename the original file (add a letter or number to the beginning of the original filename). Open the software again to make sure the datafile in the private folder opens automatically. If it does, you can delete the original file. If it doesn't, check the software's documentation or call the support line to find a solution. Warning: Some software applications create multiple files that combine to comprise a datafile. In this case, you must copy all the files related to your datafile to the private folder. Tip: Check to see if your software has a feature that lets you move or copy datafiles. For example, Quicken offers a Copy File feature. The software then asks if you want to use the copy (the file in the new location) as your datafile. Nifty feature! SHARE SOME, BUT NOT ALL, OF YOUR DOCUMENTSThe Annoyance:I save all my documents in My Documents and many of them are private. However, I want to share some documents with other users on the same computer and across the network. I use Windows XP Home Edition, and it's annoying that I can't specify shared or private status on a file-by-file basis. The Fix:It would be easier to set security permissions on individual files. However, you have several ways to work around this limitation:
WORK ON PRIVATE DOCUMENTS FROM A REMOTE COMPUTERThe Annoyance:The computer I use most frequently is also used by other household members, so I created a private subfolder under My Documents. However, sometimes I work from a different computer and need to access my private documents. Of course, the system doesn't let me into the private folder, which is really annoying. The Fix:Private means private, and when you're working on a remote computer, you're a guest on the computer that holds your private files. Because you're not the same person who made the files private, you can't access them. The only solution is to use your software's password-protection feature and save the files in a folder you configured as public and accessible across the network. When you open the software on the remote computer and then open the file across the network, entering the password makes the file available. HIDE SHARED FOLDERSThe Annoyance:I want to be able to work on my own documents from a remote computer. I'm really annoyed at all the stuff I have to go through to make folders private, public, password-protected, and so on. Is there an easier way? The Fix:You can create shared folders and then hide them. When users view the computer from My Network Places or Network Neighborhood, they see all the shared resources. They don't see shared folders that are hidden. The person who created the hidden folder is the only person who knows it exists. To create a hidden, shared folder, create the folder (use some innocuous name), share it across the network, specify that users can change the files, and make the last letter of the sharename a dollar sign (see Figure 7-12). Figure 7-12. Adding $ to the end of a sharename hides the share from My Network Places and Network Neighborhood.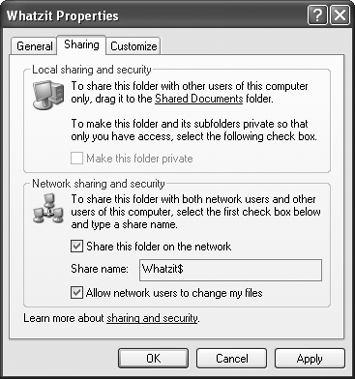 Of course, now you're asking how to get to the files in your hidden share when you're working on a remote computer. Opening My Network Places or Network Neighborhood doesn't help because the share doesn't show up. Here's the trick: select Start Click OK to open the hidden share's folder (see Figure 7-14). Go to work! Figure 7-14. Ta-da! Here are my hidden files.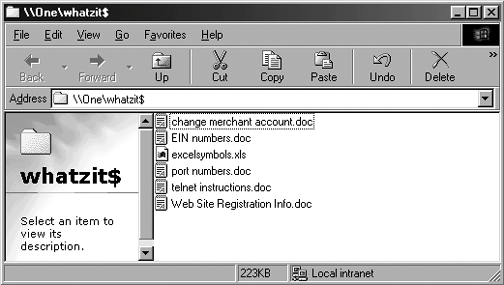 Warning: A hidden folder isn't a "private" folder. If anyone else learns the name of the folder, they can get to it.
HIDDEN SHARES WITH SHARED PARENT FOLDERS AREN'T REALLY HIDDENThe Annoyance:I created a hidden share as a subfolder under My Documents. I share the My Documents folder on the network so that I can work on files from any computer. When I open My Documents, I see the hidden share listed. It has a dollar sign at the end of the name, but it still shows up. This is really annoying. The Fix:Unfortunately, when you share a folder, you share all its contents. Anyone who can see the share can see all the contents. If those contents include shares with a dollar sign at the end of the name, that's tough nuggies. The best way to create a hidden share is to use a folder on the C drive, not a subfolder of an existing folder. If you want to use a subfolder, never share the existing parent folder. And of course, avoid sharing the drive because that becomes the parent of all folders, hidden or otherwise. If the parent is shared, so are all its contents. WHO'S VISITING MY COMPUTER?The Annoyance:I wish there were a way for me to know whether network users are in my computer, and what they're doing there. The Fix:You can track remote users easily, but the process depends on your version of Windows. View Network Visitors in Windows XP/2000In Windows XP and 2000, you can keep an eye on network connections in the Computer Management console. Right-click My Computer and choose Manage. When the console window opens, click the plus sign next to the Shared Folders object in the left pane to display the following objects:
Figure 7-15. You can see who's on your computer, and which remote computer they're using.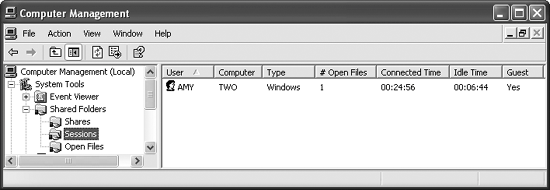 View Network Visitors in Windows 98SE/MeIn Windows 98SE and Me, your network spy is Net Watcher. Select Start Figure 7-16. Net Watcher tracks information about remote users. To change the view so that you can see the names of open files and the shares on the computer, use the options in the View menu. INSTALL NET WATCHERThe Annoyance:Net Watcher doesn't appear on my System Tools menu. The Fix:Net Watcher is not always included when you install the operating system (it depends on the settings for installation). If you don't see Net Watcher on the System Tools menu, use the following steps to install it (you'll need your Windows CD because the system has to copy the Net Watcher files):
The system copies the files from your Windows CD and installs Net Watcher on the System Tools menu. This is one of the few times you don't have to reboot Windows 98 and Me after making a change to the system. DISCONNECT REMOTE USERSThe Annoyance:Can I get rid of remote users if I want to? The Fix:Yes, you have a way to get rid of remote users. (Well, "get rid of" seems harsh, the technical term is "disconnect," which sounds less vicious.) In Windows XP and 2000, right-click My Computer and choose Manage to display the Computer Management console. Select the Sessions object in the left pane, and then take the appropriate action:
In Windows 98SE and Me, select the user you want to disconnect and choose Administer |
EAN: 2147483647
Pages: 90
 Folder Options. Click the View tab and uncheck the "Use simple file sharing (Recommended)" box.
 Run and enter \\ComputerName\