Using SSMS with SSIS
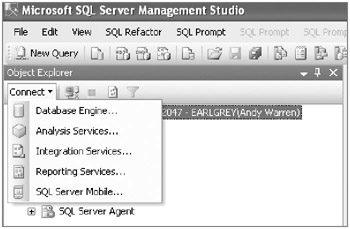
You use SSMS to administer SQL Server along with its optional components, Notification Services, Reporting Services, and of course SSIS. Figure 6.2 shows how to connect to SSIS.

Figure 6.2: Connecting to SSIS in SSMS
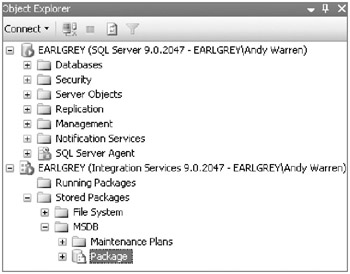
When you click Integration Services, you’ll get the standard dialog box that asks you to choose from Windows or SQL Server credentials. Once authenticated, you should see that Integration Services has been added to the SSMS view (see Figure 6.3).

Figure 6.3: SSIS view in SSMS
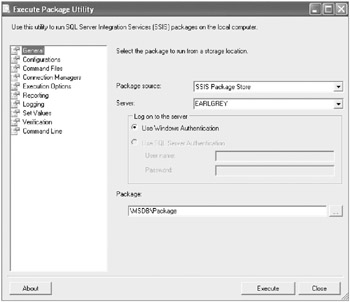
Looking at the Stored Packages folder, you can see two subfolders, one for the file system and one for MSDB, the latter being where you deployed the first practice project and shown here with the really useful name of Package! Right-click that node (the one selected earlier), and click Run Package. Figure 6.4 shows what the Execute Package Utility dialog box looks like.

Figure 6.4: Execute Package Utility dialog box
For now, keep it simple and just execute the package by clicking Execute. The package will start to run and show the percentage complete as the embedded tasks execute and then should finally report success or failure.
If you check your Excel file again, you’ll see that it worked, sort of. It didn’t delete the file and replace it with a new one as you might have expected. Instead, it just appended the rows to the end of the first set. For a more robust solution, you might first open the file and delete any rows present, or you might delete and re-create the file each time the package ran.
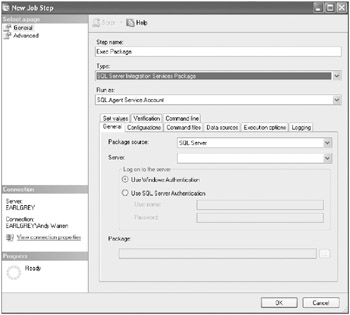
The final step is to schedule the package for daily execution by creating a job. We’re going to assume that you know how to create a job and just jump to the part that is SSIS specific. As shown in Figure 6.5, create a new job, add a step named Exec Package, and change the type to SQL Server Integration Services Package. That gives you the set of tabs that have the same options you saw when you ran your package a few minutes ago, just arranged a little differently. Enter the server name that contains the package and then, using the button at the bottom right, browse to find the package you want the job step to execute.

Figure 6.5: Scheduling an SSIS package
Browsing under the SQL Agent, you can see the job you just created. You can test your settings by executing the job now and then confirming the results in the Excel file once more.
| Note | You’ll be able to run the package successfully only three times. On the fourth run, Excel will hit the row limit of 65,000 rows, and you’ll get a portion of the fourth run only. It’s a limitation of Excel, not SSIS, and something to plan for in future packages. |
At this point, you’ve gotten a very quick overview of how to build and deploy SSIS packages. If you want to really dig into how to become an SSIS power user, we can recommend two books (see the “Additional Reading” sidebar). Now is a good time for another break; when you come back, you’ll look at some of the advanced capabilities that you can add to a package.
We’re sure that many good books on SSIS are available, but the two we prefer are Professional SQL Server 2005 Integration Services by Brian Knight et al. (Wrox, 2006) and Microsoft SQL Server 2005 Integration Services by Kirk Haselden (Sams, 2006). Both are great books, and if you plan to do any serious SSIS work, you’ll benefit greatly from investing in one or both of them.
EAN: 2147483647
Pages: 146