Important Concepts
WSS 3.0 is a web application. It uses web sites and web-related concepts to do its job. Some of these terms and functionality may be well known to you already. But some have very specific meanings in the SharePoint environment. You may recall from previous chapters that WSS is the basic foundation for SharePoint and that there is an optional extension called Microsoft Office SharePoint Server (MOSS). Even if you implement MOSS, you will still need the information in this chapter to understand how the WSS part works, since the basic structure and functionality is based on WSS, regardless of whether it is a WSS site or a MOSS site.
Administration Web Sites and User Web Sites
Windows SharePoint Services has two types of web sites:
-
q The SharePoint Central Administration web site that is used for advanced configuration and management of WSS.
-
q The user web site (also known as team sites, project sites, and meeting workspaces) contains the actual information that is shared between users, such as documents, lists, and images. There can be as many of these web sites as needed.
One important distinction between these two types of web sites is that only a SharePoint administrator will use the Administration web site, whereas everyone may use the user web sites. As you may remember from Chapter 2, these two web sites use two different web applications, that is, they are using different virtual IIS servers:
-
q SharePoint Central Administration: Used by the Administration web site and runs in its own application pool (default name: SharePoint Central Administration v3). By default, this web site will use a randomly selected TCP port, but you can set this number manually if you choose anything other than the Basic installation mode.
-
q SharePoint – 80: Used by the user web site and runs in a separate application pool (default name: SharePoint – 80). Note that the name for this virtual server may be different if you created a separate virtual server for this purpose. The default web site is also frequently used for this type of web site. By default, this web site will use TCP port 80, to make it easy for end users to access it.
If you, for any reason, need to stop all users from accessing the WSS environment, open the IIS Manager tool, right-click SharePoint – 80 (or whatever virtual IIS server the user web site uses), and select Stop. To enable the users to access it, right-click again, and select Start.
The Central Administration Web Site
You have already used the Central Administration web site in Chapter 2. This web site allows the administrator to do more advanced administration and configuration of the WSS environment, such as create new web applications, create site collections, configure the content databases, and define what database server to use. In this chapter, you learn about all the important configuration settings available in this web site and how to make the most out of your WSS environment.
SharePoint has its own security system that makes sure only users with the proper permissions are able to access the Administration web site. As an extra security feature, this web site uses a randomly selected port number, known as the administrative port, which you must know in order to access it. This port number is set automatically for Basic installations, and can be set manually for Advanced installations, when the Configuration Wizard runs after the initial installation. Note that if you set the port number manually, make sure to use a number above 1024, since all numbers below this limit are referred to as "well known ports" that may be used by other applications.
You have several ways of accessing this Administration web site, assuming that you have the proper permission. The easiest way is to use the Windows 2003 startup folder by going to Start ![]() Administrative Tools
Administrative Tools ![]() SharePoint 3.0 Central Administration. Another way is to open this web site directly by using a browser. This requires that first you know the administrative port. Assuming that the port number is 5000 (as in Figure 3-2), you can open the web site using the URL address http://localhost:5000, then the string localhost will be replaced by the server name, as shown in Figure 3-3.
SharePoint 3.0 Central Administration. Another way is to open this web site directly by using a browser. This requires that first you know the administrative port. Assuming that the port number is 5000 (as in Figure 3-2), you can open the web site using the URL address http://localhost:5000, then the string localhost will be replaced by the server name, as shown in Figure 3-3.
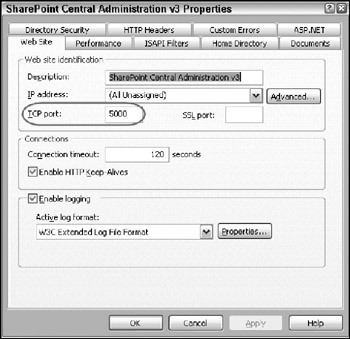
Figure 3-2
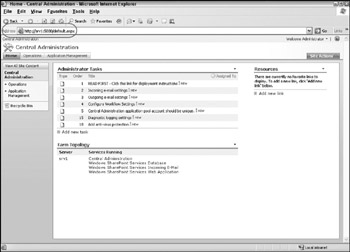
Figure 3-3
Be sure to protect this Administration web site. If a malicious user can access it, that user can remove content or even remove WSS from the virtual IIS server. But to do this, the malicious user would both have to learn the administrative port number and get access to the web site.
| Important | Even if you use the default Windows Authentication method to access the Central Administration web site, it will not protect the data sent between your web client and SharePoint. Use Secure Socket Layer (SSL) to protect the Central Administration web site if you need to access it over the Internet. If you don't need Internet access to this site, configure your firewall to prohibit access to the TCP port used by the Central Administration tool. |
The User Web Sites
This is where the action is! These web sites are the foundation for creating shared web pages, team collaborations, departmental intranets, project sites, and so on. When you installed WSS using the Basic installation method (as described in Chapter 2), your first user web site was created automatically. It should look like the one in Figure 3-4.
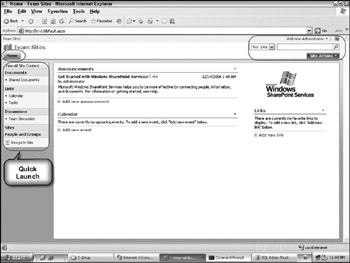
Figure 3-4
The name of this default site, which is ready to be used, is team sites. The only user who can access this site now is the user account you used when installing WSS. But you can grant access to any number of users or groups, each with individual permission settings, if required.
Note the URL address displayed in the Address field of Figure 3-4:
http://srv1/default.aspx
In this example, the WSS server name is SRV1. De fault.aspx is the page displaying the content for this web site. Its suffix .aspx indicates that this page is based on ASP.NET code. On the top of the web page are some links to different parts of the web site:
-
q Home: Takes you to the start page for this web site (that is, the page displayed in Figure 3-4).
-
q Welcome <user>: This is a menu that shows the name of the current user; click on it to display the menu options:
-
q My Settings: Displays information about the current user, such as the name, picture, department and e-mail address. Use the button Edit Item to change these settings. Use the button My Alerts to add and list all alerts for this site. Use the button My Regional Settings to see the default regional setting inherited from the web site, such as the Locale, Time Zone, and Calendar type. You can change these settings, if necessary.
-
q Sign in as Different User: Allows you to log out from the current user identity and Log on as another user. This is a very handy feature for the administrator when she want to see how a page looks to another user.
-
q Sign Out: This will sign out the current user, and close the web browser.
-
q Personalize This Page: Use this feature when you want to customize the look and feel of the current web page. These changes will only be visible to this user, that is, a personal view of this page. By default users with Read permission will not have this functionality enabled, and thus they will not see this link.
-
-
q <Question mark>: This button will open the Help system for WSS in a separate window.
-
q <Search field>: This search functionality is only active if this WSS installation is using SQL Server 2000/2005, with full-text indexing activated. You will find more about WSS searching later in this chapter.
-
q Site Actions: This menu will have different options, depending on what site you are looking at, and your permissions. By default, three options are listed here:
-
q Create: Allows you to create any type of list, library, or page supported by WSS, such as document libraries, contact lists, and issue tracking lists. You can also use this page to create a new subsite under the current site.
-
q Edit Page: This link will open the current page, for example the Default.aspx page, in edit mode. Note that any changes you make here will be visible to all other users of this site. Use this link to modify and add new content to this page, also known as web parts. You will learn more about web pages later. When done, click Exit Edit Mode to save any changes.
-
q Site Settings: This will open the general configuration settings for the current site (see Figure 3-5). Use this page to add new members to this site, to change its look and feel, to view templates and galleries, and to access many more settings. Note that the top site, that is, the first site in a site collection, will have several settings not available in subsites.
-
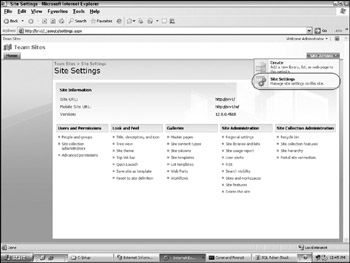
Figure 3-5
Besides the links and buttons at the top of this web site, there are several links in the Quick Launch bar, located by default at the left of the page (see Figure 3-4). The links listed here point to lists and libraries that are configured to be visible on the Quick Launch bar. There may exist more lists and libraries than are listed on the Quick Launch bar. To see them all, click View All Site Content. Note that all headlines in the Quick Launch bar also work as links to a web page that lists all objects of that particular type. For example, click on the headline Documents to display a list of all document libraries. Following are the default links on a team site in the Quick Launch bar (see Figure 3-6):
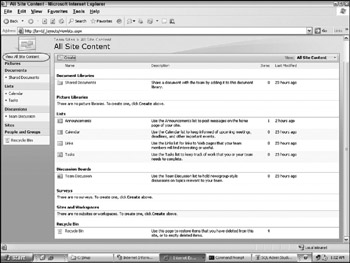
Figure 3-6
-
q View All Site Content: Shows a web page with all the content for this team site, for example the document libraries, lists, and subsites.
-
q Pictures: This is a header for future picture libraries. By default, there are no picture libraries on a team site.
-
q Documents: Shows all document, form and wiki page libraries configured to be visible on the Quick Launch bar; by default a team site lists the Shared Documents library.
-
q Lists: Shows all lists configured to be visible on the Quick Launch bar; by default a team site lists the Calendar and Tasks lists.
-
q Discussions: Shows all discussion lists configured to be visible on the Quick Launch bar; by default a team site will list the Team Discussion list.
-
q Sites: Shows all subsites under the current site; by default there is no subsite on a newly created team site.
-
q People and Groups: Click on its link to open the page where the permissions for this site are configured.
-
q Recycle Bin: Click on this link to open a web page that lists all deleted items, lists, and libraries on this web site. Use the breadcrumb trail on that page to return to the home page again. You will find more information about the Recycle Bin later in this chapter.
| Important | Note that if a link, list, library, or menu option is missing, the current user probably does not have permission to view it! |
Note that the local administration page for this site (Site Actions ![]() Site Settings) is not the same as the Central Administration web site mentioned earlier in this chapter. The local Site Settings page is where you configure the current site, for example set the permission settings, change its description, and work with templates, just to mention a few things. This type of administration is covered in detail in Chapters 9, 10, and 11.
Site Settings) is not the same as the Central Administration web site mentioned earlier in this chapter. The local Site Settings page is where you configure the current site, for example set the permission settings, change its description, and work with templates, just to mention a few things. This type of administration is covered in detail in Chapters 9, 10, and 11.
| Important | Whatever web page you are looking at, click Home or use the breadcrumb trail to go back to the start page of the site. |
Top Sites, Subsites, and Site Collections
For each WSS installation, you have at least one top site like the one you just investigated. Under this top site, you can create new sites, referred to as subsites (also known as "Webs"). Each subsite may, in turn, have its own subsite, creating a tree similar to a file system in which the top site is the root. If you need more than one top site, you can create a new one using the WSS administration web site, which creates the root for a new site tree. Figure 3-7 shows an example with two top sites that have several subsites each.
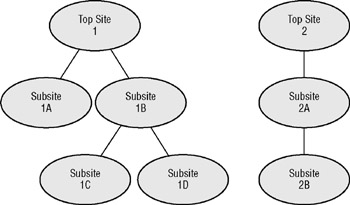
Figure 3-7
Each top site, including any optional subsites, is referred to as a site collection. There can be only one top site in each site collection, but there can be any number of subsites. Some configuration settings are specific to given site collections, such as the following:
-
q Inheritance of permission settings.
-
q SharePoint groups.
-
q Ownership and full access to all subsites.
-
q Creation and use of templates for web sites, lists, and web parts.
-
q Usage statistics.
-
q Site hierarchy.
You can copy some things (such as templates) from one site collection to another, but you should think of each site collection as an isolated island. For example, you could be the administrator in site collection A but still have no access whatsoever to site collection B. This is often exactly what different departments require: "We want our own SharePoint environment, without any possibility that someone belonging to another department can access our information!"
SharePoint uses the term web site for each web within a site collection, so the top site and all its subsites are examples of web sites. Another term you will see for these web sites is workspaces. The only difference between the two is the layout. You still have the same features and administration as with any other web site.
The reason for these two names is interesting. The development team for WSS has used the term "web site" since the beginning, that is, SharePoint Team Services released in 2001. However, when Office 2003 was released, it was designed to be integrated with WSS 2.0. One new feature in MS Office 2003 was that it could create web sites for working with documents, and MS Outlook 2003 could create web sites for meetings. But the MS Office team did not find the term "web site" very descriptive and intuitive, so they chose the new term "workspace" instead. These names are still valid in WSS 3.0 and MS Office 2007. So, whenever you see the term "workspace," understand that it is a web site created by an MS Office client.
The Security Mechanism
SharePoint keeps track of its own security settings. However, you still manage security by controlling how access is granted to different accounts. You need to be concerned with two types of security settings: user web sites and Administration web sites.
Security Settings for User Web Sites
You can grant any individual user account, from a domain or a local server account, access to all or parts of SharePoint. You can also grant access to security groups (domain or local) but not to mail distribution lists, since they are not classified as security objects, that is, they cannot be granted any type of permission.
Each user or group account must be granted some level of permission in order to get any access to SharePoint and its content. Basically, you do this in one of two ways: Make the user a member of a SharePoint group, or add the user or security group account directly to the permission list for the SharePoint object he needs to access. The level of access is controlled by the permission level, which you can think of as a security role. By default all WSS sites have these permission levels defined:
-
q Limited Access: This is a special type of security role that a user or group is granted to provide access to a specific list, library, or item, but not the site itself. In WSS 2.0 this was called "Guest." For example, if the user Anna is granted read access to a specific document library but not the site it belongs to, then Anna would get Limited Access to the site. This is handy if you want Anna to be able to open objects in the site, such as this document library, but not have any other access. (For example, she will not be able to see anything else on this site, including its home page.)
-
q Read: Can read, copy, and print documents, files, and list content in a user web site. Can also create alerts for lists, libraries, and their content.
-
q Contribute: Can do everything that Read allows and can also create, modify, and delete documents, files, and list content. Can add personal views of lists and libraries, plus do a personal customization of the site's home page.
-
q Design: Can do everything Contribute allows, plus can customize the design of the home page, for example change the color of the page, add and modify shared web parts, and create new document libraries and lists.
-
q Full Control: Has full access to everything, including security settings and local management of the web site. This is the only role that can create subsites. This role is also sometimes referred to as the "site administrator."
Later in this chapter you learn how to change these default site groups as well as create new ones.
Security Settings for the Central Administration Web Site
The previous section described how the user web site works. But how do you modify the inner guts of WSS? You may remember that I said that the account used during the installation will initially also be the only account that can access the Central Administration web site. But this is not completely true!
Assume that Anna is the only user who can access the Administration web site. In other words, she is the SharePoint Goddess. By mistake, you happen to delete her user account. Quickly you try to repair the damage before anyone notices, so you create a new user account, with the exact same name and password. Will Anna still be able to use the Administration web site? No! Because when you created a new account, it got a new Security ID (SID), although with the same name. But SharePoint has granted administrative access to the old SID for Anna, so she cannot get in.
How do you solve this? Well, you can't unless you do a restore of the user account, that is, restore the complete Active Directory database, and this is not an easy task. Is there an easier way? Yes! Your escape route out of this misery is the fact that every user who is a member of the local Administrators group of the WSS server automatically has full and unlimited access to the Central Administration tool! The solution is to add Anna's new account to this group.
The important thing for you to understand that everyone - every user and every member of any domain group - who is a member of the local Administrators group is a SharePoint God or Goddess. And by default, the domain group Domain Admins is always a member of the local Administrator group in every computer in the domain. This results in the fact that every member of Domain Admins has full access to the Central Administration tool. But not to any of the user sites in WSS! This is different from WSS 2.0, where members of the local Administrator group had full access to every site, both administrative and user sites! So, the security is better in WSS 3.0. However, any user who can access the Central Administrator tool can also add themselves as Owners to any user site, so note that only trusted people should be members of the local Administrator group!
EAN: 2147483647
Pages: 119