Section 5.3. FileUpload Control
Often an application finds the need to allow users to upload files to the web server. Although it was possible to do this in ASP.NET Version 1.x, it is made much easier in ASP.NET Version 2 with the introduction of the FileUpload control.
This control makes it easy for the user to browse for and select the file to transfer, providing a Browse button and a text box for entering the file name. Once the user has entered a fully-qualified file name in the text box, either by typing it directly or using the Browse button, the SaveAs method of the FileUpload control can be called to save the file to disk.
In addition to the normal complement of members inherited from the WebControl class, the FileUpload control also exposes several read-only properties of particular interest, listed in Tables 5-8 and 5-9.
Table 5-8. FileUpload properties
| Name | Type | Get | Set | Description |
|---|---|---|---|---|
| FileContent | Stream | | Returns a Stream object that points to the file to upload. | |
| FileName | string | | Returns the name of the file to be uploaded, without any qualifying path information. | |
| HasFile | Boolean | | If TRue , indicates that the control has a file to upload. | |
| PostedFile | HttpPostedFile | | Returns a reference to the file which has been uploaded. Exposes the read-only properties listed in Table 5-9. |

Table 5-8. HttpPostedFile properties
| Name | Type | Get | Set | Description |
|---|---|---|---|---|
| ContentLength | integer | | Returns the size of the file, in bytes, of an uploaded file. | |
| ContentType | string | | Returns the MIME content type of the uploaded file. | |
| FileName | string | | Returns the fully qualified file name on the client computer. | |
| InputStream | Stream | | Returns a Stream object that points to the uploaded file. |
All of these properties will be demonstrated in the following example.
To see a FileUpload control in action, create a new web site called FileUploadDemo . Drag a FileUpload control onto the page. Add two ASP.NET Button controls, with Text properties set to Save and Display , and ID properties set to btnSave and btnDisplay , respectively. Add two Label controls with ID 's set to lblMessage and lblDisplay . Sprinkle a few <br/> HTML elements to space things out. Switch to Design view and double-click on each of the buttons to create default-named Click event handlers for each button in the code-behind file. When you are done, the content file should look something like that shown in Example 5-11.
Example 5-11. default.aspx for FileUploadDemo
<%@ Page Language="C#" AutoEventWireup="true" CodeFile="Default.aspx.cs" Inherits="_Default" %> <!DOCTYPE html PUBLIC "-//W3C//DTD XHTML 1.1//EN" "http://www.w3.org/TR/xhtml11/DTD/xhtml11.dtd"> <html xmlns="http://www.w3.org/1999/xhtml" > <head runat="server"> <title>FileUpload Control</title> </head> <body> <form id="form1" runat="server"> <div> <h1>FileUpload Control</h1> <asp:FileUpload ID="FileUpload1" runat="server" /> <br /> <asp:Button ID="btnSave" runat="server" Text="Save" OnClick="btnSave_Click" /> <asp:Button ID="btnDisplay" runat="server" Text="Display" OnClick="btnDisplay_Click" /> <br /> <br /> <asp:Label ID="lblMessage" runat="server" /> <asp:Label ID="lblDisplay" runat="server" /> </div> </form> </body> </html> In the code-behind file, add the highlighted code from Example 5-12. The non-highlighted code was put in place by VS2005.
Example 5-12. Default.aspx.cs for FileUploadDemo
using System; using System.Data; using System.Configuration; using System.Web; using System.Web.Security; using System.Web.UI; using System.Web.UI.WebControls; using System.Web.UI.WebControls.WebParts; using System.Web.UI.HtmlControls; using System.IO; // necessary for Stream public partial class _Default : System.Web.UI.Page { protected void Page_Load(object sender, EventArgs e) { } protected void btnSave_Click(object sender, EventArgs e) { string str = ""; if (FileUpload1.HasFile) { try { str += "Uploading file: " + FileUpload1.FileName; // Save the file FileUpload1.SaveAs("c:\websites\uploads\" + FileUpload1.FileName); // show info about the file str += "<br/>Saved As: " + FileUpload1.PostedFile.FileName; str += "<br/>File Type: " + FileUpload1.PostedFile.ContentType; str += "<br/>File Length (bytes): " + FileUpload1.PostedFile.ContentLength; str += "<br/>PostedFile File Name: " + FileUpload1.PostedFile.FileName; } catch (Exception ex) { str += "<br/><b>Error</b><br/>Unable to save c:\websites\uploads\" + FileUpload1.FileName + "<br/>" + ex.Message; } } else { str = "No file uploaded."; } lblMessage.Text = str; lblDisplay.Text = ""; } protected void btnDisplay_Click(object sender, EventArgs e) { string str = "<u>File: " + FileUpload1.FileName + "</u><br/>"; if (FileUpload1.HasFile) { try { Stream stream = FileUpload1.FileContent; StreamReader reader = new StreamReader(stream); string strLine = ""; do { strLine = reader.ReadLine(); str += strLine; } while (strLine != null); } catch (Exception ex) { str += "<br/><b>Error</b><br/>Unable to display " + FileUpload1.FileName + "<br/>" + ex.Message; } } else { str = "No file uploaded."; } lblDisplay.Text = str; lblMessage.Text = ""; } }
The highlighted using statement is necessary to use the Stream object without having to type fully qualified namespaces.
In btnSave_Click , the event handler for the Save button, the HasFile property of the FileUpload control is used to test if a valid, fully qualified filename is entered in the control text box. If the text box is blank or the filename entered is not a valid file, this test will fail and lblMessage will display "No file uploaded."
Assuming there is a valid file to upload, the code in the TRy block is executed. The key statement here calls the SaveAs method of the FileUpload control, using a hard-coded path along with the FileName property to pass in a fully qualified file name. This statement may fail for any number of reasons, including insufficient disk space, an invalid path, or security issues (more on that in a moment).
If the SaveAs fails, then the catch block will come into play, displaying an error message in lblMessage , including ex.Message , the Exception Message property.
If the SaveAs is successful, then a number of pieces of information about the uploaded file are displayed in lblMessage , retrieved from properties of the FileUpload.PostedFile property (which is of type HttpPostedFile ).
After saving a file, the page will look something like that shown in Figure 5-11.
The event handler for the Display button Click event is similar except that, instead of displaying information about the file, it displays contents of the file itself. It does this by using the FileContent property to retrieve the contents of the uploaded file as a Stream object, which is then used to instantiate a StreamReader object. The ReadLine method of the StreamReader class is then used to step through the file, line by line, concatenating the lines to display in lblDisplay .
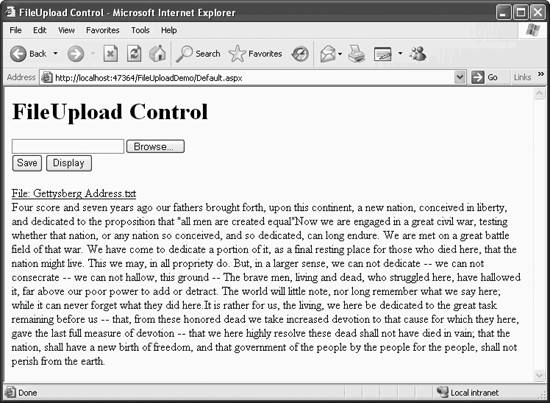
After displaying a file, in this case a text file containing the Gettysburg Address, the page will look something like that shown in Figure 5-12.
Figure 5-11. FileUploadDemo after saving a file
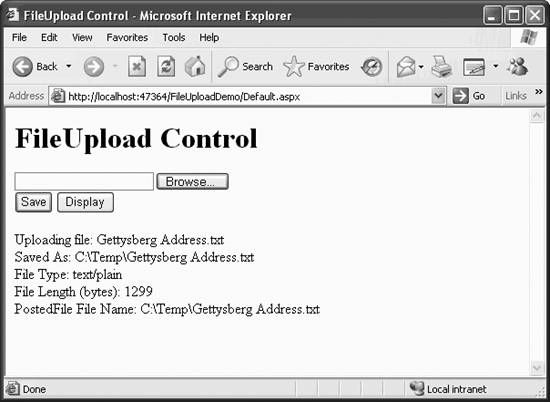
Figure 5-12. FileUploadDemo displaying a file
Whenever you talk about uploading a file to a web server from clients , security is a big concern. There are two considerations. First, opening up your web server in this way can present a huge security hole, and should be done only with care and careful consideration. Not only can uploaded files contain viruses, Trojan horses, and other malicious software, but it would be dangerous to allow the client to browse the directory structure of the web server itself. For that reason, you will almost always want to either hard-code the target directory or at least severely circumscribe where the uploaded files can be saved.
The other consideration is the permissions necessary to allow a process to write a file to disk. When developing a web application, the development computer is typically its own web server, especially when using the default mode of VS2005, in which an internal web server is used and the access to the web site is via the filesystem rather than IIS. In this situation, you will probably never run into any permissions problems.
However, when the web site is deployed to a production web server and the web site is accessed via IIS and a virtual directory, problems will arise. This is because the account that ASP.NET runs under must have write permission for the directory in which the uploaded files are to be saved. In Windows 2000/XP, this account is named ASPNET . In Windows Server 2003, write permission must given to the IIS_WPG account group .
With a FileUpload control, and good security precautions in place, your users will be able to send their own files to your site, increasing your site's versatility.
EAN: 2147483647
Pages: 173