Section 2.1. Start Page
When you open VS2005 for the first time (unless you configure it otherwise ), you'll find yourself looking at the VS2005 application window, as shown in Figure 2-1.
Along the top of the application window is a typical collection of Windows menu items and buttons , plus several that are specific to the VS2005 Integrated Development Environment (IDE). Specialized tabs that provide access to tools and controls, and to other servers and databases in the development environment, appear on the left side of the application window, labeled Toolbox and Server Explorer, respectively. The
Figure 2-1. Visual Studio 2005 Start Page
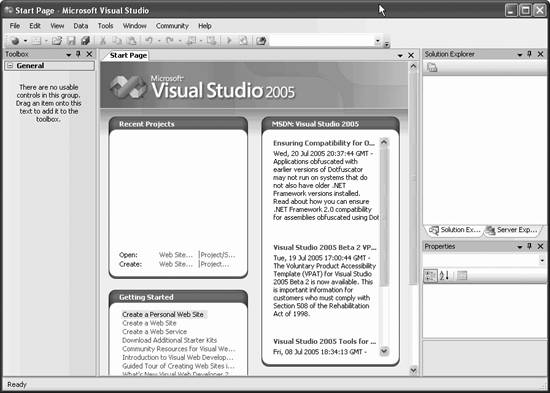
Solution Explorer, for exploring the files and classes associated with a particular project, appears on the right side. More windows are available through the VS2005 menu bar (see "The Integrated Development Environment (IDE)").
At the center of the application window is the Start Page, which contains links for creating new projects and web sites or opening existing ones. It also contains several windows with links to helpful topics for getting started and up-to-date news items.
In a tradition that goes back to the early days of computing, our first program will be a web site that displays the words "Hello World." We'll jazz it up a bit by adding a button that changes the text to "Hello Visual Studio 2005."
To begin, start VS2005 and from the Start Page click on New Web Site... or from the menu choose File  New Web Site....The New Web Site dialog opens, offering a number of options, as shown in Figure 2-2.
In the Templates window, chose ASP.NET Web Site.
Below the list of templates are a set of controls for setting the location and language for your web site.
The first drop-down, Location, allows you to work on web apps in three different manners, from three different locations: File System, HTTP, and FTP. The choice
Figure 2-2. New Web Site Dialog
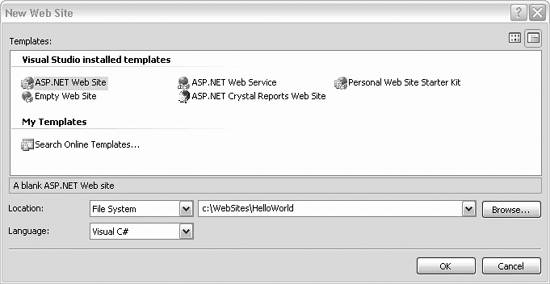
here controls much more than just a physical location, as will be described in the following sections.
2.1.1. File System
File System is the default; it causes the new web site folder to be created somewhere on the physical filesystem accessible to this PC and this user , either on the local machine or the network.
The Browse... button and associated drop-down allow you to browse the filesystem, such as Windows Explorer, and select any desired folder.
Choosing File System causes VS2005 to run the web app using its own internal web server and not IIS. A persistent virtual directory for the web app is not created and IIS is not part of the picture. In fact, you don't even need to have IIS installed on the development machine. (Of course, IIS is required on any deployment servers.)
The downside to using File System as the Location is that web pages created this way cannot be run from a browser, only through VS2005 (since there is no virtual directory to reference after "localhost" in the browser address box). This is true even when redirecting users to another page programatically with the Response.Redirect or Server.Response methods .
http://localhost/myWebApp/default.aspx
The above URL references the target web site and will not work unless you manually create a virtual directory called myWebApp in Computer Management on the local machine. To do this, right-click on My Computer and select Manage, then drill down to Services and Applications Internet Information Services Web Sites Default Web Site, then right-click and select New Virtual Directory... .
The advantage, however, is that sharing file-based solutions is easy: You just copy the entire directory to the new machine and open it in Visual Studio. This will be the preferred approach for this book.
2.1.2. HTTP
The second selection is HTTP, which indicates that IIS will be serving the pages. As such, it requires that the web app be located in an IIS virtual directory. VS2005 will automatically create this virtual directory. This is evident when you open a browser on the local machine and enter a URL such as http://localhost/myWebApp/default.aspx , which will work fine.
The Browse... button and associated drop-down allow you to browse and select from the contents, especially the virtual directories, on IIS running locally or remotely. Use the buttons on the left side of the dialog box to choose.
You can also see any virtual directories created by VS2005 by opening Computer Management and looking under Default Web Site.
2.1.3. FTP
FTP allows you to develop your web site on a remote location accessible via the FTP protocol.
The Browse... button and associated drop-down allows you to enter the information necessary to log in to an FTP site. You will be presented with an FTP Log On dialog box with a checkbox to allow Anonymous Log in and textboxes for login user name and password if necessary.
|

2.1.4. Creating Your First Web Page
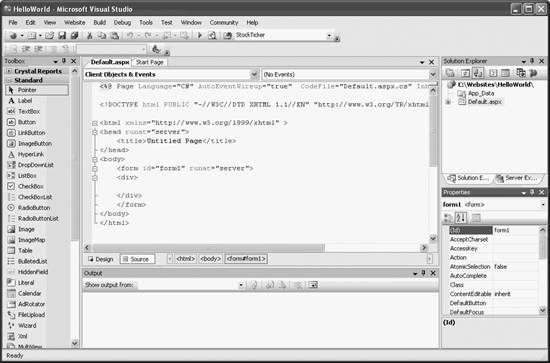
When you click OK, VS2005 creates a new web site in the file location you've designated and creates your first web page, named Default.aspx , and puts you into the Source View for that page, as shown in Figure 2-3.
Before we go into the details of the myriad capabilities of VS2005, let's get this simple program up and running. Drag a Label from the toolbox right into the source code between the opening and closing <div> tags. Your label will be given the default ID of Label1 and the default Text of Label1 . Change the text to "Hello World."
Figure 2-3. Hello World created
Switch to Design View by clicking on the tab at the bottom of the screen, and there's your label.
Drag a Button from the toolbox onto the form, next to the label. Click on the button and look at the properties in the Properties window. Scroll down the Properties window and set the text for the button to "Change." The text on the button changes immediately. Switch back to Source view and you can see that the button has been added after the label:
<div> <asp:Label ID="Label1" runat="server" Text="Hello World"></asp:Label> <asp:Button ID="Button1" runat="server" Text="Change" /> </div>
Return to Design view and double click on the Button. All sorts of things just happened . VS2005 took your double-click as an instruction to create an event handler for the "default" event of the button (all of this is explained in detail below and in later chapters). You are now in the code-behind file (the file containing the programming logic, explained in detail in Chapter 6) in the event handler. Type in the one line of code needed to change the label's Text property to "Hello Visual Studio 2005":
protected void Button1_Click(object sender, EventArgs e) { Label1.Text = "Hello Visual Studio 2005"; } As you type, Intellisense will try to help you locate the control you want (Label1). It will then provide all the properties and methods of that control for you to set or invoke. Just keep typing; we'll get to Intellisense later on.
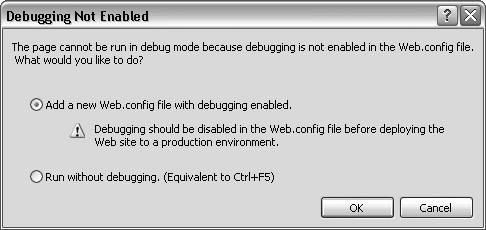
Run the application by choosing Debug Start Debugging. VS2005 will notice that you do not have debugging enabled and will offer to create a new web.config file with debugging enabled, as shown in Figure 2-4.
Figure 2-4. Enable Debugging
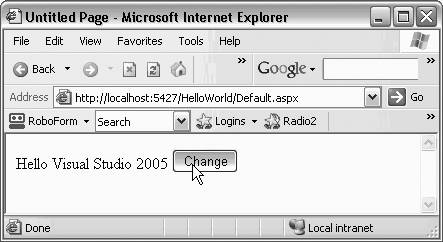
Click OK and your program will come up in a browser. Click on the Change button and your event handler runs, changing the text as expected and, as shown in Figure 2-5.
Figure 2-5. Running Hello World
You have just created a fully functional web site, with controls and an event handler that responds to user action by changing the property of one of the controls. Though this is admitedly a very simple web site, it is still notable how little typing you had to do. VS2005 does its best to make your job easier.
EAN: 2147483647
Pages: 173