Adding Styles to Your Site
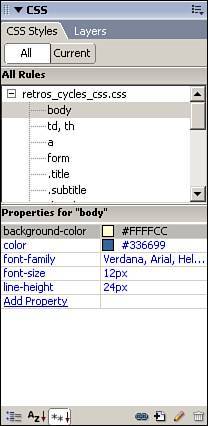
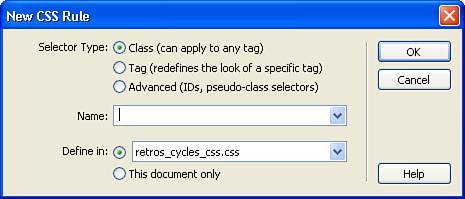
| If your goal is to make the presentation of your site easy to manage, Dreamweaver's Styles panel (see Figure 25.1) is your new best friend. From within the Styles panel you can create and manage style sheets, adjust the properties for individual styles, and easily apply styles to page content with a few clicks of your mouse. Figure 25.1. The CSS Styles panel is used to manage all your styles and style sheets.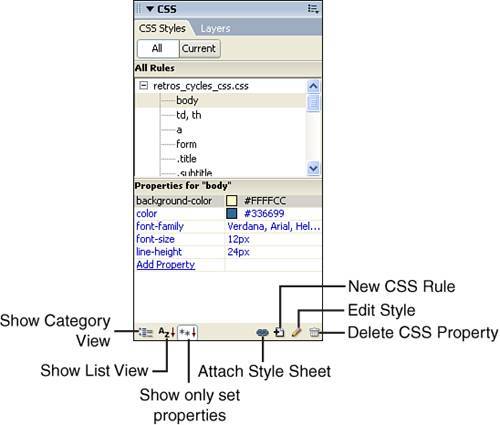 Creating a New Style SheetThe first step in managing your styles is to create an external style sheet. The style sheet can be stored in any location in your site and linked to by any of your HTML pages. When linked to, the styles included in the style sheet are available for application to objects within the page. Tip As you begin developing your site, you'll likely use only one style sheet that contains all the styles for your entire site. It's a good idea to keep that single style sheet in the root folder of your site. As the site grows, you might find a need to develop custom styles that apply to only certain sections of your site. In these cases, you can store these style sheets in the folder that corresponds to the specific section of the site, or you can create a folder named styles to store themsimilar to the way you store images in the site's images folder. There are several ways to create a new style sheet from within Dreamweaver 8. If you're new to creating styles, the easiest way is to start with the predefined style sheet templates that come with Dreamweaver. To access these templates, choose File, New from the menu bar and choose the CSS Style Sheets category in the New Document dialog box (see Figure 25.2). Figure 25.2. The CSS Style Sheets category provides access to predefined style sheets.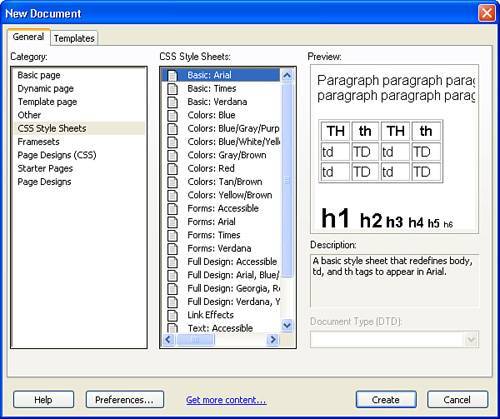 Each of the style sheet templates contains a variety of different font styles and colors for you to choose from. The templates are divided into categories ranging from Basic, which contains simple font styles, to Full Design, which includes styles for text, tables, and navigation bars. Note Remember that your pages can link to as many style sheets as you would like, so you aren't limited to just one style sheet for your website. When you select a style sheet that you think will fit with your web page design, click OK and a new instance of the style sheet is created in the code view (see Figure 25.3). This new page must be saved within your site before you can apply any of the style rules to your documents. Figure 25.3. A new style sheet has been created based on the template that you chose.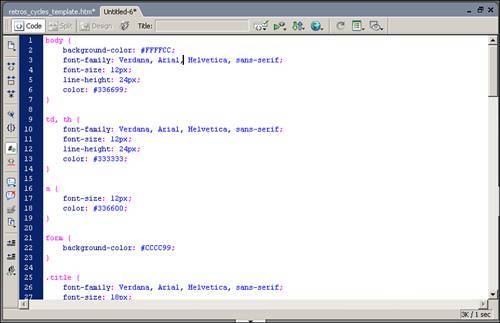 After you have saved the page to your site, you can access the styles contained in the style sheet by selecting the All button on the CSS Styles panel (see Figure 25.4). Figure 25.4. The styles are now accessible via the CSS Styles panel. If you don't want to use the predefined styles, you can generate your own style sheet by simply defining a new individual style rule. Defining New Individual StylesTo start the process of creating a new style rule in Dreamweaver, click the New CSS Rule button at the bottom of the CSS Styles panel or click the CSS Styles panel menu and choose New. Regardless of which way you choose, the New CSS Rule dialog box, shown in Figure 25.5, enables you to choose what type of style rule you want to create, designate a name for the rule, and choose whether you want to create a new style sheet, add the rule to an existing style sheet, or embed the style in the current document. Figure 25.5. The New CSS Rule dialog box starts you in the process of creating a new rule. Generally, the rules you will be creating are the Class rules because these rules can be applied to any tag placed in a web page. Tag rules can be used to define the presentation of a specific tag when it is added to your page. Advanced rules further define existing rules by enabling you to add additional properties to them. To create an advanced rule, you need to select the existing style that you want to enhance from the Name drop-down menu. If you choose to create a class rule, the next step is to create a name for it. Each class name must start with a period, so an appropriate name for a style that sets text to green, Arial, 10pt might be .bodygreenTextA10. Tip Keep in mind that when naming a style, it's a good idea to name it something that will remind you what the style is supposed to do. Generic names such as Style1 and Style2 are used by Dreamweaver when creating embedded styles, but good to get into the habit of providing custom names for your style rules. Next, you need to define whether the rule will be embedded in the current document or stored in an external style sheet. Style rules that are embedded in the document are available to only that document, so if you plan on using the style in any other page in your site, be sure to either create a new external style sheet or embed the new style rule in an existing style sheet. When you have selected where Dreamweaver should define the rule, click OK. With the type and location of the rule determined, the next step is to set the rule parameters. Elements such as font face, size, style, and a host of other properties can be selected via the CSS Rule Definition dialog box, as shown in Figure 25.6. Figure 25.6. The CSS Rule Definition dialog box enables you to customize how the rule will modify the object to which it is applied.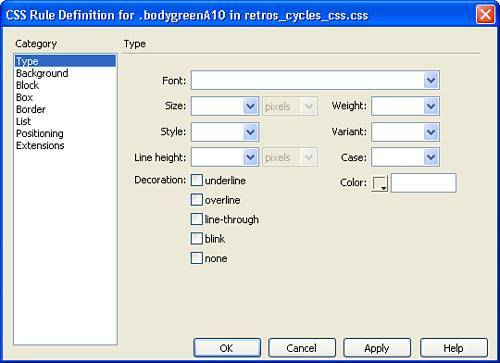 Each category provides access to a list of parameters that define how the object will be presented when the style is applied. Table 25.2 provides some basic information about the various categories and the functionality they control.
After you set the definitions for your new style, click OK and the style rule is either added to your style sheet or embedded within the page, depending on what you instructed Dreamweaver to do. Tip If your style sheet is open and you add a new style to it, you need to save the style sheet before the additions are applied to your pages. |
EAN: 2147483647
Pages: 337