Putting It All Together
|
| < Day Day Up > |
|
Once you have selected your WarDriving gear and understand what WarDriving is, you are almost ready to begin. You now know that you want to go out and identify wireless access points and map them out, but before you can do this you need to make sure you aren’t going to inadvertently connect to one or more of the wireless networks you discover. Because so many access points are set up in the default configuration, this is a real possibility.
Many wireless access points that are available today also include a built-in cable or DSL router to allow multiple hosts to access a single cable or DSL modem and get to the Internet. While this combination does help the end user quickly gain access to the Internet, both on wired and wireless networks, it also increases the potential ways that an attacker can easily compromise the network. This is primarily because, in their default configurations, the wireless access point will allow any card to connect to it without requiring any configuration on the client side, and the router has a Dynamic Host Configuration Protocol (DHCP) server enabled. The DHCP server will automatically assign a valid IP address to any host that requests one from it. When coupled with a wireless access point that grants access to any host, the DHCP server completes the connection process. At this point, an attacker has complete access to all services available on the network.
This is not an issue when using Linux software such as Kismet or AirSnort since these programs operate in monitor mode. A device in monitor mode will merely sniff all traffic without making any connections. In order to avoid accidentally connecting to these networks when using Windows, however, you will need to make a few simple configuration changes before you begin WarDriving. These steps are described in the following section.
Disabling the TCP/IP Stack in Windows
By disabling the TCP/IP stack in windows, your laptop will not have the functionality to connect to any network. This is a very simple process that you will need to perform before each WarDrive.
-
In Windows 2000/XP, right-click Network Neighborhood icon and then choose Properties, as shown in Figure 1.20.

Figure 1.20: Disabling the TCP/IP Stack Step One -
This will open the Network and Dial-Up Configurations window. There may be several network adapters listed here. Locate your wireless network card and right-click it, then choose Properties again, as shown in Figure 1.21.
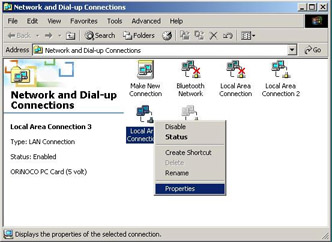
Figure 1.21: Disabling the TCP/IP Stack Step Two -
This will open the Properties for your wireless network card. Next, simply remove the check from the Internet Protocol (TCP/IP) checkbox and then choose OK. The before and after views of the dialog box can be seen in Figure 1.22.
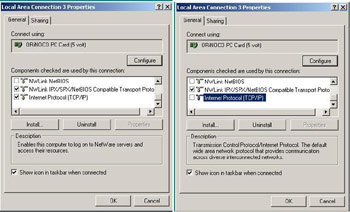
Figure 1.22: Disabling the TCP/IP Stack Step Three
One thing to be aware of when WarDriving is a tool from Black Alchemy called FakeAP (www.blackalchemy.to/project/fakeap/). FakeAP can be configured to generate hundreds or thousands of “fake” access points. A WarDriver that is in range of a system configured with FakeAP will notice a large number of access points quickly being detected. This is because FakeAP generates 802.11b beacon frames with SSIDs and MAC addresses randomly chosen from the FakeAP dictionary.
On a typical WarDrive, it is virtually impossible to detect that access points you have discovered were actually generated by FakeAP. There are several reasons for this. First, by default, FakeAP generates only four fake SSIDs per second. Driving by a system configured with FakeAP is unlikely to register because by the time enough fake access points have been generated for you to notice an anomaly, you will be out of range. Second, FakeAP can be configured to use any dictionary wordlist. This means that the SSIDs will appear to be normal SSIDs. There is no pattern that can be picked out or set of words that can be automatically discounted as FakeAP-generated. Finally, FakeAP can be configured to generate both WEP-encrypted and unencrypted fake access points. In short, this means that because FakeAPs beacons are so random and realistic, it cannot be detected.
In most cases, FakeAP will not be a serious problem for WarDrivers; however, if you happen to get stopped at a traffic light in range of FakeAP, you will have a large number of non-existent access points in your logs that you will either want to remove, or which will cause you to stop your WarDriving application and restart it after you are safely out of range of the system running FakeAP.
Your TCP/IP stack is now disabled and your wireless network card will not be able to connect to any network. Your WarDriving software will function perfectly even with TCP/IP disabled but you will not expose yourself to possible legal action by inadvertently connecting to a network that you discover while WarDriving. When you are ready to resume normal operations with your wireless network card, simply repeat steps one and two and then replace the checkmark in the Internet Protocol (TCP/IP) checkbox and click OK.
Disabling the TCP/IP Stack on an iPAQ
Disabling the TCP/IP Stack on a PDA running Windows CE or Pocket PC is not an option. There is a workaround to this, however; you can set your IP address to a non-routable, non-standard IP address. While this won’t absolutely guarantee that you will not connect, it reduces the risk to be virtually non-existent. This is accomplished in three easy steps.
-
Click Start | Settings and then choose the Connections Tab, as shown in Figure 1.23.

Figure 1.23: Setting a Non-Standard IP Address on a Pocket PC Step 1 -
Next, click the Network Adapters icon. This will bring up a listing of the network adapters that are installed on the handheld device. Select the HP Wireless Network Driver and click Properties (see Figure 1.24).

Figure 1.24: Setting a Non-Standard IP Address on a Pocket PC Step 2 -
Finally, select the Use Specific IP address radio button. In the IP address field, set the IP address to 0.0.0.1 and the subnet mask to 255.0.0.0. Leave the default gateway field blank. Your window should look similar to the window shown in Figure 1.25. Once these values have been set, click OK.

Figure 1.25: Setting a Non-Standard IP Address on a Pocket PC Step 3
After you have clicked OK, a pop-up window will appear letting you know that your settings will take effect the next time the adapter is used. Simply click OK and then remove and reinsert the PCMCIA card. You can now begin your WarDrive without worrying about connecting to an access point inadvertently.
|
| < Day Day Up > |
|
EAN: 2147483647
Pages: 125
- Key #1: Delight Your Customers with Speed and Quality
- Key #4: Base Decisions on Data and Facts
- Beyond the Basics: The Five Laws of Lean Six Sigma
- Making Improvements That Last: An Illustrated Guide to DMAIC and the Lean Six Sigma Toolkit
- The Experience of Making Improvements: What Its Like to Work on Lean Six Sigma Projects