WarDriving Using Kismet
|
| < Day Day Up > |
|
In order to successfully utilize Kismet, you need to understand the user interface. This section explains the information displayed on the Kismet user interface, and the keyboard commands used to successfully navigate Kismet.
The Kismet User Interface
The Kismet user interface, as shown in Figure 6.29, is divided into three frames:
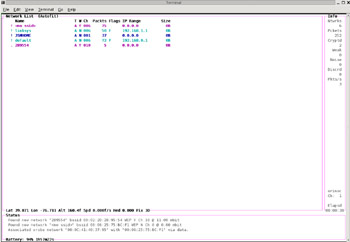
Figure 6.29: The Initial Kismet User Interface
-
The Network Display
-
The Statistics Frame
-
The Status Frame
The Network Display
The Network Display (Figure 6.30) lists the Service Set Identifiers (SSIDs) of any found wireless networks. This frame covers most of the Kismet user interface.
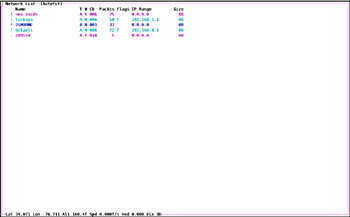
Figure 6.30: The Network Display
The lower left-hand corner of the Network Display shows the GPS information if you have a successful connection to GPSD.
The Statistics Frame
The Statistics frame (Figure 6.31) is on the right side of the interface and lists the following:
-
The total number of networks found (Ntwrks)
-
The total number of packets captured (Pckets)
-
The number of encrypted packets captured (Cryptd)
-
The number of packets with weak initialization vectors (Weak)
-
The amount of noise (Noise)
-
The number of packets discarded (Discrd)
-
The number of packets captured per second (Pkts/s)
-
The type of card used (orinoc, prism, and so on)
-
The Channel currently being sniffed (Ch:)
-
The Time Kismet has been running (Elapsd)

Figure 6.31: The Statistics Frame
The Status Frame
The Status frame (see Figure 6.32) maintains a scrolling display of all networks found and, if applicable, the Battery status.
Keyboard Commands
To get help in Kismet, simply type the letter h while the Kismet display is in the active window. This brings up the Help display, as shown in Figures 6.33 and 6.34.
![]()
Figure 6.32: The Status Frame
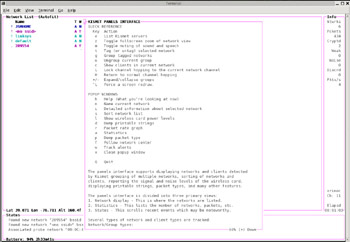
Figure 6.33: The Help Display Begins
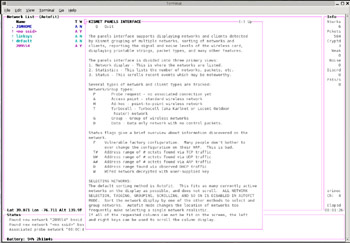
Figure 6.34: The Help Display Continues
Kismet responds to the keyboard commands shown in Figures 6.33and 6.34 by performing a specific action. For example, to stop channel hopping and stay on the current channel, type a capital L. Typing a lowercase l, on the other hand, opens the wireless card power–level popup window.
Removing the Kismet Welcome Popup Permanently
When you start Kismet 4.0.1, a Welcome message (shown in Figure 6.35) is superimposed over the Kismet user interface. Pressing the spacebar closes this window, but the next time you start Kismet, the Welcome message is back.
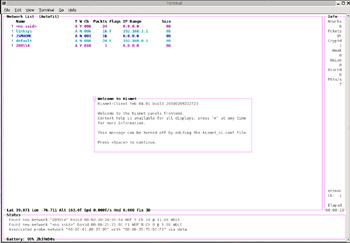
Figure 6.35: The Initial Kismet Popup
First, using the su command, change to the root user. Next, change to the /usr/local/etc directory, as shown in Figure 6.36.
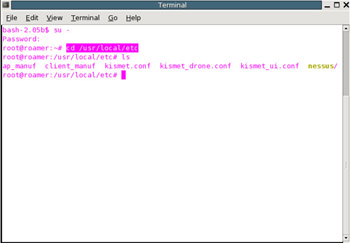
Figure 6.36: Changing to the /usr/local/etc Directory
Using your favorite editor, open the kismet_ui.conf file, as shown in Figure 6.37.
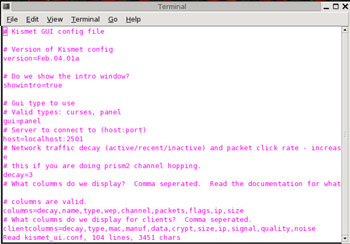
Figure 6.37: Editing the kismet_ui.conf File
Change the value of the showintro variable from true to false, as shown in Figure 6.38.
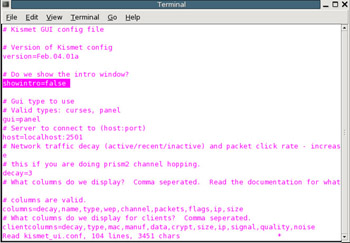
Figure 6.38: Changing the showintro Value
Now, save the changes you made to kismet_ui.conf and restart Kismet. The Welcome message is no longer displayed on startup (see Figure 6.39).

Figure 6.39: The Welcome Message No Longer Appears
While Kismet is running, Kismet data is automatically saved. When you have finished WarDriving, simply type a capital Q to quit Kismet and close the application. Since your card was in monitor mode, you need to either restart the PCMCIA services or reboot your system to resume normal wireless network usage.
|
| < Day Day Up > |
|
EAN: 2147483647
Pages: 125