Running MiniStumbler
|
| < Day Day Up > |
|
MiniStumbler is NetStumbler’s “little brother.” Where NetStumbler needs a full-fledged PC or laptop to run, MiniStumbler only requires a handheld Windows computer such as an iPAQ PocketPC. Due to the physically smaller size of the package, using MiniStumbler is much more versatile. Obviously, you are able to carry an operating PocketPC in places where it would be awkward or even impossible to carry a laptop. This versatility does come at a price, however. Owning to the nature of the mobile package, some of the features of NetStumbler have been left out of MiniStumbler.
The fact that MiniStumbler is a stripped down version of NetStumbler should not dissuade you from using it. It records all the same data as its big brother. If you want to employ filtering on captured data, it is a simple matter of transferring the data to a PC, and doing the needed analysis with NetStumbler. Figure 2.24 shows the user interface for MiniStumbler.

Figure 2.24: Captured Data Using MiniStumbler
Starting MiniStumbler is done by tapping the Start menu on the mobile. If you let the installer use the default values, then MS should be on the Start menu. Otherwise, it should be under Start Programs.
The MiniStumbler user interface is essentially the same as the Right Pane of NetStumbler. It contains the same columns as NetStumbler. You may want to refer back to Table 2.2, for a quick refresher on all of them. Since there is no left pane, there are no filters for the user to apply on the captured data.
Also, there is no secondary right pane. You have to do without the graphic Signal-to-Noise function when using MiniStumbler.
Like NetStumbler, when MiniStumbler starts, it immediately attempts to locate a usable wireless card and a GPS receiver. MiniStumbler then opens a new file, with the extension of NS1. Just like its big brother, the file name is based on the date and time, and is in the format YYYYMMDDHHMMSS.ns1. After finding the wireless card, MiniStumbler scans the airwaves for nearby WLANs. The data from any located networks is immediately entered into the new file.
MiniStumbler Menus and Tool Icons
Looking at the bottom of Figure 2.24, you can see there are two menus, File and View, and the same three special tool icons. The File menu performs the standard functions such as opening, and saving files, and has an added checkmark next to “Enable Scan” as shown in Figure 2.25. As the name implies, this box enables or disables the scanning for networks. View | Options brings up the MiniStumbler Options screen, which will be covered in Chapter 3. The Options screen is seen in Figure 2.26.
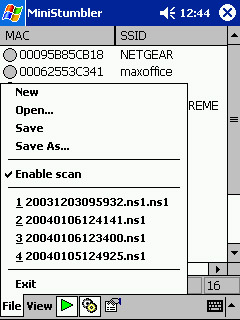
Figure 2.25: Enabling a Scan for Networks in MiniStumbler
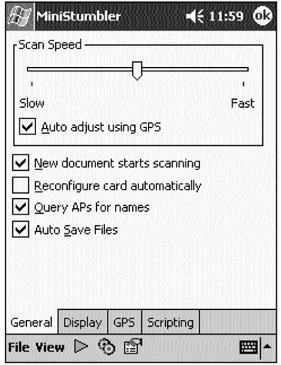
Figure 2.26: MiniStumbler Options
The tool icons perform exactly the same functions as their NetStumbler counterparts. The green arrow icon enables or disables the wireless card from scanning, while the gears automatically configure the wireless card for scanning. The hand-holding-the-menu symbol opens the same Options screen.
|
| < Day Day Up > |
|
EAN: 2147483647
Pages: 125