Flash/ColdFusion The process of creating a valid demonstration for our readers is always an interesting process. It doesn't involve appealing to a broad audience or skill levels. Instead, it really comes down to developing a couple of exercises that simply demonstrate what the technology does. This brings us to the "Marcus Factor." A couple of years ago, one of the authors was compiling a list of Flash tutorial sites for his students. In the list was a site with the odd name of FlashGoddess (http://www.flashgoddess.com). One of the site's features was a forum moderated by an individual with the handle "Warangel." This was quite an intriguing name, but the answers given by the individual were delivered in a clear, concise manner that always reflected a huge degree of enthusiasm for the task at hand. Not only that, this individual had the talent of presenting very complex technologies in a manner that was both non-technical and thorough. Two years ago, one of the authors had the pleasure of actually meeting "Warangel," whose name is Marcus J. Dickinson. About one year later, Marcus posted two tutorials to the FlashGoddess site with the most unlikely names of "Flash Remoting in Ten Minutes"and "Flash Remoting in OVER Ten Minutes." In thinking about this chapter, the author kept coming back to "How would Marcus explain this?" Being a firm believer in not reinventing the wheel, he asked Marcus if he would let us use one of his tutorials in this book. What follows is an expanded version of his first one. In fact, the files for this chapter are the files from "Flash Remoting in Ten Minutes." Thanks, Marcus. Flash Remoting in Ten Minutes We'll let Marcus take over for a bit: By now, you are looking at that heading and perhaps thinking to yourself, "Remoting in ten minutes? No way." Well, I say, "Yes, most definitely." Flash Remoting is Macromedia's tool for communicating Flash to a database. It is faster and more efficient than any previous method of database communication for Flash. It has many key features, which will make it a welcome asset in your arsenal of tools. Here are a few key features of the Flash Remoting MX: -
The authoring tools are FREE. -
The Server tools are enabled by default on a ColdFusion MX Server install. -
You can preview from the player directly. No need for uploading to test. There are, of course, many other great reasons to use Remoting, and that is the focus of this tutorial. We are going to create a slide show using nothing but Remoting in under ten minutes. You can download the source files for this tutorial from the book's site. Now let's look at our checklist and make sure we are ready to go. Remoting Checklist Before you proceed, here are some questions to answer: -
Do you have access to a server with Flash Remoting installed (localhost environment, CF Server, or Linux Server with Remoting installed)? -
Do you have the Flash Remoting Components installed on your authoring machine? -
Do you have MS Access, MySQL, or other database software installed on your authoring machine, and do you know how to use it? Common Checklist Questions You may have asked some or all of those questions, but what if you have even more questions? Here are some of those questions and their answers. | Q1: | I have read my checklist and am not sure on the first two points. How do I know if my web host or ISP supports Flash Remoting? | | A1: | It is easy to tell if you have Remoting on your server. Simply type in the following: http://www.yourdomain.com/flashservices/gateway ( www.yourdomain.com is actually your domain name.) If this page is blank, you have Remoting installed. If you receive an error, "page not found," you don't. | | Q2: | I have checked, and my server does have Remoting. How do I know if I have it installed on my machine? | | A2: | Did you download the necessary authoring components from this link? You can find them at http://www.macromedia.com/software/flashremoting/downloads/components/. | | Q3: | I think I might have installed the Flash Remoting Components, but I can't remember. Is there a way for me to check if they are installed? | | A3: | Of course there is. Open Flash and click Help in the menu at the top. Does it have an item called "Welcome to Flash Remoting?" If it does, you have the authoring components installed. |
Thank you, Marcus. Having reviewed your checklist, building a Flash Remoting application is a three-step process that focuses on each of the three elements of the application. They are: In this exercise, we will be moving away from MySQL and showing how MS Access can be used. Step 1: Building the Database The first step in the process, building the database, offers you many options for testing and ensuring functionality. This way, you can be sure the data is correct, and you don't have to worry about the design or use of Flash in the project. One final pointif you do not have MS Access installed on your machine, a copy of the file, slideinfo, is included in your Chapter 9 Exercise folder. -
Open MS Access. A blank page opens that contains a New File panel. -
Select Blank Access database. You will be prompted to name your document; use slideinfo and choose its location. Save the database in an area that is far removed from the web server. -
When the file is saved, the Database (Access 2000 File format) dialog box will open. Select Design View to create the table for this application. Select tables in the Objects menu on the left side of the dialog box and Create Table in Design View on the right side. The table will contain two columns , imageID and imageTitle (see Figure 9.2). ImageID uses autoNumber as its data type and is the primary key (a primary key is set by right-clicking the field nameimageIDand selecting Primary Key from the Context Menu). imageTitle is a memo field data type, which enables you to add more words in the field than if you had chosen the text data type. Click the close box for the table, and when prompted to save the changes, name the table images . Figure 9.2. The database is constructed in Microsoft Access.  Note A primary key in a database is a unique identifier for each record in the table that will help locate records faster when you need them. By setting the imageID field as a primary key, you are telling Access (or MySQL) that each record in the table is unique. -
When you save the table, you will be returned to the Database dialog box. Double-click the images file at the bottom of the dialog box to open the table. Click once in the first Image Title text input area and enter the text shown in Figure 9.3. When you enter the text, the number 1 will automatically appear in the imageID field. When your table resembles Figure 9.3, save the database and quit Access. Figure 9.3. The descriptive text for each image is entered into the imageTitle field.  Note If you open your Chapter 9 folder, you will see an images folder. For this slideshow to work, you must have one image for each record in the database, or the slideshow will not work properly.
Step 2: Connecting the Database to ColdFusion MX To link ColdFusion MX to the slideInfo database, follow these steps: -
Open the ColdFusion Administrator page and log in with your password. Select the Data Sources link in the Data & Services area to open the Add New Data Source window. -
Enter slideshow into the Data Source Name area and select Microsoft Access from the driver pop-down window. Click the Add button to go to the Data Source Details window. -
Click the Browse Server button and navigate to the folder containing the slideInfor.mdb file you just created, as shown in Figure 9.4. Click Apply to select the database. Figure 9.4. The path to the database file is identified for ColdFusion MX. 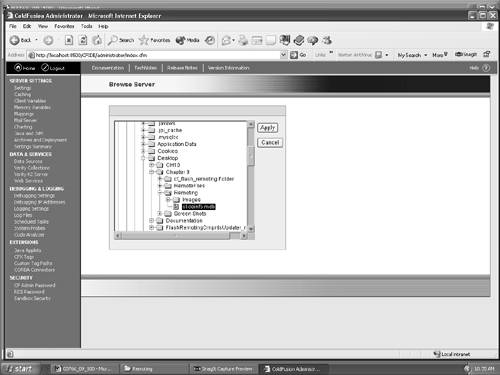 -
You will be returned to the Data Source window and shown the path to the database in the database file text input box. Click Submit. The links will be created, and you will be returned to the Add Data Source window. Your new data source will appear at the bottom of the list in the Connected Data Sources area. -
You might want to apply a little security to the file by assigning an RDS (Remote Development Server) password that restricts access to ColdFusion MX servers by Dreamweaver MX 2004. Click RDS Password in the security list on the left side of the main ColdFusion MX Administrator page. -
When the RDS Password page opens, select Use an RDS Password for Dreamweaver MX 2004 or ColdFusion Studio. -
Enter your password into the New Password text input box and enter it again in the Confirm Password input box. Click Submit Changes. If there are no problems, quit ColdFusion MX. Writing the Dreamweaver MX 2004 Code That Links to ColdFusion MX The use of Flash MX 2004, Dreamweaver MX 2004, and ColdFusion MX is an unbeatable combination because Flash Remoting is designed to work seamlessly with ColdFusion. In addition, ColdFusion MX enables you to use ColdFusion MX Components, which were introduced with ColdFusion MX. Components move the developer away from the practice of writing custom tags to adapt to a variety of situations. Instead, components are a bit more structured, making the code easy to follow and troubleshoot if problems arise. Follow these steps to write the connecting code: -
Open Dreamweaver MX 2004. When it opens, select File, New to open the New Document dialog box. Select Dynamic Page in the Categories column and select ColdFusion Component from the choices in the Dynamic page column. A page with the following code will open: <cfcomponent> <cffunction name="myFunction" access="public" returntype="string"> <cfargument name="myArgument" type="string" required="true"> <cfset myResult="foo"> <cfreturn myResult> </cffunction> </cfcomponent> -
The code creates a ColdFusion Component, and in many respects, all you have to do is to change a few things around in the code. You don't have to rewrite it from scratch. Click once after the first line of the code and press Return. Enter the following line: <cfcomponent hint = "Populates a Flash array with image information"> A hint is simply a comment that tells the other developers on the team the purpose of the argument or function that follows. -
Click once in front of the word "access" and press the Return key twice. Click once after "myFunction" and press Return. Repeat this for "public" and "string." By putting these on separate lines, they become much more accessible. Select the words "myFunction" and change them to slideProvider . Select "public" and change it to remote . Select string and change it to any . In the blank line, enter: hint = "retrieve the slide information." When finished, the code should look like this: <cfcomponent> <cfcomponent hint = "Populates a Flash array with image information"> <cffunction name="slideProvider" hint = "Retrieve the slide information" access="remote" returntype="any"> The first advantage to using a component is that you can use functions. These functions can then be called directly from any external source. The function was given a name, slideprovider, and given remote access. Remote access is the key here. It enables any external object to call this function. Without it, you can do nothing. The value of "any" in the returnType will display any data type in the database. -
The next step is to tell the function what to do. This is accomplished through a query to the database. It will be named "retrieveSlides" (just a name), and you want to make sure it is run against the datasource you previously set up in ColdFusion, which was entitled "slideShow." Click once at the end of the > located at the end of the returnType line. Press the Return/Enter key and enter: <cfquery name = "retrieveSlides" datasource = "slideShow"> -
Knowing the name of the query, where the query will be made, and what information is to be pulled out of the database are important. Press Return/Enter and add the following lines: SELECT * From images </cfquery> In this instance, we just want to select all the images from the images table in our datasource. -
Having the data retrieved, you then return the values of the query to use them in your application. To do this, press the Return/Enter key and enter the following line of code: <cfreturn retrieveSlides> -
That's all the code you need. Your ColdFusion Component code should look like this: <cfcomponent> <cfcomponent hint = "Populates a Flash array with image information"> <cffunction name="slideProvider" hint = "Retrieve the slide information" access="remote" returntype="any"> <cfquery name = "retrieveSlides" datasource = "slideShow"> SELECT * From images </cfquery> <cfreturn retrieveSlides> </cffunction> </cfcomponent> -
Save the file (see Figure 9.5) as slideEngine.cfc and quit Dreamweaver. Figure 9.5. The Dreamweaver page contains the ColdFusion Component code that drives the Flash Remoting application.  Step 3: Building the Flash MX 2004 Movie Now the fun stuff starts. You have created the database and written the code to "hook" the database into ColdFusion through the HTTP Communication Layer. The time has arrived to create the Flash movie that takes advantage of the work you have done. Before you get started, create a file in your wwwroot folder named slideshow. Copy the images folder from your Chapter 9 Exercise folder, the database file, and the slideEngine.cfc file created earlier to this folder. Now you can build the Flash movie that will play the slide show. -
Double-click the RemoteEx.fla document in your exercise folder to launch Flash MX 2004. All the code we need for Remoting, based on the web template from the previous version of Flash MX, is inserted for you. -
Select Window, Development Panels, Actions, or press the F9 key to open the ActionScript editor (see Figure 9.6). Figure 9.6. The ActionScript for the slide show is already in place.  -
The first line of the code #include "NetServices.as" provides the link to the external ActionScript files that enable Flash Remoting. The second line of the code, #include "NetDebug.as" , is necessary for development but needs to removed when the movie is produced. This is the debugging utility and is a godsend when the code doesn't do what it is supposed to do. Leaving the debugger enabled when you produce the .swf file is actually quite dangerous. If the debugger is available at run time, the server is extremely vulnerable to an attack. We'll show you how to deal with this before the .swf file is compiled. Now that Flash knows where to go to enable Remoting, you have to initialize the connection. This is where Flash tries to connect to the ColdFusion Component created earlier. The best way of doing this is to define the component as a "service" to Flash. By making it a service, you can simply pass information to it at any time. Change the code indicated in bold type, starting with if (inited == null) { in the ActionScript Editor to: if (inited == null) { inited = true; NetServices.setDefaultGatewayUrl("http://localhost: 8500 /flashservices/gateway"); gateway_conn = NetServices.createGatewayConnection(); myService = gateway_conn.getService(" slideshow.slideEngine ", this); myService.slideProvider(); } Note The following line of code is a bit deceiving: NetServices.setDefaultGatewayUrl("http://localhost:8500/flashservices/gateway"); Flash will add a port number8500when you create the file. You only need to include the port number if you are using a standalone ColdFusion Server and nothing else. If you are using IIS or Apache server, the line would be: NetServices.setDefaultGatewayUrl("http://localhost/flashservices/gateway"); Let's dissect the above code. This code will only run once, when we first run the app, which is why "inited" will equal null. The first line sets inited to true, so this condition will never run again. It then establishes your "gateway" as localhost, as we are testing locally. You will most likely have a ColdFusion Server running locally, so this will work. Flash Remoting is powered on the server end, so this gateway is successfully created. Next, it looks at the slideEngine.cfc page as a service. The project folder is called slideshow and exists in your wwwroot folder. This is very important. The getService line above says "slideshow.slideEngine." It is looking in a path structure starting with the folder slideshow for a CFC called slideEngine. Make sure your structure is the same, or you will get errors in Flash. The last line runs a function located externally, called slideProvider, which as you will remember from step 2 is the name of our function inside of the CFC. Thus, you have told Flash to create a connection and then run an external function called slideProvider. The great thing about Flash Remoting is that it will automatically return a result object to you in Flash. This object can then be directly manipulated. -
The other great thing about Flash Remoting is that you can create your own function to directly manipulate data after it is received. You do this by creating a "whateverTheServiceWas_Result" function. In the case of the Flash movie, you will create a function called "slideProvider_Result," which will pass all the results of the slideProvider ColdFusion function quickly into Flash. Click once after the "} " below the "myservice" line and enter: function slideProvider_Result(result) { -
Having defined the function, you have to now tell it what to do. It will be made to load an image directly into a movie clip named imageHolder. This ensures that something appears on the screen while the user waits for the setInterval action to fire for the first time. Press the Return/Enter key and enter the following line of code: imageHolder.loadMovie("images/image1.jpg"); -
Press the Return/Enter key and enter the next line of code: notes.text = result.items[0].imageTitle; You want the descriptive text from your database to show under the photo, which is exactly what that line of code does. -
You then set up the values for the setInterval to rotate the slides. Press the Return/Enter key and enter the following code: thisImage = setInterval(showImage, 7000, i=1); function showImage() { imageHolder.loadMovie("images/image"+result.items[i].imageID+".jpg"); notes.text = result.items[i].imageTitle; if (i<result.items.length-1) { i++; } else { i = 0; } } } -
Having told Flash how often to change the pictures, you need to pull the text out of the database and have it appear on the screen. Press the Return/Enter key and enter the following code to create an onscreen text field: _root.createTextField("notes",2,20,320,100,20); _root.notes.autoSize = true; The first line of the code uses the following syntax: movieClip.createTextField(instanceName, depth, x, y, width, height) The first bit creates an empty text field on the main timeline (_root). The stuff in the brackets tells Flash where the text goes ( "Notes" ), how many lines to show ( depth ), where the box is located on the stage ( x,y ), and how wide ( 100 pixels) and how high ( 20 pixels) to make the text box. The second line simply tells Flash to grow or expand the text box ( autosize ). -
Finally, you need to write the code that creates the image holder on the Flash stage for the images. Press the Return/Enter key and enter the following code: root.createEmptyMovieClip("imageHolder", 1); imageHolder._x = imageHolder._y=20; This bit of code creates an empty movie clip on the stage. The values inside the brackets simply create an instance and the depth of the clip. The next line simply says to place the clip 20 pixels out and 20 pixels down from the top of the stage. -
Locate the second line of code. Click once in front of it and add // . It should read: //#include "netDebug.as" The symbol // tells Flash that this is a comment and should be ignored. -
Your final code should be: #include "NetServices.as" //#include "netDebug.as" if (inited == null) { inited = true; NetServices.setDefaultGatewayUrl("http://localhost/flashservices/gateway"); gateway_conn = NetServices.createGatewayConnection(); myService = gateway_conn.getService("slideshow.slideEngine", this); myService.slideProvider(); } function slideProvider_Result(result) { imageHolder.loadMovie("images/image1.jpg"); notes.text = result.items[0].imageTitle; thisImage = setInterval(showImage, 7000, i=1); function showImage() { imageHolder.loadMovie("images/image"+result.items[i].imageID+".jpg"); notes.text = result.items[i].imageTitle; if (i<result.items.length-1) { i++; } else { i = 0; } } } _root.createTextField("notes",2,20,320,100,20); _root.notes.autoSize = true; _root.createEmptyMovieClip("imageHolder", 1); imageHolder._x = imageHolder._y=20; Testing and Finishing The Flash movie is designed to be self-contained. By that, we mean everything is driven by code. Many developers new to this technique find themselves in extremely unfamiliar territory. Essentially, the movie is nothing more than a blank stage. -
Save the movie to the your slideshow folder located in the wwwroot folder on your hard drive. -
Now that the movie has been saved, it can be tested . Select Control, Test Movie. You can also get the same result by pressing Control+Enter (PC) or Command+Enter (Mac). The images and the text appear on the screen. -
Stop the movie and select File, Publish. (Shift-F12). This will create the final .swf file for the movie.  |