| In the previous chapter, you built an image for the Oakbridge Community Center's pages. As you saw in the Freehand MX comprehensive designs, that masthead and a couple of others are used on a number of pages. If you have worked on a number of sites for a variety of clients , you know that each project involves content that is repeated across the pages. Whether it be a logo, text, tag line, navigation, or other element, it is quite commonplace to use the same content, often in the same location, on each page of a site. Dreamweaver templates make this repetitive task quite efficient. Dreamweaver MX 2004 and Templates The beauty of working with Dreamweaver templates is the fact that a template is composed of two areas on the page. Content that can be manipulated is put into an area of the page that is editable. All the other elements on the page are non-editable, or locked. In addition, you have the ability to create "child" pages from your templates. Child pages are a bit different from regular templates, in that the editable areas of the page can be changed. The non-editable areas are blocked from change. The great advantage of a template is that changes to the non-editable regions of a template, when made, will automatically ripple through the site. For example, Tom's name appears in a non-editable region of a template. His role changes, and he is replaced by Jordan. By changing "Tom" to "Jordan" on the template, that change will appear on every page based on that template. Building a Template in Dreamweaver MX 2004 The first step in creating a template-based site is obvious: Create a template upon which multiple pages will be based. In many respects, templates are somewhat chameleon-like. They change to fit the content, giving the user the illusion of a multi-page site, when in fact, it is only one page pulling information out of a database that is displaying the content. When designing a Dreamweaver template, keep the following in mind: -
Place all content that is common to every page in the template. -
Be sure to place editable regions in every area of a template that will hold content. -
Test the template before creating the site. The last thing you need is to have rigidity in pages that should be flexible. To create a new, blank template in Dreamweaver, follow these steps: -
Open Dreamweaver MX 2004 and open the Files panel. Click the Assets tab to open the Assets panel. Click the template buttonthe second icon from the bottomto open the template category of the Assets panel. -
Click the New Template button at the bottom of the panel. It is the second one from the right and looks like a page with the upper-right corner curled down. A new template named Untitled will appear in the list of templates. You will also see a tool tip in the top section of the panel that tells you how get started creating a template. -
Name the templatewe used "oakbridge_1"and click the Edit button beside the Trash Can at the bottom of the Assets panel. A new Dreamweaver page will appear, as shown in Figure 7.6. You will also notice that the filename appears on the tab in the document window and that the name has the Dreamweaver extension .dwt used for a Dreamweaver template. If you click the Files tab of the Assets Panel and select Local View from the site's view options, you will see that Dreamweaver has added a Templates folder to the site, and if you open the folder, you will see your template. Figure 7.6. A Dreamweaver blank template can be created and/or applied to a page by using the Assets Panel.  Note As we are fond of saying, "There are six thousand ways to do everything when it comes to web design." This prompted the inevitable, "That isn't the way I would do it" from one of the authors. So tell us how you would do it, Jordan: "Why not simply select File, New? When the New Document dialog box opens, select Basic Page in the Categories area of the dialog box. Then select HTML Template in the list presented under the Basic Page area and click the Create button. An even faster way to create the template is by placing only the content that will appear on each page in its final position. When that is done, you determine the Editable Regions and then save the page using File, Save as Template."
Adding Editable Regions to a Dreamweaver MX 2004 Template Jordan got a little ahead of us here, but he is absolutely correct. Until you specify which areas of a page are editable, all areas of the template will be locked. To create an Editable Region on a Dreamweaver template, follow these steps: -
Select View, Design, click once on the template, and type your name on the page. Format your name using the following settings on the Property Inspector: -
Format: Heading 6. -
Style: Select New, specify Tag, and then type in the name Style1 . Select Define In: This document only. -
Font: Default Font. -
Size: XX-large to "Super Size" your name. -
Select your name. Select Insert, Template Objects, Editable RegionControl-Alt-V (PC) or Command-Option-V (Mac)to open the New Editable Region dialog box. -
Enter a name for the selection and click OK. If you are in Design View, your name is now enclosed in a blue box, and the name of the region is in the tab at the top of the box, as shown in Figure 7.7. Figure 7.7. An Editable Region is already on the template and another is about to be created.  Tip If the color of the Editable Region isn't acceptable, it can be changed by opening the PreferencesEdit, Preferencesand selecting Highlighting. The Highlighting area will present you with a number of choices. Locate Editable regions and click on the Color Chip to open the Dreamweaver Color Picker. Choose your color and click OK. If you want to change the name of the Editable Region, select the Editable Region on the Dreamweaver page and change the name in the Dreamweaver Property Inspector.
Now that you have the basics of creating templates and Editable Regions, the next section shows you how to create an Oakbridge Community Center template used to show the team members the site's images. Constructing a Template This section reviews the way to create a template from an existing document and also presents the new table features of Dreamweaver MX 2004. -
Open the ImagePage.htm document in the Templates folder of the Chapter 7 Exercise folder downloaded from the book's web site. Tip You don't always have to use the Dreamweaver File menu to locate and open a Dreamweaver document. Open Dreamweaver, locate the file to be opened, and drag it into the Dreamweaver interface. When the cursor changes to a page with a "+" sign, release the mouse, and the page opens. Mac users can simply drag the page onto the Dreamweaver icon on the Dock or into the Dreamweaver interface if the application is open. -
At the bottom of the page are three table cells . We are going to nest a new table in each one. Click once inside the left-most cell at the bottom of the page. Click the Insert Table button on the toolbar to open the Insert Table dialog box. -
The Insert Table dialog box, as you may have noticed in Figure 7.8, has been redesigned. The usual table settings are at the top of the dialog box, but location and accessibility areas have also been added. Use the following settings: Figure 7.8. The Insert Table dialog box has been completely revamped in this release of Dreamweaver. 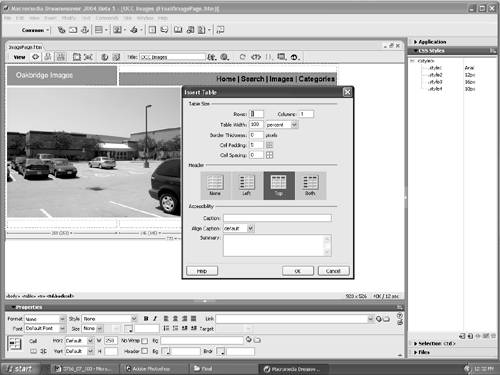 After you enter the values, click OK and the new table appears in the cell. -
Click once inside the left cell of the new table. Click the image button on the Common toolbar to open the Select Image Source dialog box. Navigate to the Graphics folder inside the Templates exercise folder and select the Baseball.jpg image. Click OK and the image will appear in the selected cell. -
Select the first two sentences of the Lorem text and copy it. Click inside the cell beside the baseball image and paste the text. In the Property Inspector, set the font to Arial, Helvetica, Sans-serif, the size to 10 pixels, and the alignment to Flush left. Copy the text. -
Add new tables to the remaining two cells using the same settings. Paste the text on the clipboard into the two new tables and insert the Skating and Trails images into the tables. The downside of pasting is that the formatting copied from the baseball text area won't maintain its left alignment. Your page should resemble that shown in Figure 7.9. Figure 7.9. The page is completed and ready to be turned into a template. 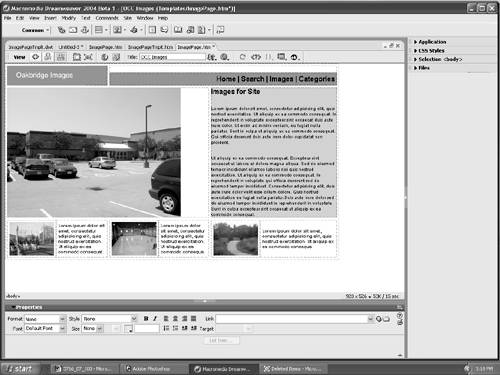 Converting an HTML Page to a Dreamweaver MX 2004 Template With the layout complete, the page can be turned into a multiuse template. Follow these steps to turn the design into a template: -
Select the text cell beside the large image. You can do this in one of two ways. The first is to hold down the Control (PC) or Command (Mac) key and click on the cell when you see it surrounded by a red key line. The second is to click on the <td> tag at the bottom of the document window. -
With the cell selected, select Insert, Template Objects, Editable region or press the Control-Alt-V (PC) or Command-Option-V (Mac) keys to open the New Editable Region dialog box. Name the region MainText and click OK. This makes the text in this section of any page with the template applied fully editable. Because you are working with an HTML file, as soon as you convert an area to an editable region, you get an alert box that warns that Dreamweaver is going to convert the document to a template (unless you have previously checked the Do Not Show This Alert Again box). If you see this warning, just click OK. -
Select the second <table> tag at the bottom of the document window. Be sure you include the image and the text. Insert an editable region in this area named Sports1 . -
If you click on each region, you will see how each is treated a bit differently. Click on the name for the MainText region and the text will be selected. Click on the name for the Sports1 region and the entire table is covered with a gray overlay (see Figure 7.10). Figure 7.10. The Editable Regions have been assigned to the template and the Sports1 region is selected. 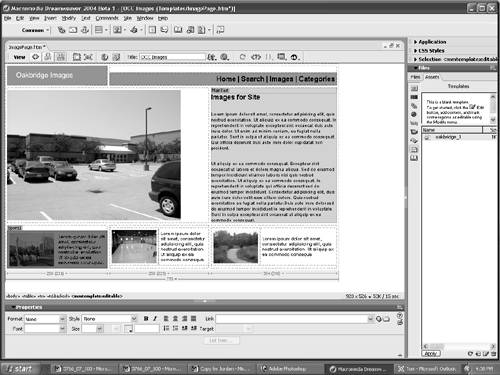 -
Select File, Save As Template. This will open the Save As Template dialog box. Select the site to which the template will be assigned from the pop-down list, name the template ImagePage , and click OK to close the dialog box and save the template. Close the template document. The template just created will be saved to the site's root level and will have a .dwt extension after the name to indicate a template. It is also moved over to the Assets area of the File panel. To apply a template to a new page: -
Open a new blank documentFile, New, Basic Page, HTML. Open the File panel and click the Assets tab. Select the ImagePage template found in the list of Assets and click the Apply button at the bottom of the Assets panel. The template is applied to the page. -
Another common method is to select File, New, and click the Templates tab in the New Document dialog box. In the Templates For: section, select the site to which the template is to be applied. When you do that, the templates associated with the site appear under the Site: area. Select the template, and a thumbnail of the page (see Figure 7.11) will appear in the preview section of the dialog box. Click Create. Figure 7.11. Templates can be applied to blank pages by either selecting them in the Assets panel or by assigning them to new documents.  |