Implementing a Delegated Zone for DNS

We've already covered creating and configuring zones; now we will take a brief look at delegating a zone. Delegation is the process of designating a portion of the DNS namespace to another zone. It gives administrators a way of dividing a namespace among multiple zones. For example, an administrator may place the bayside.net domain in one zone and place the sales.bayside.net subdomain in another delegated zone. The bayside.net zone would contain all the records for the sales subdomain if it is not delegated. By delegating, the bayside.net zone only contains information for bayside.net , as well as records to the name servers authoritative for the sales.bayside.net subdomain, but the host entries for any machines in sales.bayside.net are contained only on the delegated server.

In any case, when deciding whether to delegate, keep the following points in mind:
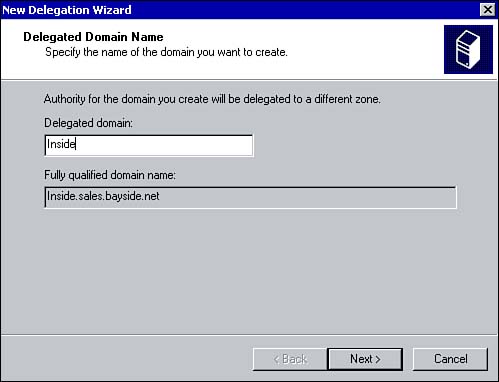
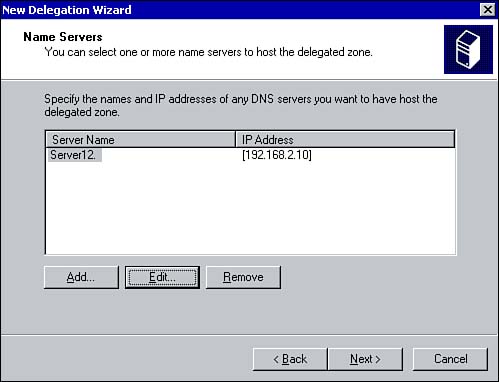
  • It allows you to delegate management of part of the DNS namespace to other departments or locations.

  • It allows you to distribute a large DNS database across multiple servers for load balancing, faster name resolution, and increased performance.

  • It allows you to extend the namespace for business expansion.

graphics/note_icon.gif

To facilitate the delegation of zones, you need the appropriate delegation records that point to the name servers that are authoritative for the new zones.


Delegating a Zone

Before you delegate a zone, all the subdomains must first be listed in the current zone. After they've been added, you can use the following procedure to create a zone delegation:

  1. From within the DNS management console, right-click the subdomain you want to delegate and select New Delegation. The New Delegation Wizard opens. Click Next.

  2. Type a name for the delegated domain in the Delegated domain text box (see Figure 2.11). Click Next.

    Figure 2.11. Configuring the name of a delegated domain.

    graphics/02fig11.jpg

  3. Specify the name servers that will host the delegated domain by clicking the Add button (see Figure 2.12). The New Resource Record screen appears, allowing you to specify the name and IP address of the name servers. Click OK. Click Next.

    Figure 2.12. Configuring the name servers to host a delegated domain.

    graphics/02fig12.jpg

  4. Click Finish.


Windows 2000 Network Infrastructure Exam Cram 2 (Exam 70-216)
MCSE Windows 2000 Network Infrastructure Exam Cram 2 (Exam Cram 70-216)
ISBN: 078972863X
EAN: 2147483647
Year: 2005
Pages: 167

flylib.com © 2008-2017.
If you may any questions please contact us: flylib@qtcs.net