Configuring TCPIP on a Server Computer
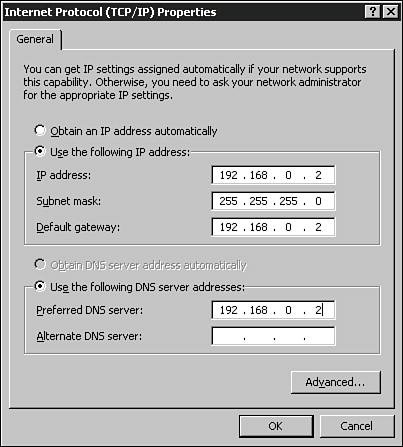
Configuring TCP/IP on a Server ComputerIP addresses can be dynamic or static. With static IP addressing, a computer (or other device) is configured to always use the same IP address. With dynamic addressing, the IP address can change periodically and is managed by a centralized network service. In some cases it is necessary to use static IP addresses. This is often the case with servers on the network. Some of the components that you might install on a server require that the server be configured with a static IP address. For example, during the installation of Active Directory or the domain name system (DNS), a message appears informing you that the server should be configured with a static IP address. DHCP IP Address AssignmentsIf you plan to use DHCP to assign IP addresses to clients, you can leave the default client configuration for TCP/IP as-is. During the installation of Windows Server 2003, the default configuration is to obtain an IP address automatically (that is, pull addresses from a DHCP server). This is also the case with Windows 2000 and Windows XP clients. Note Automatic private IP addressing (APIPA) is a feature mainly found in Microsoft operating systems and is not normally used as a method of purposefully assigning IP addresses. It is limited in use because it does not automatically configure additional parameters such as a default gateway or DNS servers. It is designed to be used in single-subnet networks (networks that are not routed). It is also useful if a DHCP server is unavailable. DHCP clients can assign themselves an IP address in the range of 169.254.0.1 to 169.254.255.254 with a default Class B subnet mask of 255.255.0.0. APIPA enables clients to still communicate with other computers on the same network segment until an IP address can be obtained from a DHCP server, allowing the machine to fully participate on the network. Usually, if you notice your system has been assigned a 169.254.x.y IP address, you can assume that the DHCP client/server communication did not function as expected. Static IP AddressingTo statically configure IP address parameters, you need to edit the properties of TCP/IP for the network connection. To statically configure TCP/IP, follow these steps:
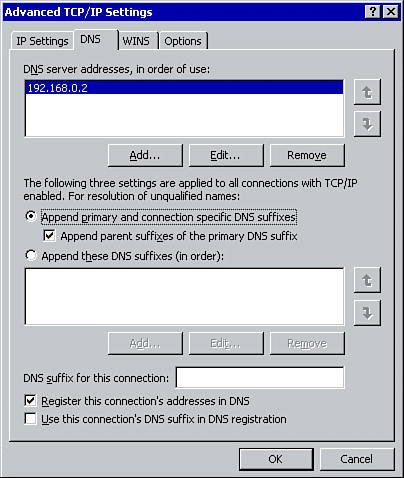
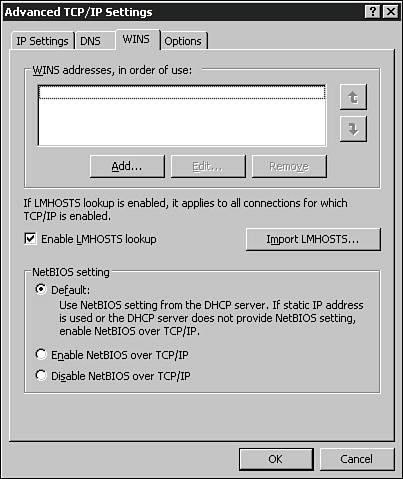
Figure 2.1. You can statically configure IP address parameters from the General tab of the TCP/IP Properties dialog box Configuring Advanced SettingsAside from basic address configuration, you can configure a number of advanced settings for TCP/IP. Clicking the Advanced button shown in Figure 2.1 opens the Advanced TCP/IP Settings window (see Figure 2.2). Figure 2.2. You can configure additional TCP/IP settings via the Advanced TCP/IP Settings dialog box From the IP Settings tab shown in Figure 2.2, you can configure additional IP addresses and gateways for the network connection. Additional IP addresses for the interface might need to be configured if the computer is connected to a single network subnet and requires multiple IP addresses to communicate on the network, or if the computer needs to communicate with multiple subnets. Similarly, you can configure multiple default gateways to be used by the connection. The metric is used to assign a numeric value for the gateway that is used in routing. The default setting of Automatic Metric assigns a metric value to the gateway based on interface speed. Deselecting the Automatic Metric option enables you to manually configure this value. The gateway with the lowest value is favored. Selecting the DNS tab shown in Figure 2.3 enables you to configure advanced DNS settings for the network connection if multiple DNS servers are in use on your network. Additional DNS servers can be configured, along with the order in which they are used for name resolution. Figure 2.3. You can configure DNS settings from the DNS tab of the Advanced TCP/IP Settings dialog box You can also select from the following three options to configure name resolution:
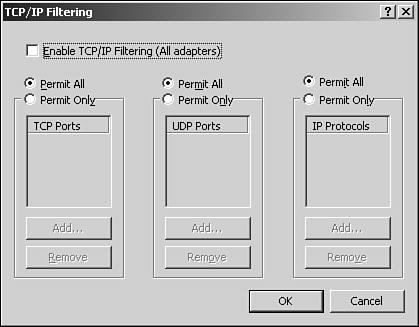
From the bottom of the DNS tab, you can configure the DNS suffix for the connection as well as specify whether the IP address and the connection's DNS suffix should be automatically registered with a DNS server. Note The HOSTS file is manually created and is used to map Internet Protocol (IP) addresses to host names. When a new host is added, the HOSTS file must be updated to reflect the new IP address and host name. The HOSTS file is used when a DNS server is not available. Using the WINS tab shown in Figure 2.4, you can configure the IP addresses of the WINS servers on the network and specify the order in which they will be used for NetBIOS name resolution. You also can enable LMHOSTS for name resolution. Figure 2.4. You can configure WINS settings from the WINS tab of the Advanced TCP/IP Settings dialog box Note DNS is the primary namespace used in a Windows Server 2003 environment. NetBIOS is also supported for backward-compatibility. Windows Internet Name Service (WINS) is used to centralize the process of registering and resolving NetBIOS names to IP addresses. The LMHOSTS file is a static method of resolving NetBIOS names to IP addresses in the same way that the HOSTS file is a static method of resolving domain names into IP addresses. An LMHOSTS file is a text file that maps NetBIOS names to IP addresses; it must be manually configured and updated. The three options at the bottom of the dialog box enable you to configure additional NetBIOS settings. The first option, Default, should be selected if the NetBIOS settings are assigned through a DHCP server. The remaining two options allow you to enable or disable NetBIOS if IP configuration is performed manually. For example, if the network does not have any preWindows 2000 clients and all names are registered with a DNS server, NetBIOS over TCP/IP can be disabled. On the other hand, this option should be enabled if there are legacy clients or services on the network. The Options tab allows you to enable TCP/IP filtering to control the type of TCP/IP traffic that reaches your computer. Clicking the Properties button on the Options tab opens the TCP/IP filtering window (see Figure 2.5), where you can enable filtering to specify the type of traffic that is permitted based on Transmission Control Protocol (TCP) and User Datagram Protocol (UDP) ports (ports are the endpoints for the logical connections), as well as specific IPs. Figure 2.5. You can configure TCP/IP filtering by clicking the Properties button on the Options tab of the Advanced TCP/IP Settings dialog box and adjusting settings on the TCP/IP Filtering dialog box |

EAN: N/A
Pages: 126