Implementing Secure Access Between Private Networks

Implementing Secure Access Between Private Networks

As networks throughout the world become more interconnected , network administrators are challenged with ensuring that data transferred across a network is secure. This is where the IP Security (IPSec) protocol comes into play and allows for authentication of hosts , data integrity, and data encryption.

IPSec is used to protect data that is sent between hosts on a network, which can be remote access, VPN, LAN, or WAN. IPSec ensures that data cannot be viewed or modified by unauthorized users while being sent to its destination. Before data is sent between two hosts, the source computer encrypts the information. It is decrypted at the destination computer. IPSec provides the following benefits:

  • Secure end-to-end communication between hosts

  • Secure connections for remote access clients using the Layer 2 Tunneling Protocol (L2TP)

  • Secure router-to-router connections

As you will see when you begin to configure IPSec, different levels of security can be implemented to meet varying needs. IPSec is implemented through IPSec policies. The policies are created and assigned to individual computers or groups of computers (or groups of users). The policies determine the level of security that will be used.

IPSec consists of three components that work together to provide secure communications between hosts:

  • IPSec Policy Agent This component is responsible for retrieving policy information from the local computer or Active Directory.

  • ISAKMP/Oakley Key Management Service This component is responsible for establishing a secure channel between hosts and creating the shared key that is used to encrypt the data. It also establishes a security association between hosts before data is transferred. The security association determines the mechanisms that are used to secure data.

  • IPSec Driver On the sending computer, this component monitors IP packets. Packets matching a configured filter are secured using the security association and shared key. The IPSec driver on the receiving computer decrypts the data.

The following steps outline how the different components work together to provide secure communications:

  1. When Computer1 starts, the IPSec policy agent retrieves policy information from the local computer or Active Directory.

  2. When Computer1 attempts to send data to Computer2, the IPSec driver examines the IP packets to determine whether they match the configured filters. If a match is determined, the IPSec driver notifies the ISAKMP/Oakley.

  3. The ISAKMP/Oakley service on the two computers is used to establish a security association and a shared key.

  4. The IPSec driver on Computer1 uses the key and security association to encrypt the data.

  5. The IPSec driver on Computer2 decrypts the information and passes it to the requesting application.

In summary, before any data is transferred between two hosts, the security level must be negotiated. This negotiation includes agreeing on an authentication method, a hashing method, and an encryption method.

Configuring IPSec

You can enable IPSec using the Local Security Policy snap-in. The following list describes the three default policies. You can enable any policy for the local computer by right-clicking the policy and choosing the Assign option.

  • Client (Respond Only) This is used for computers that should not secure communications most of the time, but if requested to set up a secure communication, they can respond.

  • Server Secure (Require Security) When this option is selected, the server requires all communications to be secure. If a client is not IPSec-aware, the session will not be allowed.

  • Server (Request Security) This is used for computers that should secure communications most of the time. In this policy, the computer accepts unsecured traffic but always attempts to secure additional communications by requesting security from the original sender.

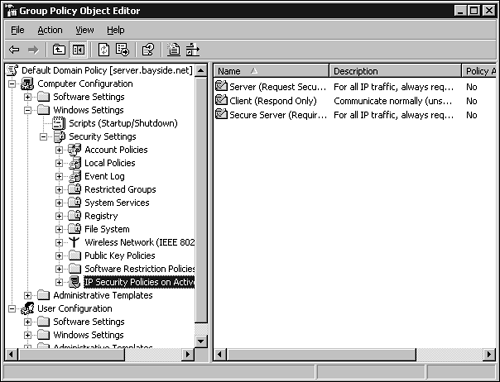
If you are running Active Directory, you can create an IPSec policy that is stored within Active Directory. To view the policies, open the Group Policy snap-in, shown in Figure 5.23.

Figure 5.23. IPSec policies within the Group Policy snap-in.

graphics/05fig23.gif

The three policies that exist by default are Client, Server Secure, and Server. (The process of creating new IPSec policies is outlined in the following section.) To assign an IPSec policy to Group Policy, right-click the policy and click the Assign option.

Configuring IPSec for Transport Mode

IPSec can be used in one of two modes: transport mode or tunnel mode . Tunnel mode is used for server-to-server or server-to-gateway configurations. The tunnel is the path a packet takes from the source computer to the destination computer. This way, any IP packets sent between the two hosts or between the two subnets, depending on the configuration, are secured.

Two formats can be used with tunneling mode: ESP tunnel mode and AH tunnel mode. With Authentication Header (AH) tunnel mode, the data itself is not encrypted. It provides authentication and integrity, and it protects the data from modification, but it is still readable. With Encapsulating Security Payload (ESP) tunnel mode, authentication, integrity, and data encryption are provided.

graphics/alert_icon.gif

Tunnel mode is not used for remote access VPNs. IPSec/L2TP or PPTP is used for VPN connections. Tunnel mode is used for systems that cannot use IPSec/L2TP or PPTP VPNs.


To create a new IPSec policy, perform the following steps:

  1. Click Start and click the Run command. Type mmc and click OK.

  2. Click File and select Add/Remove snap-in. Click Add.

  3. From the List of available snap-ins, select IP Security Policy Management. Click Add. Click Finish. Click Close.

  4. Click OK.

  5. To create a new policy, right-click IP Security Policies on Local Computer and select Create IP Security Policy. Click Next.

  6. Type a name for the new policy. Click Next.

  7. From the Requests for Secure Communications window, leave the default option of Activate the Default Response Rule selected to have the computer respond to those that request security. Click Next.

  8. Select the authentication method. You can choose Kerberos, certificates, or a preshared key. You can edit the policy afterward to add multiple authentication methods . Click Next.

  9. Click Finish.

To configure an IPSec tunnel, perform the following steps:

  1. From the Properties window of the IPSec policy that you want to manage, select the rule you want to edit and click the Edit button.

  2. Select the Tunnel Setting tab.

  3. Select the tunnel endpoint that is specified by this IP address option and type the IP address of the tunnel endpoint.

  4. After the tunnel endpoint has been specified, you can configure the tunneling mode using the Filter Actions tab. For ESP tunnel mode, select High. For AH tunnel mode, select Medium.

Customizing IPSec Policies and Rules

Each of the policies can be edited using the policy's Properties window. IPSec policies consist of several components, including the following:

  • Rules IPSec rules determine how and when communication is secured.

  • Filter lists Filter lists determine what type of IP packets trigger security negotiations.

  • IPSec security methods The security methods determine the security requirements of the rule.

  • IPSec authentication methods Authentication methods determine the ways in which hosts can identify themselves .

  • IPSec connection types This determines the types of connections, such as remote access or local area connections, to which the rule applies.

From the General tab of an IPSec policy's Properties window, you can change the name and description for the policy and configure the interval at which the computer will check for policy updates. Using the Advanced button, you can configure the Key Exchange Settings.

graphics/tip_icon.gif

When configuring the Key Exchange Settings, you can select the Master Key Perfect Forward Secrecy option. This ensures that no previously used keying material is used to generate new master keys. You can also specify the interval at which authentication and key generation must take place.


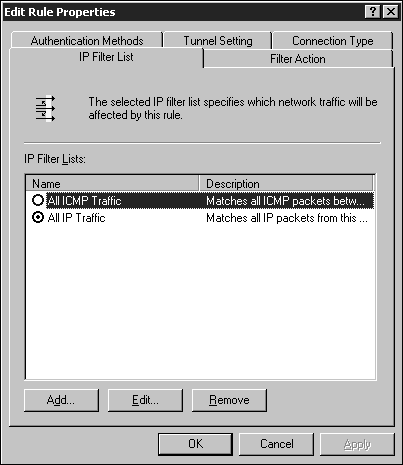
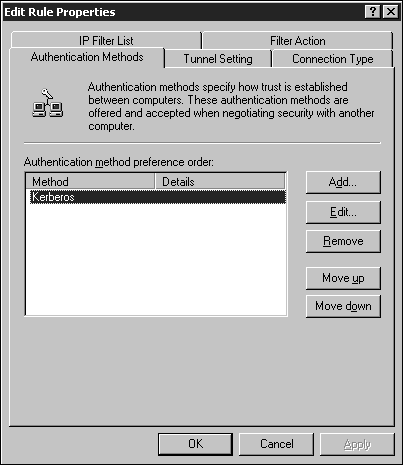
The Rules tab lists all of the rules that are configured for the policy. Other rules can be added by clicking the Add button; you can edit the existing rules using the Edit button. Clicking the Edit button brings up the Edit Rule Properties window (see Figure 5.24).

Figure 5.24. Editing IPSec rules.

graphics/05fig24.gif

The IP Filter List tab defines the type of traffic to which the rule will apply. The Filter Action tab defines whether the rule negotiates for secure traffic and how the traffic will be secured. Configuring the filter actions enables you to define the different security methods that can be negotiated. The security algorithms supported by IPSec include MD5 and SHA1. The encryption algorithms supported include DES and 3DES.

The Authentication Methods tab enables you to configure the method used to establish trust between the two computers (see Figure 5.25). If multiple authentication methods are configured for a rule, you can change the order in which they are used. The authentication methods available include these:

  • Kerberos Kerberos 5 is the default authentication method in a Windows Server 2003 domain. Users running the Kerberos protocol within a trusted domain can authenticate using this method.

  • Certificates If a trusted certificate authority is available, certificates can be used for authentication.

  • Preshared key For nonWindows Server 2003 computers or those not running Kerberos, a preshared key can be used for authentication.

Figure 5.25. Configuring IPSec authentication methods.

graphics/05fig25.gif

The Connection Type tab enables you to define the types of connections to which the rule applies. This enables you to define different rules for different types of connections. Rules can be applied to local area connections, remote access connections, or all network connections.

The Tunnel Setting tab enables you to specify a tunnel endpoint where communication will take place between two specific computers.

You can edit the existing policies, or you can create and assign a new policy through the Group Policy snap-in. To create a new policy, right-click IP Security Policies on Active Directory within a Group Policy Object and select Create IP Security Policy. A wizard walks you through the process of creating the initial policy, which you can configure further using the Properties window for the new policy.

graphics/alert_icon.gif

In Windows 2000, the secedit /refreshpolicy machine_policy command was used to refresh policy settings. Windows Server 2003 now uses the gpupdate command to refresh policy settings. When the command is used on its own, both the computer and user settings are applied. Using the command with the /target switch, you can specify that only the computer or user settings are applied. The /force switch causes all policy settings to be reapplied, regardless of whether they have changed.


graphics/alert_icon.gif

Matching policies must exist on both computers before communication can take place.


Windows Server 2003 Network Infrastructure Exam Cram 2 (Exam 70-291)
MCSA/MCSE 70-291 Exam Cram: Implementing, Managing, and Maintaining a Microsoft Windows Server 2003 Network Infrastructure (2nd Edition)
ISBN: 0789736187
EAN: 2147483647
Year: 2002
Pages: 118
Authors: Diana Huggins

flylib.com © 2008-2017.
If you may any questions please contact us: flylib@qtcs.net