Using Ubuntu s kickstart Installation Method
Using Ubuntu's kickstart Installation MethodAutomating the installation process can save system administrators a lot of time and effort during an initial deployment, upgrade, or maintenance cycle by managing multiple computers at one time. Ubuntu offers a highly automated installation technique called kickstart which can be used for unattended installation of Linux. Ubuntu's kickstart installation uses a single configuration file with a special, extensive syntax on a server, boot floppy, or other medium to install Ubuntu via CD/DVD, a hard drive partition, or a network connection. Using kickstart is easy and involves passing a kernel argument to the Ubuntu Linux boot kernel. The various arguments tell the boot kernel to look for a configuration file on floppy, a designated server, via a network, specific file, or CD/DVD. You can use kickstart to install Ubuntu on one or more computers at the same time. First, set up a web or FTP server with Ubuntu's installation files. For directions, see the "Installing Using a Network" section in Chapter 3. Next, create a network boot floppy using the techniques described in the next section. Follow the directions given here (choosing an FTP install) and then copy the custom kickstart file to the network boot floppy. You can then use this floppy (and copies) to boot one or more PCs to a network install using your FTP server. Tip Ubuntu does not automatically install system-config-kickstart, the utility used to create and customize kickstart files. Be sure that you install it using either apt or the Add/Remove Programs tool. To begin the automated installation process, you create the configuration file that will be used by kickstart as an installation profile. You can configure the complex configuration file with Ubuntu's Kickstart Configurator. To start the configuration, click the Kickstart item from the System Tools menu on the desktop, or enter the system-config-kickstart command, like so: $ sudo /usr/sbin/system-config-kickstart & After you press Enter, you see the Kickstart Configurator dialog box, as shown in Figure 2.2. Figure 2.2. Ubuntu's kickstart configuration tool, system-config-kickstart, can be used to quickly and easily create installation profiles for use in automated installations.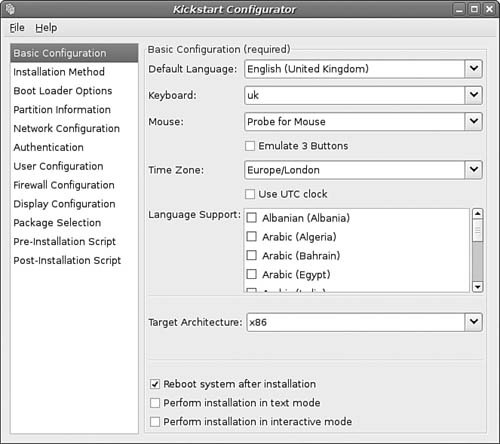 Click to select various options, and then enter the specifics desired for the target system. Start by selecting the default system language, type of keyboard, mouse, and so on. Of course, automated installations work best when installing to similar equipment. When finished, press Ctrl+S, or use the Save file item from the File menu. The configuration will be saved with the name ks.cfg. When you use the kickstart installation method, the kickstart file will be read by computers booting to the install. The kickstart language covers nearly every aspect of an install with the exception of sound card, printer, or modem setup. For example, a portion of a kickstart file generated for an install might look like #Generated by Kickstart Configurator #System language lang en_US #Language modules to install langsupport en_US #System keyboard keyboard us #System mouse mouse genericps/2 #System timezone timezone --utc America/New_York #Root password rootpw --iscrypted $1$/n3yjyDV$AWoBZgRQq/lAxyRhX1JSM1 ... Note that not all the output of a sample ks.cfg is shown. However, you can see that this file will feed kickstart directions for an install, including an encrypted root password to be installed on the target system. The next step is to copy your new ks.cfg to a boot disk created using one of the boot floppy images (found under the images directory on the first Ubuntu CD/DVD). You can do this with Linux by using the mount and cp commands. For example, insert your boot disk into your PC, and then use the mount command (as root) like so: $ sudo mount /mnt floppy If Ubuntu has mounted your floppy automatically, you'll receive an error message such as /dev/fd0 already mounted. You can then simply copy the ks.cfg file to your floppy like so: $ sudo cp ks.cfg /mnt/floppy You can verify the contents of the floppy using the ls command like this: $ ls /mnt/floppy boot.msg general.msg initrd.img ks.cfg ldlinux.sys options.msg param.msg rescue.msg snake.msg splash.lss syslinux.cfg syslinux.png vmlinuz Then unmount the floppy using the umount command like so: # umount /mnt/floppy Remove the disk. It is now ready for use. When you use the disk to boot a PC, after booting, tell the install boot image that you would like to perform a kickstart install like this: linux ks=floppy The installer will then use the specifications you outlined in the Kickstart Configurator and saved in ks.cfg to install Ubuntu. |
EAN: 2147483647
Pages: 318