Step-by-Step Installation
| < Day Day Up > |
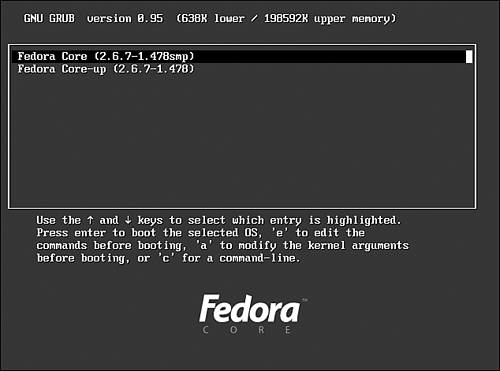
| This section provides a basic step-by-step installation of Fedora from CD-ROM. There are many different ways to proceed with an install, and the installer can provide a graphical or text-based interface in a variety of modes. This example installation prepares a computer for general duties as a server, perhaps to host a File Transfer Protocol (FTP) site, a web server using Apache, or Session Message Block (SMB) services using Samba. Before you begin, you should ensure that your computer is not connected to the Internet. Although you can use the installer to set up network protection during the install, it is best to check your system settings after any install and before opening up any public services (see the section "Firewall and Security Configuration" later in this chapter). TIP If you are installing to a system that has an older display monitor, it is a good idea to have your monitor's manual handy during the installation. If the install does not detect your monitor settings, you might need to specify the monitor's vertical and horizontal frequencies. This does not happen often, but if it does, you will be prepared. NOTE Fedora's graphical installation dialogs are convenient and easy to use. However, you can use a text-based installation, which works with any PC. Simply specify linux text at the install boot prompt. Use the graphical install outlined here as a starting point for learning more about installing Fedora. Starting the InstallTo get started, insert the first Fedora disc and reboot your computer. You'll first see a boot screen that offers a variety of options for booting (see Figure 3.1). Options may be passed to the Linux install kernel by typing special keywords at the boot prompt. Note that the install kernel is different from the kernel that will be installed on your system during installation! Figure 3.1. Select an installation option in this first Fedora Core boot screen. The basic options most often used are
To install using a text-based interface (used for our example), type linux text and press Enter; otherwise, just press Enter to start the install. Several function keys can be used at this first boot screen to cycle through four help screens providing additional install information. Use these function keys at the boot prompt to jump to different screens describing alternative installation options and modes:
Some of the options you can use at the boot prompt include
The F4 screen lists options that can be used at the boot prompt to set a specific resolution for the installation. For example, this is done by typing linux resolution= at the boot prompt, along with an option such as "800x600". Other options, such as optional arguments for kernel modules (in order to properly configure or initialize hardware) may be passed to the install kernel if you use the noprobe option. TIP The installer will start automatically in 60 seconds. Press the spacebar, reboot, or turn off your PC if you need to halt the install. After you press Enter, the installer's kernel loads, and you're asked (in a text-based screen) if you would like to perform a media check of your CD-ROM, as shown in Figure 3.2. Figure 3.2. You can check your CD-ROM media before installing Fedora. This check can take quite some time (depending on the speed of your CD drive), but can ensure the integrity of the CD-ROM's contents, as an md5sum value is embedded on each CD-ROM. This check can help foil installation of malicious software from CD-ROMs with tampered contents. The check can also be helpful to make sure that the CD-ROM you are using will work on your PC and in your CD drive. To perform the check, choose OK; otherwise, use the Tab key to navigate to the Skip button and press Enter to choose it. After checking your CD-ROM or skipping the check, the display will clear. The Fedora installer, Anaconda, will load, and you are presented with a graphical welcome screen as show in Figure 3.3. The installer should recognize your PC's graphics hardware and mouse. You can then click on the Release Notes button to get detailed information about Fedora Core, along with tips on hardware requirements and how to perform various installs. Figure 3.3. Read Help or Release Notes before installing Fedora.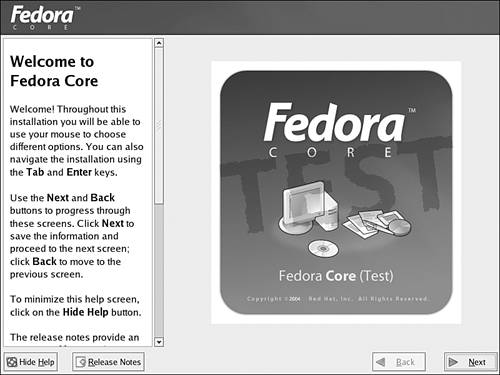 If your pointing device (mouse) is not recognized, you can press Alt+R to "press" the Release Notes button. Similarly, you can click Alt+H to hide text shown on the left side of the screen, but you should take a minute to read frame's contents. Click Next (or press Alt+N) to continue, and the installer asks you to select one of 31 different languages for the installation, as shown in Figure 3.4. Figure 3.4. Select a language to use when installing Fedora. You can navigate the installer's dialogs (during a text-based or graphical install) using the Tab key. You can scroll through lists using your cursor keys. Note that you can now "step backward" through the install by using a Back button. Select a language and click the Next button. You'll then be asked to select a keyboard for the install, as shown in Figure 3.5. Figure 3.5. Select a default keyboard to use when installing and using Fedora. Scroll to the appropriate keyboard option. You use this option to configure the install to support one of 53 different language keyboards. Click Next after making your selection. If your PC's monitor was not detected, you might be asked to select your model from 132 different manufacturers. In rare instances, you might have to specify your monitor's exact horizontal and vertical frequencies. This can happen with older displays. If an existing Linux install is detected, you'll be asked if you want to upgrade and reinstall; otherwise, you're then asked to select a type of installation, as shown in Figure 3.6. Figure 3.6. Select a type of installation.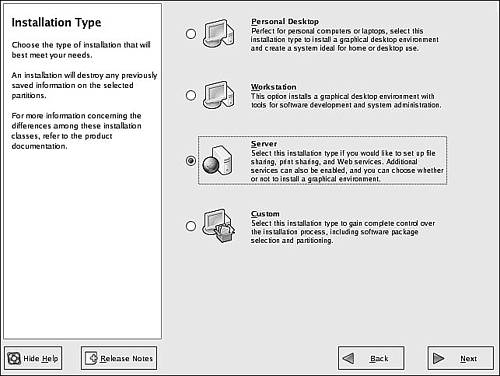 Select a type of installation suitable for your intended use we'll use a Server install for our example. As we mentioned earlier, you can use the Custom install instead to select the specific packages to be installed. This can be helpful in order to prune unnecessary software from your system and might save some time later on. After you select the installation type, click Next to continue. You will then see a screen that offers a choice of partitioning schemes and tools. NOTE Fedora's installer also supports the ability to monitor background and install processes running during an installation. You can watch the progress of an install and hardware information reported by the Linux install kernel by navigating to a different console display or virtual console by simultaneously pressing the Ctrl, Alt, and appropriate Fn key (such as F1 F5). Use this approach to watch for kernel messages, monitor hardware detection, gain access to a single-user shell, and view the progress of the installer script. When using a graphical installer, press Ctrl+Alt+F4 (then Alt+F2 or Alt+F3) to navigate to the various screens. Press Alt+F7 to jump back to the installer. When performing a text-based installation, use Alt+F2 (then Alt+F3 or Alt+F4). Use Alt+F1 to jump back to a text-based install. Partitioning Your DriveYou learned how to choose and plan a partitioning scheme in "Planning Partition Strategies," earlier in this chapter, based on the more specific partitioning information offered in Chapter 2. The Disk Partitioning Setup screen, shown in Figure 3.7, offers two options for disk partitioning. Here is what the options do:
Figure 3.7. Select a partitioning scheme or tool. NOTE See the section "Partitioning Before and During Installation" in Chapter 2. Chapter 10, "Multimedia Applications," contains information on using another partitioning utility, the text-based Linux fdisk command. For this example, select Manually Partition with Disk Druid button and click Next. If you are using a new hard drive that hasn't previously been partitioned, you will be asked if you would like to create new partitions on the drive. Click the Yes button to initialize the drive. If you are using a hard drive that has been previously partitioned or formatted and the partitions are recognized, Disk Druid will present the partitions in its partition dialog. Figure 3.8 shows the graphical interface presented for a 6GB hard drive that hasn't been partitioned. Figure 3.8. You can use Disk Druid to partition your drive before installing Fedora.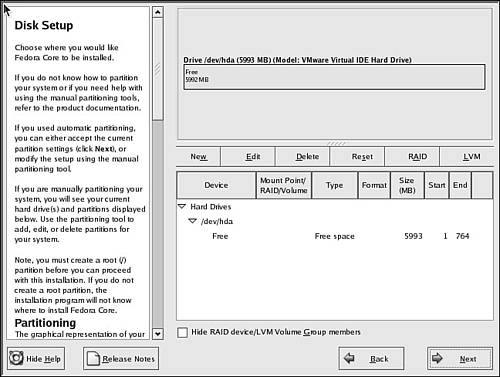 To use Disk Druid, select any listed free space, and then click the New button (or press Alt+W) to create a new partition. Alternatively,
After you choose the New button, you see a screen as shown in Figure 3.9. Figure 3.9. Set partition information about a selected or new partition on a hard drive.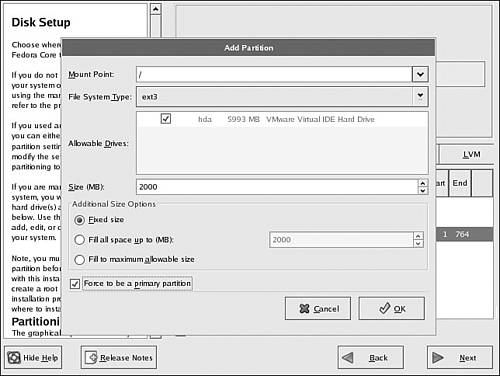 You use the Add Partition dialog to assign a mount point (such as /boot or /), assign a filesystem (such as ext2, ext3, RAID, swap, or vfat) by using the drop-down menu set at ext3 by default, and assign the size of the partition. Remember that, at a minimum, your system should have a root (/) and swap partition. The ext3 filesystem is the best choice for your Linux partitions because it is the default and specifically supported by Fedora, but you can also use ext2 (and convert to ext3 later on see Chapter 37, "Managing the File System"). The size of the partition can be fixed by entering a number (in megabytes), or if you select the Fill All Available Space field, will use all remaining free space (but not yet, as you need to create a partition for swap). Click OK to save the new partition information. TIP You can perform diagnostic checks on your storage media after installing Fedora by using various Linux software tools, as shown in Chapter 37. Remember: Linux requires at least a root (/) and swap partition. The swap partition should be about twice as large as the amount of installed memory (or more) in order to get the most from your computer if you run a lot of programs or host many users. After you create an initial partition for the root filesystem, repeat the steps to create a new partition, but select swap as the filesystem type using the drop-down menu. Figure 3.10 shows a simple, completed partitioning scheme with a separate /home partition on a server using a 6GB hard drive. Figure 3.10. Review your partitioning scheme for your hard drive.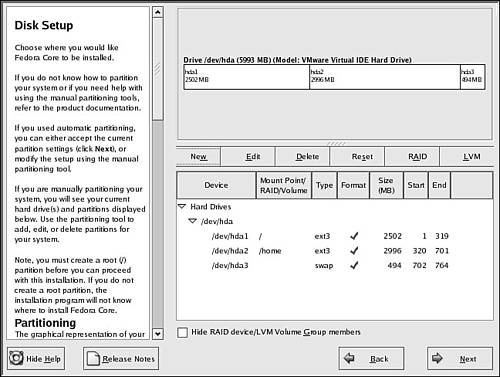 Take a moment to review your partitioning scheme. If you are not satisfied with the partitioning, you can make changes by selecting a partition and then using the Edit button to change the partition's information (such as mount point or type of filesystem). Use the Delete button to delete the partition entry and to free up partition space. You can then use the New button again to create partitions in the space that is now free. When satisfied, click Next to continue the install. Choosing, Configuring, and Installing the Boot LoaderAfter you accept the partitioning scheme, a screen appears asking you to select a boot loader for booting Fedora (see Figure 3.11). This screen also enables you to choose not to use a boot loader (when booting from floppy, a commercial boot utility, a DOS partition, or over a network), and the ability to boot other operating systems if you have configured a dual-boot system. Review "Choosing a Boot Loader," shown previously in this chapter, for more information on making this choice. Figure 3.11. Select whether you want to use a boot loader and configure other boot options. TIP Fedora will work well with other operating systems, but the reverse is not always true. If you need specialized help with configuring a dual-boot system, check various HOWTOs at http://www.tldp.org for hints and tips. Select the GRUB boot loader. GRUB is typically installed in the MBR of the first IDE hard drive in a PC. However, the boot loader can also be installed in the first sector of the Linux boot partition, or even not installed on the hard drive. In this situation, you will need to create a boot floppy during the install; see "Create a Boot Disk," later in this chapter. Note that you can also backtrack through the install process to change any settings. Note that you can assign a password for the boot loader. If you choose to use this option, you will need to enter a password at the GRUB boot screen (see the section "Login and Shutdown" at the end of this chapter for information on graphical logins). Carefully note the password! It does not have to be the same password used to log in, but if you password protect booting through your computer's BIOS and use a boot loader password here, you will subsequently need to enter three passwords (BIOS, boot loader, and login) in order to access Linux. Type in a password of at least eight characters twice (once on each line); then click OK or Cancel to exit the dialog. If you click the Configure Advanced Boot Loader Options button, you're asked for arguments to pass to the Linux kernel before booting. Kernel arguments are used to enable or disable various features of Linux at boot time. If you install the source to the Linux kernel, you'll find documentation about the more than 200 different kernel arguments in the file kernel-parameters.txt under the /usr/src/linux/Documentation directory. Click Next to set your boot loader configuration. You'll then proceed to network interface configuration, as shown in Figure 3.12. Figure 3.12. Select or enter networking configuration information.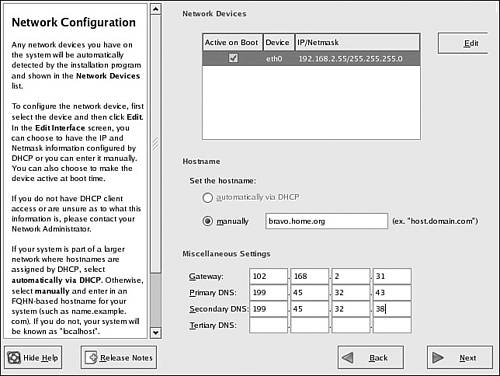 Network ConfigurationIf you have an installed network adapter, you are asked for network configuration details, as shown in Figure 3.12. Fedora can be set to automatically configure networking upon booting. Note that you can also configure networking following installation using Fedora's system-config-network graphical network administration tool (see Chapter 13, "Managing Users," for details about using these tools). NOTE If the Linux kernel finds more than one network interface installed on your computer, you might be asked to configure a second Ethernet device. This might be the case, for example, if you are installing Fedora on a computer that will serve as a gateway or firewall. If you configure more than one Ethernet device, the device named eth0 will be the first active interface when you start Fedora. You can choose to have your interface information automatically set using DHCP. Otherwise, especially if you are configuring a DHCP server, manually enter an IP address, hostname, or gateway address (such as for a router), along with DNS information if you click the Edit button listed by the interface (such as eth0 in the example). After making your selection, click Next to continue. You'll be asked to select a firewall configuration. Firewall and Security ConfigurationFigure 3.13 shows the Fedora installer Firewall Configuration dialog, which offers an opportunity to set default security policies for the new server. Protecting your system using a firewall is especially important if your server is connected to a network (although it is best to first install Linux, set security policies, and then connect to a network). These settings in this installation screen determine how remote computers or users will be able to access your server. You can change these policies after finishing the install and logging in. Also on this screen is the option to either enable or disable SELinux, the more secure version of Fedora. If you have not come across SELinux before, you should consider setting it to either warn or disable because it will enable you to learn how SELinux could potentially impact your installation. Figure 3.13. Select a desired security level and allowed services.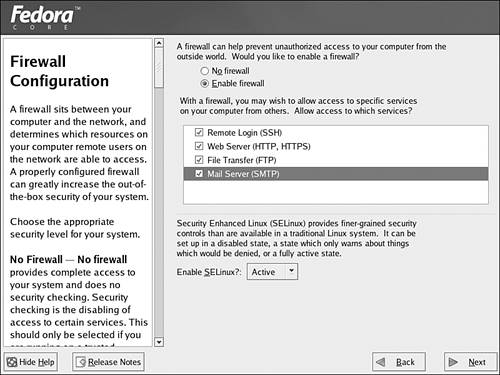 If you have a general idea of how you want to protect your computer, use the dialog shown in Figure 3.14 to turn on firewalling. Figure 3.14. Select your time zone.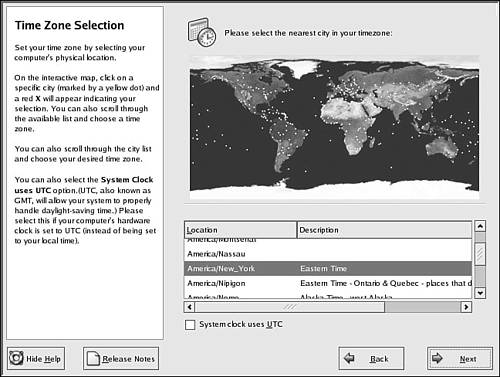 Choosing the No Firewall setting is not recommended; use this setting only if Fedora will be used as a non-networked workstation. NOTE Note that you can also manually configure security settings after installation using the text-based lokkit command, system-config-securitylevel client, or graphical gnome-lokkit client. See Chapter 33, "Securing Your Machines," for details on how to protect your system using these clients and various security level settings. Click any allowable services, as shown in Figure 3.14. For some servers, HTTP, FTP, and Simple Mail Transport Protocol (SMTP) requests are acceptable and reasonable. Do not select or use the Telnet service, which is used to allow remote network logins. For security reasons, the Secure SHell (SSH) service is a much better choice (see Chapter 5, "First Steps with Fedora," on how to use the ssh client). Click Next to install the firewall security settings. You will then be asked to select additional language support on your server. Again click Next when finished. Setting the Time ZoneYou are next shown a Time Zone Selection dialog (see Figure 3.14). There are two "clocks," or times, when using a PC: the hardware clock, maintained by hardware in the computer and a backup battery; and the system time, set upon booting and used by the Linux kernel. It is important to keep the two times accurate and in synchronization because automated system administration might need to take place at critical times. Many computer installations use computers with hardware clocks set to GMT, which stands for Greenwich Mean Time. The more modern designation is UTC or Coordinated Universal Time. The Linux system time is then set relative to this time and the default time zone, such as Eastern Standard Time, which is 5 hours of UTC. Setting the computer's hardware clock to UTC (GMT) has the advantage of allowing the Linux system time to be easily set relative to the geographic position of the computer and resident time zone (such as a Linux laptop user who would like to create files or send electronic mail with correct time stamps, and who has traveled from New York to Tokyo). See Chapter 4, "Post-Installation Configuration," for details on setting the date and time for Linux. TIP Read the manual page for the hwclock command to learn how to keep a running Linux system synchronized with a PC's hardware clock. See Chapter 4 for more details on using the hwclock command and Linux time-related software. Choose your time configuration, and then click Next. Creating a Root Password and User AccountsYou are next asked to enter a root operator password, as shown in Figure 3.15. Type in a password, press Tab or Enter, and then type it again to make sure that it is verified. The password, which is case sensitive, should be at least eight characters (or more) and consist of letters and numbers. Note that the password is not echoed back to the display. Your root password is important because you will need it to perform any system administration or user management with Fedora. Figure 3.15. Type in, and do not forget, your root password. CAUTION Do not forget your system's BIOS, boot loader, or root passwords! Some equipment, such as notebook computers, might require factory replacement of motherboard components if the owner forgets the BIOS password. The BIOS settings on most desktop PCs can usually be reset via a jumper or removal and insertion of the motherboard battery. If you forget your boot loader password, use a boot disk (perhaps created during installation as shown later on in this chapter) or boot to a rescue mode using your first Fedora Core CD-ROM and reset the root password using the passwd command. When finished, click Next to continue on to software package selection for your new server. NOTE You can only create a root account during a Fedora install. You will have to create user accounts later on after booting, using command-line programs (such as adduser) or the graphical system-config-users client. Create an account for yourself and any additional users. Usernames traditionally consist of the first letter of a person's first name and the last name. For example, Cathy Taulbee would have a username of ctaulbee. Do not forget to enter a password for any new user! If you create a user without a creating a password, the new user will not be able to log in. You should create at least one user for your server besides the root operator. This is for security purposes and to avoid logging in as root, either through the keyboard at the server or remotely over the network. The default shell and home directory settings should remain set at the defaults, which are the Bourne Again SHell (bash) and the /home directory. NOTE See Chapter 5 for how to become the root user or run root commands as a regular user. See Chapter 13, "Managing Users," for details on managing users. Software Selection and InstallationThe Package Group Selection dialog shown in Figure 3.16 displays the installer's suggested software for your class of installation (a server in our example). Figure 3.16. Select software package groups for installation.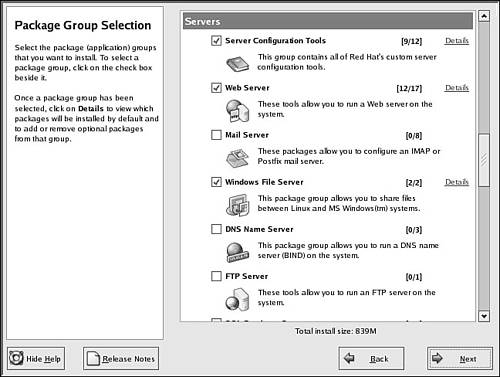 If you choose to install a personal desktop, workstation, or other installation type, the software packages appropriate for that installation will be automatically selected for you. Each package (actually a Group) provides many different individual software packages (refer to "Choosing Software Installation Options," earlier in the chapter). Scroll through the list of package groups, and then click a software package check box to select or deselect software to be installed. Note that the entire size (drive space requirements) of the installed software will be dynamically reflected by your choices. Click the Next button when finished to start installing Linux and the Fedora Core software. The installer will then perform a quick dependency check and present a dialog informing you that a log of the install will be saved under the /root directory in the file named install.log. Press the Enter key to begin the installation of the software on your system. Be certain that you are ready when you confirm the process, as you cannot step back from this point on! The installer will then format and prepare your new Linux partitions. Next, the installer will prepare for the install by gathering a list of the RPM files and will start placing the software on the newly formatted partitions. This process can take anywhere from several minutes to two or more hours, depending on your PC and the amount of software you have chosen to be installed. The installer reports on the name of the current package being installed and the remaining time, as shown in Figure 3.17. Figure 3.17. The Fedora installer formats your drive, and then installs selected software package groups. If you are installing over a network, go take a break because the install will proceed unattended through the software installation. If you are using this book's CD-ROMs, you might be prompted to remove the first CD-ROM and insert another. You might also be asked to repeat this operation using the third CD-ROM at some point. Creating a Boot DiskWhen the software installation finishes, the installer will perform some temporary file cleanup, install the boot loader, and then ask if you would like to create a boot disk for possible use later on, as shown in Figure 3.18. Figure 3.18. Create a boot disk for use with Fedora. You can create this boot disk now, or, as mentioned earlier, you can use Fedora's mkbootdisk command later on while using Fedora. Select Yes or No. Having a boot disk can be handy, especially if an error was made during the install and the boot loader fails to boot Linux. If you choose to create a boot disk, you will need to have a blank disk on hand. Select Yes, insert a blank disk when prompted, create the boot disk, and continue the install. TIP If you chose the X Window System, you can skip X configuration during the install and configure X after installation. This might be a better approach if the install fails to accurately probe your hardware or cannot configure X during the install, but you still desire to have X software installed. See Chapter 6 for details on configuring X to work with your PC's graphics card. Finishing the InstallYou are done! Press the Exit button, and the installer will eject any inserted CD-ROM and reboot. The GRUB boot loader will present a boot prompt as shown in Figure 3.19. Figure 3.19. Boot Fedora with GRUB by pressing the Enter key or waiting 10 seconds.
If you have set a GRUB password, press the p key, type your password, and press Enter. If you do nothing for 10 seconds or press Enter, either boot loader will boot Linux. NOTE After installation, you can edit the file /boot/grub/grub.conf and change the timeout= setting to change the boot time to a value other than 10 seconds. |
| < Day Day Up > |
EAN: 2147483647
Pages: 361
- Chapter V Consumer Complaint Behavior in the Online Environment
- Chapter VIII Personalization Systems and Their Deployment as Web Site Interface Design Decisions
- Chapter IX Extrinsic Plus Intrinsic Human Factors Influencing the Web Usage
- Chapter X Converting Browsers to Buyers: Key Considerations in Designing Business-to-Consumer Web Sites
- Chapter XI User Satisfaction with Web Portals: An Empirical Study