Using the Network File System
| < Day Day Up > |
| The Network File System (NFS) was developed by Sun Microsystems as a way for computers to share files as if they were local to the remote machine. NFS is commonly used to share home directories between hosts within a network. This reduces the need to have a home directory on every computer and ensures that no matter which computer you log in to, your home directory will be consistent. Another popular use for NFS is to share binary files between similar computers. If you have a new version of a package that you want all machines to have, you only have to do the upgrade on the NFS server, and all hosts running the same version of Fedora will have the same upgraded package. Installing and Starting or Stopping NFSNFS is installed by default on Fedora and consists of several programs that work together to provide the NFS server service. One is rpc.portmapper, which maps NFS requests to the correct daemon. Two others are rpc.nfsd, which is the NFS daemon, and rpc.mountd, which controls the mounts and unmounts of file systems. To have NFS automatically started when Fedora boots, use command-line or graphical administrative utilities, such as chkconfig, ntsysv, or system-config-services. Make sure you have the portmap service started because it is used as part of the service. One way to manually start or stop NFS is by directly calling its service control script nfs like this: # /etc/rc.d/init.d/nfs start Starting NFS services: [ OK ] Starting NFS quotas: [ OK ] Starting NFS daemon: [ OK ] Starting NFS mountd: [ OK ] In this example, NFS has been started. Use the stop keyword instead to stop the service. This approach to controlling NFS is handy, especially after configuration changes have been made. You can also use the service command or the graphical system-config-services client in the same way. See the next section on how to configure NFS support on your Fedora system. NFS Server ConfigurationThe NFS server can be configured by editing the /etc/exports file. This file is similar to the /etc/fstab file in that it is used to set the permissions for the file systems being exported. The entries look like this: /file/system yourhost(options) *.yourdomain.com(options) 192.15.69.0/24(options) This shows three common clients to which to share /file/system. The first, yourhost, shares /file/system to just one host. The second, .yourdomain.com, uses the asterisk (*) as a wildcard to enable all hosts in yourdomain.com to access /file/system. The third share enables all hosts of the Class C network, 192.15.69.0, to access /file/share. For security, it is best not to use shares like the last two across the Internet because all data will be readable by any network the data passes by. Some common options are shown in Table 21.1.
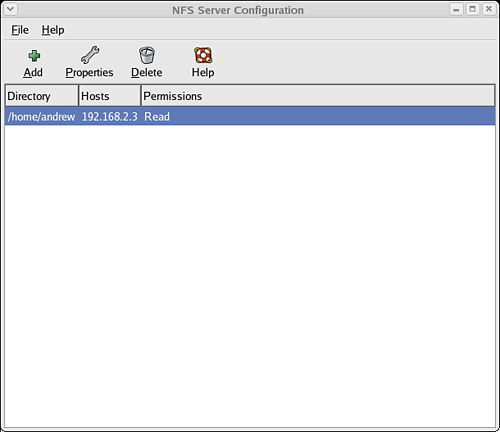
The following is an example of an /etc/exports file: # /etc/exports file for myhost.mydomain.com /usr/local yourhost(ro,show) /home/jkennedy *.yourdomain.com(rw,hide,sync) This file exports (makes available) /usr/local to yourhost. The mount is read-only (which is good for a directory of binary files that don't get written to). It also allows users on yourhost to see the contents of file systems that might be mounted on /usr/local. The second export mounts /home/jkennedy to any host in yourdomain.com. It doesn't allow subsidiary file systems to be viewed, but you can read and write to the file system. After you have finished with the /etc/exports file, the following command # /usr/sbin/exportfs r exports all the file systems in the /etc/exports file to a list named xtab under the /var/lib/nfs directory, which is used as a guide for mounting when a remote computer asks for a directory to be exported. The -r option to the command reads the entire /etc/exports file and mounts all the entries. The exportfs command can also be used to export specific files temporarily. Here's an example using exportfs to export a file system: /usr/sbin/exportfs -o async yourhost:/usr/tmp This command exports /usr/tmp to yourhost with the async option. Be sure to restart the NFS server after making any changes to /etc/exports. If you prefer, you can use Red Hat's system-config-nfs graphical client to set up NFS while using the X Window System. Start the client by clicking the System Settings menu and then selecting the NFS Server menu item from the Server Settings menu. You can also start the client from the command line of an X terminal window, like so: $ system-config-nfs & After you press Enter, you are prompted for the root password. Type in the password and click OK, and you see the main window. Click the Add button, and you see the Add NFS Share dialog box, as shown in Figure 21.1. Figure 21.1. Red Hat's system-config-nfs client can be used to quickly set up local directories for export using NFS.
In the Directory text box, type in a name of a directory to be exported; in the Host(s) text box, type in a hostname or the IP address of a remote host that is to be allowed access to the directory. By default, a directory is exported as read-only, but you can choose read and write access by clicking either option in the Basic Permissions area of the dialog box. When finished, click the OK button, click the Apply button, and then use the File menu to quit. NFS Client ConfigurationTo configure your host as an NFS client (to acquire remote files or directories), edit the /etc/fstab file as you would to mount any local file system. However, instead of using a device name to be mounted (such as /dev/hda1), enter the remote hostname and the desired file system to be imported. For example, one entry might look like this: # Device Mount Point Type Options Freq Pass yourhost:/usr/local /usr/local nfs nfsvers=3,ro 0 0 NOTE If you use autofs on your system, you need to use proper autofs entries for your remote NFS mounts. See the section 5 man page for autofs. The options column uses the same options as standard fstab file entries with some additional entries, such as nfsvers=3, which specifies the third version of NFS. You can also use the mount command, as root, to quickly attach a remote directory to a local file system by using a remote host's name and exported directory. For example, # mount -t nfs 192.168.2.67:/music /music After you press Enter, the entire remote directory appears on your file system. You can verify the imported file system using the df command like so: # df Filesystem 1k-blocks Used Available Use% Mounted on /dev/hda2 18714368 9642600 8121124 55% / /dev/hda1 46636 13247 30981 30% /boot none 120016 0 120016 0% /dev/shm 192.168.2.67:/music 36875376 20895920 14106280 60% /music Make sure that the desired mount point exists before using the mount command. When finished using the directory (perhaps for copying backups), the umount command can be used to remove the remote file system. Note that if you specify the root directory (/) as a mount point, you will not be able to unmount the NFS directory until you reboot (because Linux will complain that the file system is in use). |
| < Day Day Up > |
EAN: 2147483647
Pages: 361
- Structures, Processes and Relational Mechanisms for IT Governance
- Measuring and Managing E-Business Initiatives Through the Balanced Scorecard
- A View on Knowledge Management: Utilizing a Balanced Scorecard Methodology for Analyzing Knowledge Metrics
- Measuring ROI in E-Commerce Applications: Analysis to Action
- The Evolution of IT Governance at NB Power