7-3. Firewall Failover Configuration Examples This section presents several examples of firewall failover configuration, each with a different set of platforms or failover modes. In each example, two PIX Firewalls are configured as a failover pair. Each interface from the failover pair connects to a separate switch or VLAN so that the failover feature can exchange hello messages and detect failures. Active-Standby Failover Example with PIX Firewalls Figure 7-7 shows the IP addresses of each interface. The addresses of the standby unit interfaces are also given. Stateful failover is used so that connection state information is passed to the standby unit in real time. An example of failover using the serial failover cable is shown first, followed by a LAN-based failover scenario. Following the failover guidelines, a separate VLAN or switch is used for stateful failover (the "stateful" interface) and for LAN-based failover (the "lanfo" interface) information exchange. Figure 7-7. Network Diagram for the Active-Standby Example 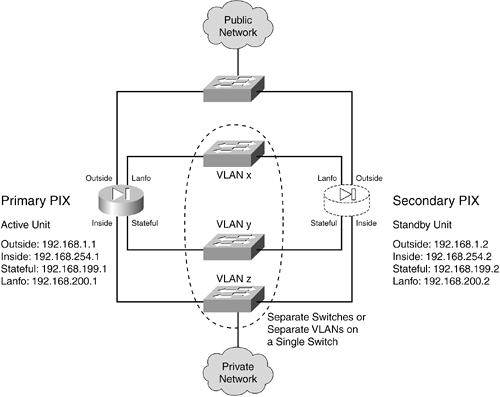
The failover pair is configured to use the most aggressive peer monitoring policy possible, using a peer hello interval of 3 seconds on PIX 6.x and 500 milliseconds on PIX 7.x. Configuration for stateful failover using the serial failover cable is as follows: PIX 6.x Configuration | PIX 7.x Configuration |
|---|
Firewall(config)# nameif gb- ethernet0 outside security0 Firewall(config)# ip address outside 192.168.1.1 255.255.255.0 Firewall(config)# failover ip address outside 192.168.1.2 Firewall(config)# nameif gb- ethernet1 inside security100 Firewall(config)# ip address inside 192.168.254.1 255.255.255.0 Firewall(config)# failover ip address inside 192.168.254.2 Firewall(config)# nameif gb- ethernet2 stateful security20 Firewall(config)# ip address stateful 192.168.199.1 255.255.255.0 Firewall(config)# failover ip address stateful 192.168.199.2 Firewall(config)# failover link stateful Firewall(config)# failover replicate http Firewall(config)# failover poll 3 Firewall(config)# failover
| Firewall(config)# interface gigabitethernet0 Firewall(config-if)# description Outside public network Firewall(config-if)# nameif outside Firewall(config-if)# security-level 0 Firewall(config-if)# ip address 192.168.1.1 255.255.255.0 standby 192.168.1.2 Firewall(config-if)# exit Firewall(config)# interface gigabitethernet1 Firewall(config-if)# description Inside private network Firewall(config-if)# nameif inside Firewall(config-if)# security-level 100 Firewall(config-if)# ip address 192.168.254.1 255.255.255.0 standby 192.168.254.2 Firewall(config-if)# exit Firewall(config)# interface gigabitethernet2 Firewall(config-if)# description Stateful Failover link Firewall(config-if)# failover interface ip stateful 192.168.199.1 255.255.255.0 standby 192.168.199.2 Firewall(config-if)# exit Firewall(config)# failover link stateful ethernet0 Firewall(config)# failover replication http Firewall(config)# failover polltime unit msec 500 holdtime 3 Firewall(config)# failover
|
Additional configuration for the primary LAN-based failover unit is as follows: PIX 6.x Configuration | PIX 7.x Configuration |
|---|
Firewall(config)# nameif gb- ethernet3 lanfo security30 Firewall(config)# ip address lanfo 192.168.200.1 255.255.255.0 Firewall(config)# failover ip address lanfo 192.168.200.2 Firewall(config)# failover lan unit primary Firewall(config)# failover lan interface lanfo Firewall(config)# failover lan key myprivatekey Firewall(config)# failover lan enable
| Firewall(config)# interface gigabitethernet3 Firewall(config-if)# description LAN-based failover Firewall(config-if)# no shutdown Firewall(config-if)# exit Firewall(config)# failover interface ip lanfo 192.168.200.1 255.255.255.0 standby 192.168.200.2 Firewall(config)# failover lan unit primary Firewall(config)# failover lan interface lanfo gigabitethernet3 Firewall(config)# failover lan myprivatekey Firewall(config)# failover lan enable
|
Now, a session is opened to the secondary failover unit, and the following additional configuration commands are added to it: PIX 6.x Configuration | PIX 7.x Configuration |
|---|
Firewall(config)# nameif gb-ethernet3 lanfo security30 Firewall(config)# ip address lanfo 192.168.200.1 255.255.255.0 Firewall(config)# failover ip address lanfo 192.168.200.2 Firewall(config)# failover lan unit secondary Firewall(config)# failover lan interface lanfo Firewall(config)# failover lan key myprivatekey Firewall(config)# failover lan enable
| Firewall(config)# interface gigabitethernet3 Firewall(config-if)# description LAN-based failover Firewall(config-if)# no shutdown Firewall(config-if)# exit Firewall(config)# failover interface ip lanfo 192.168.200.1 255.255.255.0 standby 192.168.200.2 Firewall(config)# failover lan unit secondary Firewall(config)# failover lan interface lanfo gigabitethernet3 Firewall(config)# failover key myprivatekey Firewall(config)# failover lan enable
|
Active-Standby Failover Example with FWSM Now, suppose these firewalls are actually FWSMs. Suppose the inside interface uses VLAN 100, outside uses VLAN 200, stateful uses 300, and lanfo uses 400. The configuration for the primary FWSM in slot 3 would look like this, beginning with the necessary Catalyst 6500 commands: Switch(config)# vlan 100,200,300,400 Switch(config)# firewall vlan-group 1 100,200,300,400 Switch(config)# firewall module 3 vlan-group 1 Switch(config)# exit ! Now open a session to the FWSM itself Switch# session slot 3 processor 1
Next are the FWSM commands: fwsm(config)# nameif vlan100 inside security100 fwsm(config)# ip address inside 192.168.254.1 255.255.255.0 standby 192.168.254.2 fwsm(config)# nameif vlan200 outside security0 fwsm(config)# ip address outside 192.168.1.1 255.255.255.0 standby 192.168.1.2 fwsm(config)# failover interface ip stateful 192.168.199.1 255.255.255.0 standby 192.168.199.2 fwsm(config)# failover link stateful vlan 300 fwsm(config)# failover interface ip lanfo 192.168.200.1 255.255.255.0 standby 192.168.200.2 fwsm(config)# failover lan unit primary fwsm(config)# failover lan interface lanfo vlan 400 fwsm(config)# failover
Then, on the secondary FWSM in the module 4 slot, the following configuration commands are entered, beginning with the Catalyst 6500 session. Note that the first two switch commands are entered again only if the two FWSMs are located in separate switch chassis. If the FWSMs are housed in the same switch chassis, the VLANs and the firewall VLAN group are already configured: Switch(config)# vlan 100,200,300,400 Switch(config)# firewall vlan-group 1 100,200,300,400 Switch(config)# firewall module 4 vlan-group 1 Switch(config)# exit ! Now open a session to the FWSM itself Switch# session slot 4 processor 1 [output omitted] fwsm(config)# failover interface ip stateful 192.168.199.1 255.255.255.0 standby 192.168.199.2 fwsm(config)# failover link stateful vlan 300 fwsm(config)# failover interface ip lanfo 192.168.200.1 255.255.255.0 standby 192.168.200.2 fwsm(config)# failover lan unit secondary fwsm(config)# failover lan interface lanfo vlan 400 fwsm(config)# failover
Active-Active Failover Example Suppose a Cisco firewall is to be configured with multiple security contexts so that it can provide firewall services to two customers of a service provider. A total of three contexts are needed: To enhance the availability of the firewall contexts, a second firewall is added to form a failover pair. Active-active failover is used so that one firewall has the active role for some contexts and the other firewall is active for a different set of contexts. Figure 7-8 shows a basic diagram for this arrangement. The primary and secondary firewalls use LAN-based failover communication over their Ethernet0 interfaces. The firewalls send failover hello messages every 3 seconds and wait for 9 seconds before declaring their peer failed. Stateful failover carries connection state information between the firewalls over their GigabitEthernet2 interfaces. Figure 7-8. Network Diagram for the Active-Active Example 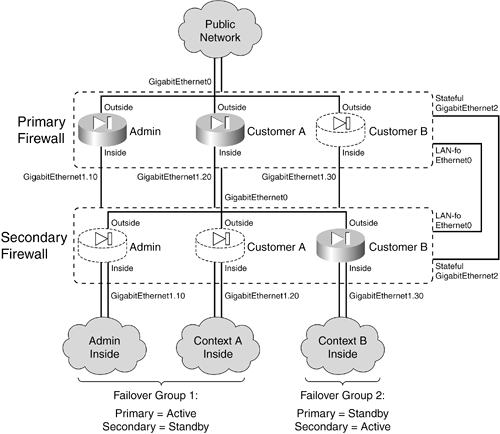
One path to the public network is provided over the firewalls' GigabitEthernet0 interfaces. This connection becomes the outside interface for each of the security contexts so that they share a common pipe to the public Internet. Each security context has its own separate inside interface, which is carried as a VLAN over the GigabitEthernet1 trunking firewall interfaces. VLAN 10 is assigned to the admin context, VLAN 20 to the CustomerA context, and VLAN 30 to the CustomerB context. Finally, two failover groups are used to allow the two firewalls to have differing roles in the contexts. Failover group 1 gives preference to the primary unit having the active role. The admin and CustomerA contexts are members of group 1. Failover group 2 gives preference to the secondary unit having the active role, where the CustomerB context is a member. Remember that each interface of the primary firewall is "connected" to the corresponding interface of the secondary firewall. In other words, the two firewalls have their corresponding interfaces assigned to the same VLANs so that failover messages can be exchanged between the firewall units over each of their interfaces. This is required for failover operation. Active-active failover can be difficult to visualize and configure. The configuration for this example is broken into several steps, as described in the following sections. Primary Firewall Configuration First, you need to configure the primary firewall. Remember that failover is configured in the system execution space of a multiple-context firewall. 1. | Begin with only the interfaces needed for failover.
The GigabitEthernet2 (stateful failover) and Ethernet0 (LAN-based failover) interfaces are needed. Their configuration isn't necessary, because the actual failover commands remove any IP addressing or other parameters that might be assigned in interface configuration mode. They are shown here only for clarity:
Firewall(config)# mode multiple [output omitted] ! Here, the system execution space is being configured ! Firewall(config)# interface gigabitethernet2 Firewall(config-if)# description Stateful failover interface Firewall(config-if)# exit Firewall(config)# interface ethernet0 Firewall(config-if)# description LAN-based failover interface Firewall(config-if)# exit
| 2. | Configure LAN-based failover:
Firewall(config)# failover lan unit primary Firewall(config)# failover lan interface LAN-fo ethernet0 Firewall(config)# failover interface ip LAN-fo 192.168.1.1 255.255.255.0 standby 192.168.1.2 Firewall(config)# failover polltime unit 3 holdtime 9 Firewall(config)# failover key ***** Firewall(config)# failover lan enable
| 3. | Configure stateful failover:
Firewall(config)# failover interface ip Stateful 192.168.2.1 255.255.255.0 standby 192.168.2.2 Firewall(config)# failover link Stateful gigabitethernet2
| 4. | Define the failover groups:
Firewall(config)# failover group 1 Firewall(config-fover-group)# primary Firewall(config-fover-group)# preempt Firewall(config-fover-group)# exit Firewall(config)# failover group 2 Firewall(config-fover-group)# secondary Firewall(config-fover-group)# preempt Firewall(config-fover-group)# exit
| 5. | Enable failover:
Firewall(config)# failover
|
Secondary Firewall Configuration 1. | Begin with only the interfaces needed for failover.
The GigabitEthernet2 (stateful failover) and Ethernet0 (LAN-based failover) interfaces are paired with identical interfaces on the primary firewall. Their configuration isn't necessary; it is shown here only for clarity:
Firewall(config)# mode multiple [output omitted] ! Here, the system execution space is being configured ! Firewall(config)# interface gigabitethernet2 Firewall(config-if)# description Stateful failover interface Firewall(config-if)# exit Firewall(config)# interface ethernet0 Firewall(config-if)# description LAN-based failover interface Firewall(config-if)# exit
| 2. | Configure LAN-based failover.
Here, the secondary unit begins its life in standby mode for all failover groups. Therefore, it knows to pick up the standby IP address for the LAN-based and stateful failover interfaces in the following commands:
Firewall(config)# failover lan unit secondary Firewall(config)# failover lan interface LAN-fo ethernet0 Firewall(config)# failover interface ip LAN-fo 192.168.1.1 255.255.255.0 standby 192.168.1.2 Firewall(config)# failover polltime unit 3 holdtime 9 Firewall(config)# failover key ***** Firewall(config)# failover lan enable
| 3. | Configure stateful failover:
Firewall(config)# failover interface ip Stateful 192.168.2.1 255.255.255.0 standby 192.168.2.2 Firewall(config)# failover link Stateful gigabitethernet2
| 4. | Define the failover groups.
Although the failover groups could be explicitly configured here, as they were on the primary firewall unit, that isn't really necessary. The failover group configuration is replicated to the secondary unit as soon as failover is enabled on each. The following commands become a part of the configuration:
Firewall(config)# failover group 1 Firewall(config-fover-group)# primary Firewall(config-fover-group)# preempt Firewall(config)# exit Firewall(config)# failover group 2 Firewall(config-fover-group)# secondary Firewall(config-fover-group)# preempt Firewall(config)# exit
| 5. | Enable failover:
Firewall(config)# failover
|
Allocating Interfaces to the Contexts Configuration should continue on the primary firewall in the system execution space. As soon as failover is enabled on both firewalls and is operational, any remaining configuration commands are replicated to the secondary unit automatically. This saves time and effort over entering the same commands in the two firewalls manually. 1. | Define physical interfaces in the system execution space.
Here, you identify the interfaces. You also configure the subinterfaces of GigabitEthernet1 with their VLAN numbers on the trunk. No IP addresses are assigned in the system execution space. Rather, the addressing is left up to the administrator of the context where each interface will be allocated:
Firewall(config)# interface gigabitethernet0 Firewall(config-if)# description Public Network for all contexts Firewall(config-if)# exit ! Firewall(config)# interface gigabitethernet1 Firewall(config-if)# description Trunk for non-public networks Firewall(config-if)# exit ! Firewall(config)# interface gigabitethernet1.10 Firewall(config-if)# description Private network for admin context Firewall(config-if)# vlan 10 Firewall(config-if)# exit ! Firewall(config)# interface gigabitethernet1.20 Firewall(config-if)# description Private network for CustomerA context Firewall(config-if)# vlan 20 Firewall(config-if)# exit ! Firewall(config)# interface gigabitethernet1.30 Firewall(config-if)# description Private network for CustomerB context Firewall(config-if)# vlan 30 Firewall(config-if)# exit
| 2. | Allocate interfaces to the contexts and failover groups.
For the admin context, you can allocate interfaces only with their physical interface names. For the CustomerA and CustomerB user contexts, however, you can assign logical names (intf0 and intf1) so that the physical identity remains hidden:
Firewall(config)# context admin Firewall(config-ctx)# allocate-interface gigabitethernet0 Firewall(config-ctx)# allocate-interface gigabitethernet1.10 Firewall(config-ctx)# config-url flash:/admin.cfg Firewall(config-ctx)# join-failover-group 1 Firewall(config-ctx)# exit ! Firewall(config)# context CustomerA Firewall(config-ctx)# description Virtual firewall for CustomerA Firewall(config-ctx)# allocate-interface gigabitethernet0 intf0 Firewall(config-ctx)# allocate-interface gigabitethernet1.20 intf1 Firewall(config-ctx)# config-url flash:/CustomerA.cfg Firewall(config-ctx)# join-failover-group 1 Firewall(config-ctx)# exit ! Firewall(config)# context CustomerB Firewall(config-ctx)# description Virtual firewall for CustomerB Firewall(config-ctx)# allocate-interface gigabitethernet0 intf0 Firewall(config-ctx)# allocate-interface gigabitethernet1.30 intf1 Firewall(config-ctx)# config-url flash:/CustomerB.cfg Firewall(config-ctx)# join-failover-group 2 Firewall(config-ctx)# exit
|
Configuring Interfaces in Each Context After you have allocated the physical firewall interfaces to the security contexts, you must configure them for use by the contexts. You do this by opening a session to each context in turn. At this point, remember that the context is a virtual firewall, so each interface needs an IP address, a security level, and a name. Also remember that each context has its own concept of failover. Each interface needs a standby IP address, too. 1. | Configure the admin context interfaces:
Firewall# changeto context admin Firewall/admin# configure terminal Firewall/admin(config)# interface gigabitethernet0 Firewall/admin(config-if)# nameif outside Firewall/admin(config-if)# security-level 0 Firewall/admin(config-if)# ip address 192.168.93.1 255.255.255.0 standby 192.168.93.2 Firewall/admin(config-if)# exit ! Firewall/admin(config)# interface gigabitethernet1.10 Firewall/admin(config-if)# nameif inside Firewall/admin(config-if)# security-level 100 Firewall/admin(config-if)# ip address 192.168.1.1 255.255.255.0 standby 192.168.1.2 Firewall/admin(config-if)# exit Firewall/admin(config)# exit
| 2. | Configure the CustomerA context interfaces:
Firewall/admin# changeto context CustomerA Firewall/CustomerA# configure terminal Firewall/CustomerA(config)# interface intf0 Firewall/CustomerA(config-if)# nameif outside Firewall/CustomerA(config-if)# security-level 0 Firewall/CustomerA(config-if)# ip address 192.168.93.140 255.255.255.0 standby 192.168.93.141 Firewall/CustomerA(config-if)# exit ! Firewall/CustomerA(config)# interface intf1 Firewall/CustomerA(config-if)# nameif inside Firewall/CustomerA(config-if)# security-level 100 Firewall/CustomerA(config-if)# ip address 192.168.200.10 255.255.255.0 standby 192.168.200.11 Firewall/CustomerA(config-if)# exit Firewall/CustomerA(config)# exit
| 3. | Configure the CustomerB context interfaces:
Firewall/CustomerA# changeto context CustomerB Firewall/CustomerB# configure terminal Firewall/CustomerB(config)# interface intf0 Firewall/CustomerB(config-if)# nameif outside Firewall/CustomerB(config-if)# security-level 0 Firewall/CustomerB(config-if)# ip address 192.168.93.150 255.255.255.0 standby 192.168.93.151 Firewall/CustomerB(config-if)# exit ! Firewall/CustomerB(config)# interface intf1 Firewall/CustomerB(config-if)# nameif inside Firewall/CustomerB(config-if)# security-level 100 Firewall/CustomerB(config-if)# ip address 192.168.220.10 255.255.255.0 standby 192.168.220.11 Firewall/CustomerB(config-if)# exit Firewall/CustomerB(config)# exit
|
|