Section 3-4. Multicast Support
|
|
3-4. Multicast SupportTo participate in forwarding and inspecting IP multicast traffic, a firewall can coexist with multicast routers running Protocol-Independent Multicast (PIM) sparse mode. A firewall can operate as an IGMP proxy agent, also called a stub router. For all multicast-related operations, the firewall acts on behalf of the recipients. IGMP requests from recipient hosts on one firewall interface are intercepted, inspected, and relayed to multicast routers on another firewall interface. Beginning with PIX 7.x, a firewall can also be configured to act as a PIM router so that it communicates with other PIM routers to build a complete multicast distribution tree. After recipients join multicast groups, the firewall can intercept, inspect, and relay multicast traffic from the source on one interface to the recipients on another interface. Multicast OverviewA network uses three basic types of IP traffic:
Two extremes are covered herea unicast, which travels from host to host, and a broadcast, which travels from one host to everyone on a segment. Multicast falls somewhere in the middle, where the intention is to send packets from one host to only the users who want to receive themnamely, those in the designated multicast group. Ideally, the recipients of multicast packets could be located anywhere, not just on the local segment. Multicast traffic is generally unidirectional. Because many hosts receive the same data, it makes little sense to allow one of the hosts to send packets back toward the source over the multicast mechanism. Instead, a receiving host can send return traffic to the source as a unicast. Multicast traffic is also sent in a best-effort connectionless format. UDP (connectionless) is the commonly used format, whereas TCP (connection-oriented) is not. Hosts that want to receive data from a multicast source can join or leave a multicast group dynamically. In addition, a host can decide to become a member of more than one multicast group at any time. The principal network task is then to figure out how to deliver multicast traffic to the group members without disturbing other uninterested hosts. Multicast AddressingRouters and switches must have a way to distinguish multicast traffic from unicasts or broadcasts. This is done through IP addressing by reserving the Class D IP address range, 224.0.0.0 through 239.255.255.255, for multicasting. Network devices can quickly pick out multicast IP addresses by looking at the 4 most-significant bits, which are always 1110. How does a router or switch relate a multicast IP address to a MAC address? There is no ARP equivalent for multicast address mapping. Instead, a reserved Organizationally Unique Identifier (OUI) value is set aside so that multicast MAC addresses always begin with 0100.5e (plus the next-lower bit, which is 0). The lower 28 bits of the multicast IP address must also be mapped into the lower 23 bits of the MAC address by a simple algorithm. Some of the IP multicast address space has been reserved for a particular use:
Forwarding Multicast TrafficIP multicast traffic must be forwarded from one network interface to another, just like any other Layer 3 packets are handled. The difference is in knowing where to forward the packets. For example, unicast IP packets have only one destination interface on a router or firewall (even if multiple paths exist). Multicast IP packets, however, can have many destination interfaces, depending on where the recipients are located. Cisco firewalls running PIX 6.2 or 6.3 have a limited multicast capability. They can act only as a multicast forwarding proxy, also known as a stub multicast router (SMR), depending on other routers in the network to actually route the multicast packets. The firewalls can determine where the multicast recipients are located on their own interfaces. They must be statically configured to forward the multicast traffic between a source and the recipients. Beginning with PIX 7.x, Cisco firewalls can participate in multicast routing by using the PIM routing protocol. This lets a firewall communicate with other PIM routers to distribute multicast traffic dynamically and along the best paths. Multicast TreesThe routers in a network must determine a forwarding path to get multicast packets from the source (sender) to each of the recipients, regardless of where they are located. Think of the network as a tree structure. At the root of the tree is the source, blindly sending IP packets to a specific multicast address. Each router along the way sits at a branch or fork in the tree. If a router knows where all the multicast group recipients are located, it also knows which branches of the tree to replicate the multicast packets onto. Some routers have no downstream recipients, so they do not need to forward the multicast traffic. Other routers may have many downstream recipients. This tree structure is somewhat similar to a spanning-tree topology because it has a root at one end and leaf nodes (the recipients) at the other end. The tree is also loop-free so that none of the multicast traffic gets fed back into the tree. TIP In multicast routing, the router nearest the multicast source is called the first-hop router. It is the first hop that multicast packets reach when they leave the source. Routers at the tree's leaf nodes, nearest the multicast receivers, are called last-hop routers. They are the last hop that multicast packets reach at the end of their journey. Reverse Path ForwardingMulticast routers usually have one test to perform on every multicast packet they receive. Reverse Path Forwarding (RPF) is a means to make sure packets are not being injected back into the tree at an unexpected location. As a packet is received on a router interface, the source IP address is inspected. The idea is to verify that the packet arrived on the same interface where the source can be found. If this is true, the packet is actually proceeding out the tree's branches, away from the source. If this is not true, someone else has injected the packet on an unexpected interface, headed back down the tree's branches toward the source. To perform the RPF test, a PIM router looks up the source address in its unicast routing table. If the next-hop interface used to reach the source address also matches the interface where the packet was received, the packet can be forwarded or replicated toward the multicast recipients. If not, the packet is quietly discarded. IGMP: Finding Multicast Group RecipientsHow does a router know of the recipients in a multicast group, much less their locations? To receive multicast traffic from a source, both the source and every recipient must first join a common multicast group, known by its multicast IP address. A host can join a multicast group by sending a request to its local router. This is done through Internet Group Management Protocol (IGMP). IGMPv1 is defined in RFC 1112, and its successor, IGMPv2, is defined in RFC 2236. Think of IGMP as a means of maintaining group membership only on the local router. When several hosts join a group by contacting their local routers, it is the multicast routing protocol (such as PIM) that "connects the dots" and forms the multicast tree between routers. NOTE Keep in mind that IGMP is always used on multicast routers and Cisco firewalls to interact with multicast hosts. In PIX 6.3 and earlier, Stub Multicast Routing offers IGMP for local group membership and IGMP forwarding so that multicast routers can use the IGMP information on a broader scale. PIM is available only beginning with PIX 7.x. The firewall then becomes a true multicast router, running both PIM and IGMP. IGMPv1To join a multicast group, a host can dynamically send a Membership Report IGMP message to its local router (or firewall). This message tells the router what multicast address (group) the host is joining. The multicast address is used as the IGMP packet's destination IP address, as well as the group address requested in the message. Every 60 seconds, one router on each network segment queries all the directly connected hosts to see if they are interested in receiving multicast traffic. This router is known as the IGMPv1 Querier. It functions simply to invite hosts to join a group. Queries are sent to the 224.0.0.1 all-hosts multicast address for quick distribution. (By definition, every host must listen to the all-hosts address; no group membership is required.) If a host is interested in joining a group, or if it wants to continue receiving a group that it has already joined, it must respond to the router with a membership report. Hosts can join multicast groups at any time. However, IGMPv1 does not have a mechanism to allow a host to leave a group if it is no longer interested in the group's content. Instead, routers age a multicast group out of an interface (network segment) if no membership reports are received for three consecutive query intervals. This means that, by default, multicast traffic is still sent onto a segment for up to 3 minutes after all the group members have stopped listening. Notice that a router does not need to keep a complete host membership list for each multicast group that is active. Rather, it needs to record only which multicast groups are active on which interfaces. IGMPv2IGMP version 2 introduced several differences from the first version. Queries can be sent as General Queries to the all-hosts address (as in IGMPv1). They also can be sent as Group-Specific Queries, sent only to members of a specific group. In addition, hosts are allowed to leave a group dynamically. When a host decides to leave a group it has joined, it sends a Leave Group message to the all-routers address (224.0.0.2). All routers on the local segment take note, and the Querier router decides to investigate further. It responds with a Group-Specific Query message, asking if anyone is still interested in receiving traffic for that group. Any other hosts must reply with a Membership Report. Otherwise, the Querier router safely assumes that there is no need to continue forwarding the group traffic on that segment. NOTE If any IGMPv1 routers are on a segment, all multicast routers on the segment must run IGMPv1. Otherwise, the IGMPv1 routers cannot understand the IGMPv2 messages. IGMPv2 is enabled by default on Cisco router and firewall interfaces. PIM: Building a Multicast Distribution TreePIM is a routing protocol that can be used to forward multicast traffic. PIM operates independently of any particular IP routing protocol. Therefore, PIM uses the IP unicast routing table and does not keep a separate multicast routing table. (The unicast routing table is itself routing protocol-independent because one or more routing protocols can be used to populate a single table.) PIM can operate in two modes, depending on the density of the recipients in a multicast group. Cisco has developed a third hybrid mode as well. The PIM modes are as follows:
In addition, two versions of the PIM protocol can be used in a network: PIM version 1 and PIM version 2. Cisco firewalls running PIX 7.x or later can operate only in PIM sparse mode, although they can coexist with other routers running PIM-SM or PIM sparse-dense mode. PIM Sparse ModePIM sparse mode takes a "bottom-up" approach to constructing a multicast distribution tree. The tree is built by beginning with the recipients or group members at the end leaf nodes and extending back toward a central root point. Sparse mode also works on the idea of a shared tree structure, where the root is not necessarily the multicast source. Instead, the root is a PIM-SM router that is centrally located in the network. This root router is called the rendezvous point (RP). The tree from the RP to the group members is actually a subset of the tree that could be drawn from the source to the group members. If a multicast source anywhere in the network can register for group membership with the RP, the tree can be completed end-to-end. Because of this, the sparse mode tree is called a shared tree. NOTE Sparse mode multicast flows are designated by a (source,destination) pair. The letters S and G represent a specific source and group, respectively. An asterisk (*) can also be used to represent any source or destination. For example, multicast flows over the shared tree are described as (*,G) because the shared tree allows any source to send to a group G. In PIM-SM, the shared tree is built using the following basic sequence of steps:
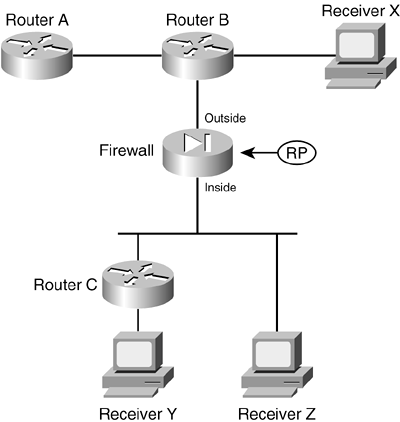
For example, consider the network shown in Figure 3-15. A firewall separates a public and private network and also acts as the RP for PIM multicast routing. Three receivers (end-user hosts) in the network join a single multicast group in preparation to receive traffic from a multicast source. Figure 3-15. A Sample Network with PIM Multicast Routers
Figure 3-16 illustrates the group membership process. On the left side of the figure, the multicast receivers X, Y, and Z each send an IGMP membership request to join group address 239.0.0.1. Router B receives the request from Receiver X and also creates a multicast route entry (*,239.0.0.1) that points back toward the receiver. Router B also sends a PIM Join message for (*,239.0.0.1) toward the RP, which adds the link between it and the firewall to the multicast tree. Figure 3-16. Building a Shared Multicast Tree with PIM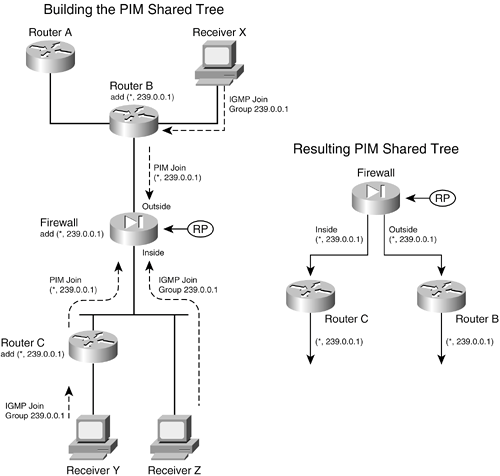 Router C takes similar steps for the IGMP request it receives from Receiver Y. Receiver Z is a slightly different case; the firewall receives its IGMP request directly because it is directly connected. The firewall adds a (*,239.0.0.1) multicast route entry to its table, pointing back toward the receiver on the inside interface. Notice how all the IGMP membership reports terminate at the closest router (or firewall) while PIM Join messages travel from router to router. After the RP receives all the Join messages, the multicast tree is complete, as shown in the right portion of Figure 3-16. The network topology has been redrawn slightly to show how the RP (firewall) is at the root of the tree. This is called a PIM shared tree because it is used by all the devices participating in the multicast group. Routers that have no active multicast group receivers (Router A, for example) don't send a PIM Join message, so they don't become part of the tree. A shared tree always begins with the RP at the root and progresses downward toward the leaf nodes, where the receivers are located. Only the PIM routers are shown, because they actually build and use the tree. PIM shared trees are always unidirectional. Multicast packets can only start at the RP and be sent toward the receivers. Finally, a multicast source must also join the group so that traffic can flow toward the receivers. The left portion of Figure 3-17 illustrates this process, where the source is connected to Router C. Figure 3-17. Adding a Multicast Source to PIM Trees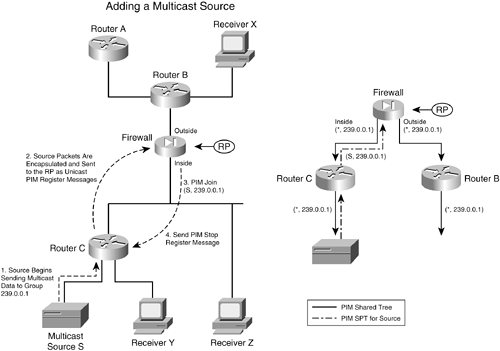 When a source joins a multicast group, the following steps take place:
The right portion of Figure 3-17 illustrates the resulting tree structures. The solid arrows show the PIM shared tree, from the RP down to the routers where receivers are located. The broken-line arrows represent the SPT that is built from the source up to the RP. Although it is not shown in this example, last-hop PIM routers are allowed to perform an SPT switchover to attempt to build a more direct path to the multicast source. This process is very similar to the steps described previously, where specific (S,G) flows are added to the PIM routers along the path. After an SPT switchover occurs, the RP is no longer required to be at the root of the tree if a better path can be found. To simplify the tree structure and improve efficiency, PIM can also support a bidirectional mode. If every PIM router supporting a multicast group is configured for bidirectional mode, a single multicast tree is formed to connect the multicast source to all its receivers. Multicast packets can flow up or down the tree as necessary to disperse in the network. The PIM routers take on designated forwarder (DF) roles, deciding whether to forward multicast packets onto a network segment in the appropriate direction. Because a single bidirectional tree is used, the multicast source can join the group without the PIM source registration process. PIM RP DesignationIn PIM sparse mode, every PIM router must know the RP's identity (IP address). After all, each router has to send PIM Join/Prune messages toward the RP by using its unicast routing table to find the correct interface. The simplest method of identifying the RP is to manually configure its address in each PIM router. If there aren't many PIM routers to configure, this method is very straightforward. However, if there are many PIM routers or if the RP address is likely to change in the future, manual configuration can be cumbersome. NOTE Beginning with PIX 7.x, static RP configuration is the only option available. Other more dynamic RP discovery methods are described in this section because they might be used on PIM routers in your network. Cisco also provides a proprietary means to automatically inform PIM-SM routers of the appropriate RP for a group. This is known as Auto-RP. Routers that can potentially become an RP are configured as candidate RPs. These routers advertise their capability over the Cisco-RP-Announce multicast address 224.0.1.39. These announcements are picked up by one or more centrally located and well-connected routers that have been configured to function as mapping agents. A mapping agent collects and sends RP-to-group mapping information to all PIM routers over the Cisco-RP-Discovery multicast address 224.0.1.40. A mapping agent can limit the scope of its RP discovery information by setting the time-to-live (TTL) value in its messages. This limits how many router hops away the information will still be valid. Any PIM router within this space dynamically learns of the candidate RPs that are available to use. The second version of PIM also includes a dynamic RP-to-group mapping advertisement mechanism. This is known as the bootstrap router method and is standards-based. PIMv2 is similar to the Cisco Auto-RP method. First, a bootstrap router (BSR) is identified; this router learns about RP candidates for a group and advertises them to PIM routers. Only the BSR and candidate RPs have to be configured; all other PIM routers learn of the appropriate RP dynamically from the BSR. These bootstrap messages permeate the entire PIM domain. The scope of the advertisements can be limited by defining PIMv2 border routers, which does not forward the bootstrap messages further. NOTE If Auto-RP is being used in your network, be aware that a firewall running PIX 7.x can't participate in the Auto-RP process. The firewall must have the PIM RP address statically configured. However, the candidate RP announcements over 224.0.1.39 and the Router Discovery messages over 224.0.1.40 can pass through the firewall to reach PIM routers on the other side. Therefore, the Auto-RP mechanism can still work across the firewall, but the firewall can't directly benefit from the dynamic RP discovery itself. Configuring PIMUse the following steps to configure PIM multicast routing on a firewall running PIX 7.x or later. Keep in mind that you have to configure explicit access list rules to permit multicast host access through a firewall. All multicast traffic is subject to normal firewall inspection, with the exception of IGMP, PIM, OSPF, and RIPv2. You do not have to configure address translation for the multicast group addresses, however. The firewall automatically creates an internal identity NAT for addresses such as 239.0.0.1, 239.255.148.199, and so on.
Configuring Stub Multicast Routing (SMR)A firewall can be configured to participate as a stub multicast router. In this case, it acts as a proxy between fully functional PIM routers and multicast participants. Only IGMP messages are relayed between firewall interfaces; PIM routing is not used. In fact, as soon as SMR is configured, any existing pim rp-address commands for multicast routing are automatically removed from the configuration. This is the only multicast function available in PIX release 6.3. It is optional in PIX release 7.x if PIM is undesirable. The steps for configuring SMR are as follows:
Configuring IGMP OperationIGMP is used on firewall interfaces to handle multicast group membership for directly connected hosts. You can use the following configuration steps to tune or change the IGMP operation:
Stub Multicast Routing ExampleA firewall separates a multicast source from its recipients. The source is located on the outside interface, and the recipients are on internal networks found on the inside interface. Recipients can join multicast groups only in the 224.3.1.0/24 and 225.1.1.0/24 ranges. The PIX 6.3 configuration commands needed are as follows: Firewall(config)# access-list mcastallowed permit ip any 224.3.1.0 255.255.255.0 Firewall(config)# access-list mcastallowed permit ip any 225.1.1.0 255.255.255.0 Firewall(config)# multicast interface outside Firewall(config-multicast)# exit Firewall(config)# multicast interface inside Firewall(config-multicast)# igmp forward interface outside Firewall(config-multicast)# igmp access-group mcastallowed Now, consider the same example, where the source and recipients trade places. If the multicast source (192.168.10.1) is located on the inside of the firewall, with recipients on the outside, the configuration could look like the following: Firewall(config)# access-list mcastallowed permit ip any 224.3.1.0 255.255.255.0 Firewall(config)# access-list mcastallowed permit ip any 225.1.1.0 255.255.255.0 Firewall(config)# multicast interface inside Firewall(config-multicast)# igmp forward interface outside Firewall(config-multicast)# mroute 192.168.10.1 255.255.255.255 inside 224.3.1.0 255.255.255.0 outside Firewall(config-multicast)# mroute 192.168.10.1 255.255.255.255 inside 225.1.1.0 255.255.255.0 outside Firewall(config)# multicast interface outside Firewall(config-multicast)# igmp access-group mcastallowed PIM Multicast Routing ExampleA Cisco firewall running release PIX 7.x is to be configured for PIM multicast routing between its inside and outside interfaces. The firewall acts as the RP for any multicast group address beginning with 239. You could use the following PIX 7.x configuration commands: Firewall(config)# multicast-routing Firewall(config)# interface GigabitEthernet1 Firewall(config-if)# nameif inside Firewall(config-if)# security-level 100 Firewall(config-if)# ip address 192.168.198.1 255.255.255.0 Firewall(config-if)# exit Firewall(config)# access-list PIMgroups standard permit 239.0.0.0 255.0.0.0 Firewall(config)# pim rp-address 192.168.198.1 PIMgroups Verifying IGMP Multicast OperationYou can display the current multicast configuration on a firewall running PIX 6.3 with the show multicast command, as shown in the following example: Firewall# show multicast multicast interface outside igmp access-group mcastallowed multicast interface inside igmp forward interface outside igmp access-group mcastallowed Firewall# As soon as multicast is configured and IGMP becomes active on some firewall interfaces, you can display IGMP activity with this EXEC command:
If you do not use any arguments, the output displays all firewall interfaces configured for multicast. Otherwise, you can specify a multicast group or an interface. In addition, the output displays any currently active multicast groups. For example, the following multicast group addresses are shown to be active with receivers on the inside and outside interfaces of a PIX 7.x firewall: Firewall# show igmp groups IGMP Connected Group Membership Group Address Interface Uptime Expires Last Reporter 239.0.0.1 inside 1d01h 00:04:16 192.168.198.4 239.255.148.199 inside 1d01h 00:04:14 192.168.198.198 239.255.199.197 inside 1d01h 00:04:15 192.168.198.198 239.255.255.250 inside 1d01h 00:04:16 192.168.198.198 224.0.1.40 outside 1d01h 00:04:01 128.163.93.129 239.0.0.1 outside 1d01h 00:04:00 128.163.93.129 Firewall# You can display the current IGMP settings on a specific firewall interface with this command:
The following example provides some sample output from this command: Firewall# show igmp interface inside inside is up, line protocol is up Internet address is 192.168.198.1/24 IGMP is enabled on interface Current IGMP version is 2 IGMP query interval is 125 seconds IGMP querier timeout is 255 seconds IGMP max query response time is 10 seconds Last member query response interval is 1 seconds Inbound IGMP access group is: IGMP limit is 500, currently active joins: 4 Cumulative IGMP activity: 4 joins, 0 leaves IGMP querying router is 192.168.198.1 (this system) Firewall# Verifying PIM Multicast Routing OperationAfter you enable multicast routing on a firewall running PIX 7.x or later, you should verify that it is seeing hello messages from its PIM router neighbors. You can do this with the following command:
For example, the following output shows that a firewall is communicating with two PIM neighbors located on two different interfaces: Firewall# show pim neighbor Neighbor Address Interface Uptime Expires DR pri Bidir 192.168.198.4 inside 1d02h 00:01:19 1 (DR) 10.1.93.1 outside 01:54:40 00:01:19 N/A Firewall# The Uptime column shows how long the firewall has been successfully receiving PIM hello messages from the peer router. The firewall must receive the next hello before the time shown in the Expires column reaches 0. TIP You can also verify that the firewall is sending its own PIM hellos by checking its neighbor status from a directly connected PIM router. For example, the router located on the firewall's outside interface shows the following information about the firewall as a PIM router: Router# show ip pim neighbor PIM Neighbor Table Neighbor Address Interface Uptime Expires Ver Mode 10.1.93.2 Vlan4 01:59:15 00:01:34 v2 (DR) Router# You can display the current multicast routing table with the following command:
Finally, a firewall maintains information about the PIM routing topology. This includes entries for each multicast flow that the firewall has received a PIM Join/Prune message about, as well as the flow uptime, RP for the group, firewall interfaces actively forwarding traffic for the flow, and various flags about the flow state. As a quick summary of multicast flows in the topology table, you can use the following command: Firewall# show pim topology route-count PIM Topology Table Summary No. of group ranges = 6 No. of (*,G) routes = 6 No. of (S,G) routes = 2 No. of (S,G)RPT routes = 2 Firewall# The actual PIM topology information is displayed with the show pim topology command, as shown in the following example. Here, the firewall is the RP (192.168.198.1) for several of the multicast groups. A Cisco IP/TV multicast source is located at 192.168.198.198, using multicast group 239.255.199.197 for streaming video and 239.255.148.199 for streaming audio. Firewall# show pim topology IP PIM Multicast Topology Table Entry state: (*/S,G)[RPT/SPT] Protocol Uptime Info Entry flags: KAT - Keep Alive Timer, AA - Assume Alive, PA - Probe Alive, RA - Really Alive, LH - Last Hop, DSS - Don't Signal Sources, RR - Register Received, SR (*,224.0.1.40) DM Up: 1d13h RP: 0.0.0.0 JP: Null(never) RPF: ,0.0.0.0 Flags: LH DSS outside 1d13h off LI LH (*,239.0.0.1) SM Up: 1d13h RP: 192.168.198.1* JP: Join(never) RPF: Tunnel1,192.168.198.1* Flags: LH inside 1d13h fwd Join(00:02:45) LI outside 1d13h fwd LI LH (*,239.255.148.199) SM Up: 1d13h RP: 192.168.198.1* JP: Join(never) RPF: Tunnel1,192.168.198.1* Flags: LH outside 00:00:33 fwd LI LH inside 1d13h fwd Join(00:03:14) LI (192.168.198.198,239.255.148.199)RPT SM Up: 1d13h RP: 192.168.198.1* JP: Prune(never) RPF: Tunnel1,192.168.198.1* Flags: KAT(00:02:59) RA RR inside 1d13h off Prune(00:03:14) (192.168.198.198,239.255.148.199)SPT SM Up: 00:04:00 JP: Join(never) RPF: inside,192.168.198.198* Flags: KAT(00:02:59) RA RR No interfaces in immediate olist (*,239.255.199.197) SM Up: 1d13h RP: 192.168.198.1* JP: Join(never) RPF: Tunnel1,192.168.198.1* Flags: LH outside 00:00:33 fwd LI LH inside 1d13h fwd Join(00:03:20) LI (192.168.198.198,239.255.199.197)RPT SM Up: 1d13h RP: 192.168.198.1* JP: Prune(never) RPF: Tunnel1,192.168.198.1* Flags: KAT(00:02:56) RA RR inside 1d13h off Prune(00:03:20) (192.168.198.198,239.255.199.197)SPT SM Up: 00:04:08 JP: Join(never) RPF: inside,192.168.198.198* Flags: KAT(00:02:56) RA RR No interfaces in immediate olist (*,239.255.255.250) SM Up: 1d13h RP: 192.168.198.1* JP: Join(never) RPF: Tunnel1,192.168.198.1* Flags: LH outside 00:01:23 fwd LI LH inside 1d13h fwd Join(00:02:59) LI Firewall# Each multicast flow is listed as (*,G), (S,G), or (S,G)RPT, where _ means any source, S is a specific source address, and G is the multicast group address. In addition, the following values are shown:
NOTE The firewall automatically creates a multicast flow for (*,224.0.1.40), which is used for Cisco Auto-RP discovery messages. The flow is listed as DM because it is a hop-by-hop announcement that doesn't depend on a sparse mode RP. To dynamically discover an RP, the discovery protocol can't rely on an RP. In the example, two multicast flows of interest are shaded. The first, (*,239.255.199.197), represents the multicast flow from any source to group 239.255.199.197. This is the video stream of data being pushed down the shared multicast tree toward the receivers that have joined the group. Note that the RPF or the source of the data is listed as Tunnel1,192.168.198.1, which is the firewall's inside interface. The firewall is acting as the RP, so it is receiving multicast data from the source over a special internal "tunnel" interface. The second flow, (192.168.198.198,239.255.199.197)SPT, represents the multicast flow from the source (192.168.198.198) to the multicast group. This data is actually being fed to the RP over an SPT built for this purposehence the SPT designation in the flow descriptor. The RPF points to the inside interface, where the source is located. |
|
|
EAN: 2147483647
Pages: 120