Configuring Your Printer and Internet Service
| Before you begin using Linux, you'll likely want to configure both your printer and your dial-up Internet service (if you are a dial-up user) to make your Linux system fully operational. In order to do this, you must log in to the root (administrative) user's account and use several Fedora Core 4 configuration tools. To log in to the root account, enter the word root into the Username box that you see in the center of your screen and press Enter. When the word Password appears in front of the box, enter the root password you selected when installing Linux into the same box and press Enter once more.
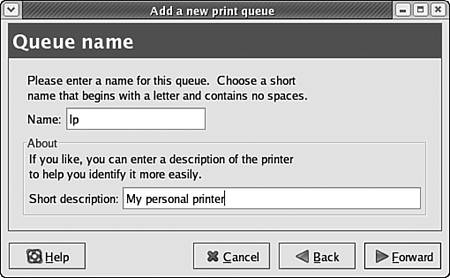
Configuring Your PrinterAfter you enter the word root and the root password at the login screen, you find yourself logged in to the root account's desktop environment. To configure your printer, click the word Desktop near the top of your display to open the Desktop menu, then click the System Settings item in the menu, and then click the Printing item in the System Settings menu, as shown in Figure 3.13. After you click the Printing item, the Printer configuration tool opens. Figure 3.13. Click Desktop, System Settings, Printing to open the Printer configuration tool.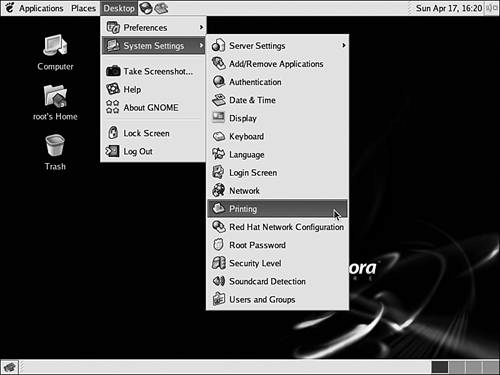 Click the New button near the upper-left corner of the Printer configuration tool window now to add a printer to Fedora Core 4's list of available printers. The Add a New Print Queue dialog box appears. Click the Forward button to display the Queue Name dialog box, which is used to name your printer, as shown in Figure 3.14. In the Name box, enter lp. You should always name your default printer lp because it is what many older Linux and Unix applications expect the default printer to be called. You can also enter a brief human-readable description of the printer in the Short Description box if you choose to do so. Figure 3.14. Enter lp as the queue name for your default printer. You can also enter a description if you want.
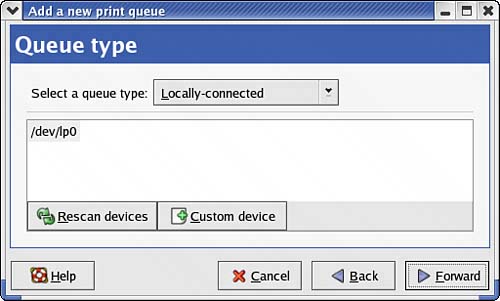
Click the Forward button after you have named your printer to display the Queue Type dialog box, which is used to tell Fedora Core 4 how to communicate with this printer, as shown in Figure 3.15. Figure 3.15. Choose a connection type for this printer. For parallel or USB printer users, the correct queue type option is the Locally-connected option.
If your printer is connected directly to your computer by Universal Serial Bus (USB) or parallel (Printer) port, select Locally-connected from the Select a Queue Type drop-down list. In the box below the Select a Queue Type drop-down list, choose the port to which your printer is connected. Table 3.1 contains a list of common ports.
In the list of ports that Linux has discovered in your computer system, select the port to which your printer is connected.
Configuring a Network PrinterIf you need to print to a printer that is on your local area network, click on the Select a Queue Type drop-down list and select the network protocol that is appropriate for your configuration. For users on primarily Unix- or Linux-based networks, the correct choice is usually CUPS or Unix; for users on primarily Windows-based networks, the correct choice is usually either Windows or Novell type networks. After you select the appropriate type of network connectivity for the printer in question, enter the network address or other related details for the printer in question. If you need assistance with this process or aren't sure what type of network printer you will be using, contact your network administrator. Selecting a Printer Make and ModelAfter you select your printer port (for locally connected printers) or enter your printer's network information (for networked printers), click the Forward button to display the Printer Model dialog box, used to select the type of printer connected to your computer. By selecting a make and model for your printer, you tell Fedora Core 4 what language to use when communicating with your printer. In the Printer Model dialog box, shown in Figure 3.16, select the make of your printer from the drop-down list near the top of the dialog box. The list of known printers for the make you selected then appears in the bottom half of the dialog box; select your model from the list. Then click the Forward button to display the confirmation dialog box. Figure 3.16. Select your make from the drop-down list and then your model from the list in the lower half of the dialog box.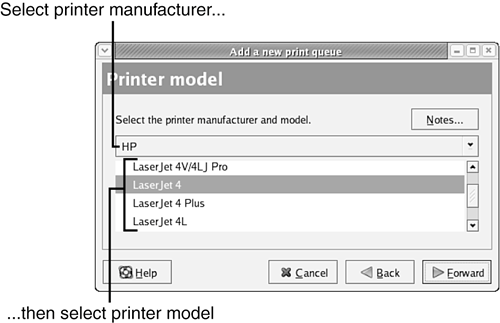
Review the settings listed in the confirmation dialog box; if your make and model are correctly listed, click the Finish button to save your printer configuration. You then are asked whether you want to print a test page to ensure that your settings have been entered correctly. To be certain that your printer is configured correctly, you should choose Yes. If the test page does not print correctly, remove the queue by clicking the Delete button in the Printer configuration tool window and repeat the steps in this section, trying different settings. After you successfully add a printer, if you want to add more printers, repeat the steps in this section. If you are done adding printers, click the word Action at the upper left of the Printer configuration tool window and then select Quit from the drop-down menu to exit the Printer configuration tool. When prompted, click the Save button to save your new printer configuration. Configuring Your Dial-up Internet ServiceIf you use broadband Internet service like Cable Internet or Digital Subscriber Line (DSL), you most likely need no special network configuration. Simply plug your network cable into the back of your computer system and skip to the next chapter. If your Internet service requires more than simple Ethernet connectivityfor example, if you use a dial-up modem or your environment requires Virtual Private Network (VPN) capabilityyou need to perform additional configuration before you can enjoy full network connectivity in Fedora Core 4. To start the Network Configuration tool, click the word Desktop near the top of your screen to display the Desktop menu, then click System Settings, and then Network, as shown in Figure 3.17. The Network Configuration tool starts. Figure 3.17. Start the Network Configuration tool to configure Fedora Core 4 to connect to your Internet service provider.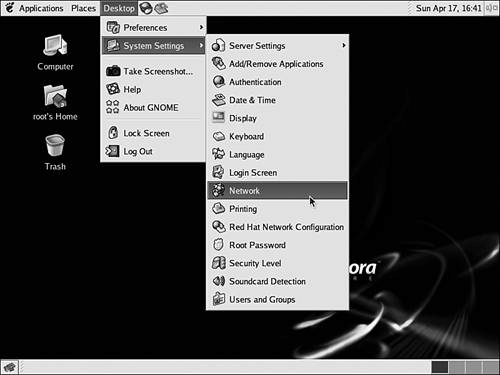 To configure a modem for dial-up Internet use with Fedora Core 4, click the New button in the Network Configuration tool to indicate that you want to create a new connection. Be sure that your modem is powered on (if it is external), then select Modem connection and click the Forward button in the Add New Device Type dialog shown in Figure 3.18 to cause Linux to search for your modem. When your modem is found, the detected settings appear, as shown in Figure 3.19. Figure 3.18. Select Modem Connection in the Add New Device Type dialog box and click Forward to have Linux auto-detect your modem.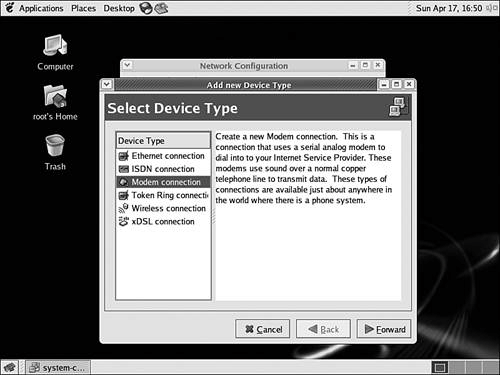 Figure 3.19. After your modem is detected by Fedora Core 4, the correct settings automatically appear.
With the exception of the Modem Volume setting, which you can adjust to suit your dialing volume tastes, you should not change any of the other settings from those detected by Linux. Click the Forward button to display a dialog box that allows you to enter details related to your ISP, as shown in Figure 3.20. Figure 3.20. The Network Configuration tool needs details about your ISP to configure your connection.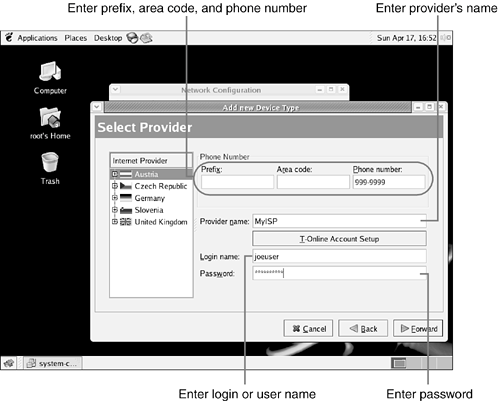
Enter your dial-up service provider's dialing details, name, login (username), and password into the relevant entry boxes shown in Figure 3.20. When you are done, click the Forward button to display the IP Settings dialog box, as shown in Figure 3.21. Figure 3.21. In the IP Settings dialog box, you can adjust the parameters that Fedora Core 4 will use to establish your Internet connection.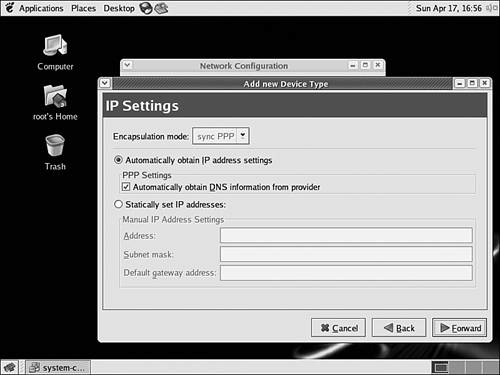 Most users should leave the default choice, Automatically Obtain IP Address Settings, selected. If, on the other hand, your ISP has provided you with a specific set of static IP addresses and settings, select Statically Set IP Address and enter those settings now. When you are done, click the Forward button to display your configuration summary. After you verify that all the information shown in the summary is correct, click Apply to save your changes and display the Network Configuration tool once again, this time listing the connection that you have just created, as shown in Figure 3.22. Figure 3.22. The Network Configuration tool is used to activate (connect) and deactivate (disconnect) your Internet connections.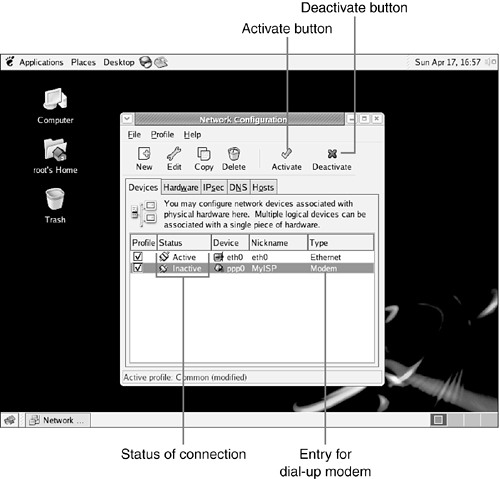 To connect to your ISP, click your modem's entry in the device list and then click the Activate button near the top of the dialog box. Fedora Core 4 then attempts to connect to your ISP. While you are connected, the word Active appears in the Status column for your dial-up connection. When you click the Deactivate button to disconnect once again, the status returns to Inactive. Any time you want to connect to the Internet using your dial-up account, restart the Network Configuration tool, select your modem, and click the Activate button. For additional details on using the Network Configuration tool, refer to "Managing Network Interfaces" in Chapter 29, "Command-Line System Administration." Logging OutAfter you finish configuring your printer and dial-up Internet service, exit the root desktop account and return to the Linux login screen by clicking the Desktop button near the top of your screen and then selecting the Log Out option, as shown in Figure 3.23. The confirmation dialog box shown in Figure 3.24 is displayed. To confirm that you want to log out and return to the Linux login screen, select Log Out and then click OK. Figure 3.23. Click Desktop, Log Out to indicate that you want to log out of the root desktop account and return to the Linux login screen.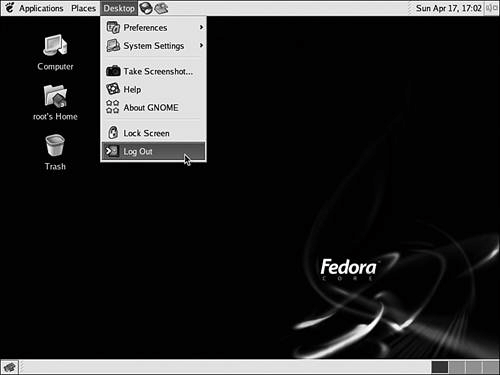 Figure 3.24. A confirmation dialog box appears to make sure that you really want to log out. Choose Log Out and click OK to return to the login prompt.
|
EAN: 2147483647
Pages: 311