Allowing and Starting Remote X Sessions
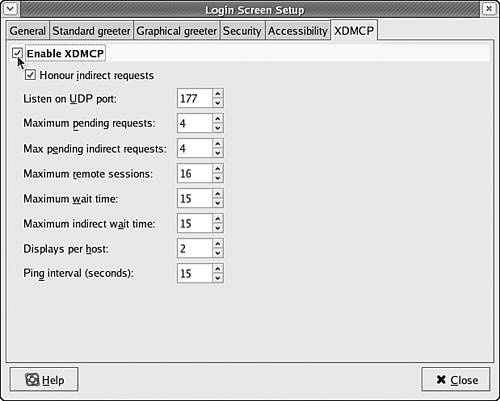
| Although being able to run individual applications remotely is convenient, sometimes it would be more helpful to run an entire desktop sessionbeginning with the graphical login screenfrom a remote location. This capability can be especially helpful when you're building diskless thin clients or using small computers with minimal Linux installations that need to function as full-fledged workstations. By changing a setting in the Red Hat Fedora 4 login manager configuration, you can allow remote display of entire desktop sessions, from login through logout. After you make this change, you can launch remote sessions by supplying a special argument to the XFree86 command from a Linux console, or by using the Xvfb command from your desktop. Configuring the Login Manager for XDMCPTo allow users to remotely display entire X Window System sessions on a Fedora Core 4 host, you must configure the login manager (the program you see when you first start Red Hat Fedora 4) to allow requests that use the X Display Manager Control Protocol (XDMCP). To do this, start the GNOME Desktop Manager (GDM) Setup tool on the Fedora Core 4 in question by choosing Desktop, System Settings, Login Screen or on any Fedora Core system by typing gdmsetup from the command line when logged in as root. Once the tool starts, click the XDMCP tab to display the dialog box shown in Figure 27.5. Figure 27.5. In the GDM Setup tool, check Enable XDMCP to allow other hosts on the network to log in to a desktop session on this host.
On the XDMCP tab, check the first box labeled Enable XDMCP. Then close the dialog box. Choosing this setting enables remote systems to query an entire X Window System session from your computer; your computer displays a login prompt on the remote machine, allowing users to log in and use applications and environments on your machine graphically. Your firewall must also be properly configured before incoming XDMCP requests are accepted. To do this, start the Security Level Configuration tool as described earlier in this chapter and enter the following additional exceptions into the Other Ports entry box: 177:tcp,177:udp This setting allows incoming traffic on port 177, which is the port used by the XDMCP protocol. For more information on using the Security Level Configuration tool to create exceptions for certain network ports, see "Managing the Red Hat Fedora 4 Firewall" in Chapter 30, "Security Basics."
Querying a Remote X SessionAfter you enable XDMCP on your machine, remote machines with the X Window System installed can query an X session (access the graphical login prompt on your machine). This way, remote users can work on your machine from login to logout, as if they were sitting right in front of it. Traditionally, a remote desktop session is queried from the console, not from within an existing X Window System session. This can be done in a number of ways, depending on the version and vendor of the X Window System on the machine. On older Linux or Unix machines running XFree86 version 3.x or earlier, the command that should be entered at the console shell is one of the following: X -query host Xwrapper -query host Replace host with the hostname or IP address of the machine on which an XDMCP session (login prompt) is to be requested. On more recent Linux machines running XFree86 version 4.x or later, including all Fedora Core machines, the command is XFree86 -query host Again, replace host with the hostname or IP address of the machine in question. For example, assuming that you have enabled XDMCP on your computer, work station20, another Red Hat Fedora 4 user on a machine called danscomputer could access your graphical login prompt by entering the following command at the console shell: [dan@danscomputer dan]$ XFree86 -query workstation20.mycompany.com After Dan enters this command, the graphical desktop starts on danscomputer and a login prompt is displayed. When Dan logs in, however, he must log in using an account that exists on workstation20, and the desktop environment and applications that Dan sees are also running on workstation20. In fact, Dan's entire X Window System session is running on workstation20, even though it is being displayed on his own monitor. When you query an entire session this way, none of the other techniques in this chaptersuch as the ssh command or the DISPLAY environment variableneed to be used; applications are automatically displayed remotely as a part of the requested session. Querying a Remote X Session from the DesktopOn newer Linux and Unix systems, including all systems that run Fedora Core, you can also start a remote desktop session from your own desktop. This has the effect of creating a desktop-within-a-desktop: The remote desktop you connect to is displayed inside an application window on your own desktop. This has several advantages:
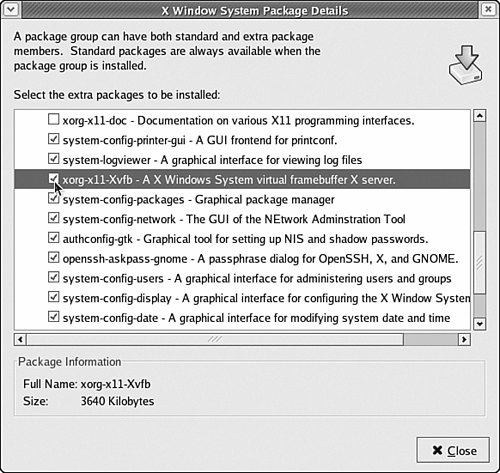
The tool that makes this functionality possible is called the X Virtual Frame Buffer, or Xvfb for short. To install the Xvfb command on a Fedora Core 4 system, follow these steps:
Once the Xvfb command has been installed, you can query a remote desktop login session by using Xvfb with the following arguments: Xvfb -query remotehost -screen 0 heightxwidthxdepth
As an example, to start a remote desktop session on a computer called timspc at a desktop resolution of 800x600, enter [you@workstation20 ~]$ Xvfb -query timspc -screen 0 800x600x24 Within moments, an 800x600 pixel application window appears on your own desktop, displaying a desktop login prompt for timspc. After entering the username and password for your account on timspc, you are logged in to the desktop of timspc and can use it as if you were sitting physically in front of it. |
EAN: 2147483647
Pages: 311

